

Franie Margot
Original tutorial Here
This tutorial is written by Estela Fonseca the © is from her.
You’re not allowed to copy, link and / or place these or parts of it without her permission.
The © ️of the materials wich are used is for the rightful owner.
If you want to use this tutorial on your own forum, club or group, you have to request permission from the writer herself.
We have permission to translate Estela Fonseca’s tutorials into English.
Thank you Estela for the permission to translate your tutorials.
Temos permissão para traduzir os tutoriais da Estela Fonseca para o inglês.
Obrigado Estela pela tradução dos tutriais.
We have permission from Estela Fonseca to translate her tutorials into Dutch and English.
Estela Fonseca Thank you for letting us translate your tutorials.
Her Site
Materials used: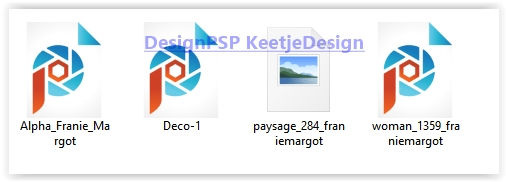
Download Materials
Plugins used:
Unlimited 2.0 – Funhouse – Faceter
Unlimited 2.0 – &<Sandflower Specials “V” – Design Blinds
Unlimited 2.0 – Tile & Mirror – Seamless Blend (vertical)
VanDerLee – Unplugged-X – Defocus
Simple – Top Left Mirror
Toadies – Plain Mosaic Blur
Mura’s Meister – Perspective Tiling
Mura’s Seamless – Emboss at Alpha
FM Tile Tools – Saturation Emboss
Carolaine and Sensibility – CS_DLines
AAA Frames – Foto Frame
Alien Skin Eye Candy 5 Impact – Glass
User Defined Filter – Edge_Enhance
The tutorial is written with these colors and materials.
If you use your own colors and / or materials, you may have to play with the Blend Mode / Opacity settings.
1
Material palette – Foreground color # 7e5b47 / Background color # f4f3f1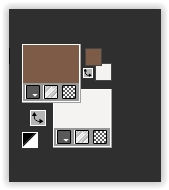
Create a Linear gradient on the Foreground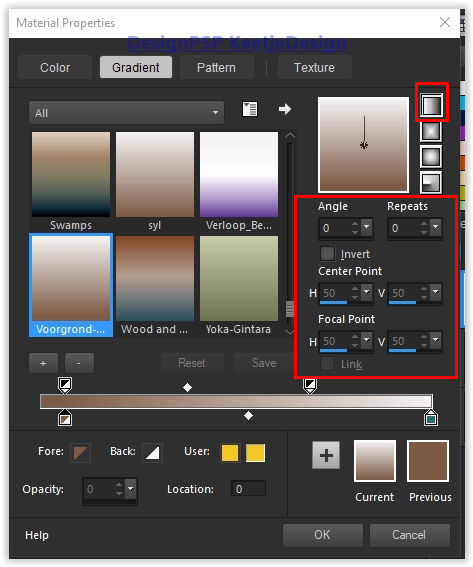
Open the alpha file Alpha_Franie_Margot – Window – Duplicate (or use Shift+D) – Close the original file we are working on the copy
Fill in the gradient
2
Effects – Filter Unlimited 2.0 – Funhouse – Faceter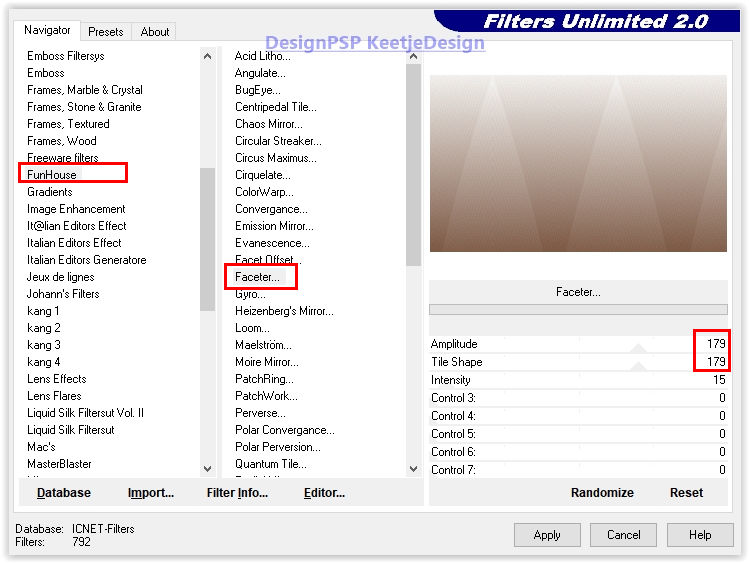
Effects – Reflection Effects – Rotating Mirror / Default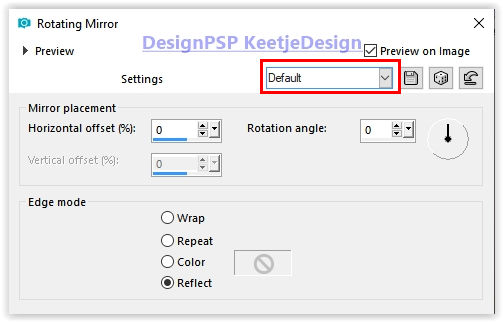
3
Effects – User Defined Filter – Edge_Enhance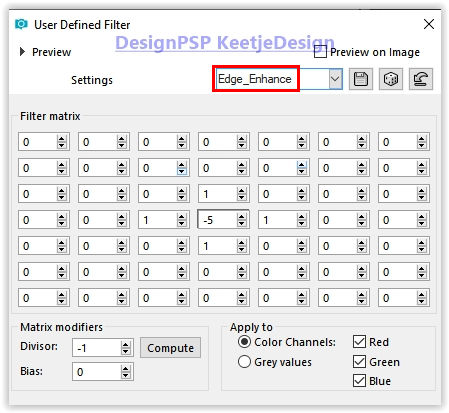
Effects – Filter Unlimited 2.0 – Tile & Mirror – Seamless Blend (vertical)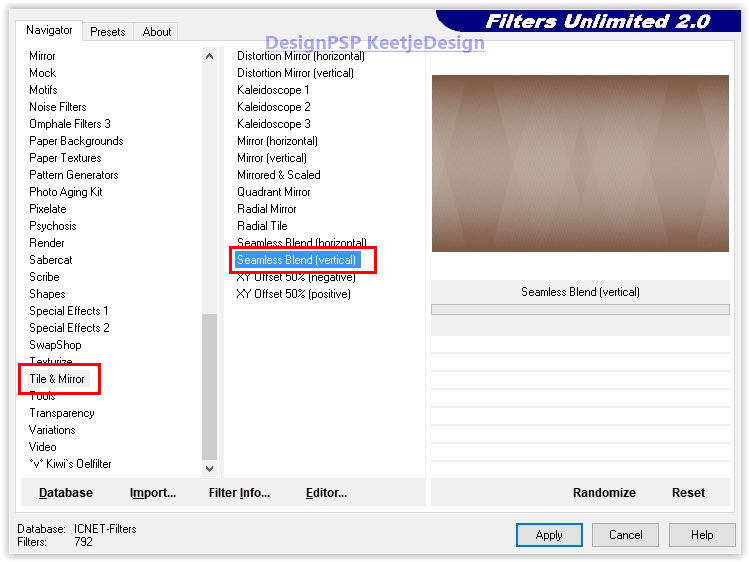
4
Layers – Duplicate
Layers – Properties – Overlay Blend Mode
Layers – merge – merge down
Layers – Duplicate
5
Image – Resize – Change with 80% – Uncheck all layers
Image – Free rotate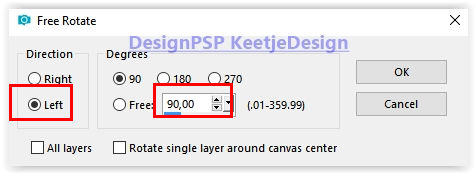
Effects – Plugins VanDerLee – Unplugged-X – Defocus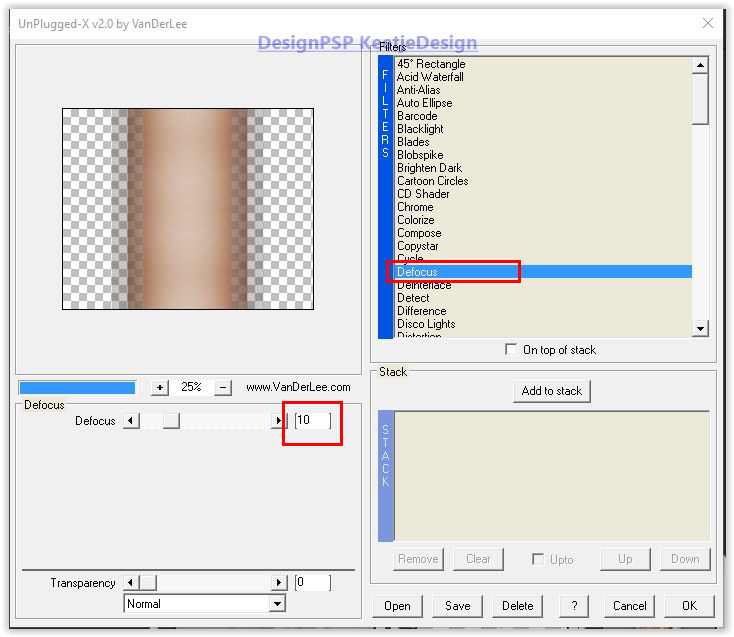
6
Effects – Edge Effects – Erode
Layers – Duplicate
Layers – Properties – Blend mode Hard light
Layers – merge – merge down
Layers – Duplicate
Layer palette – Activate the middle layer (Copy of Raster 1)
Effects – Geometric Effects – Skew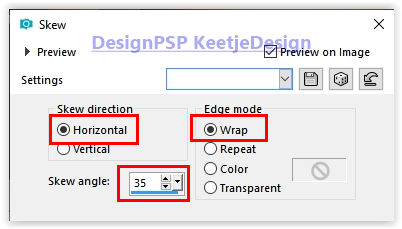
Effects – Filter Simple – Top Left Mirror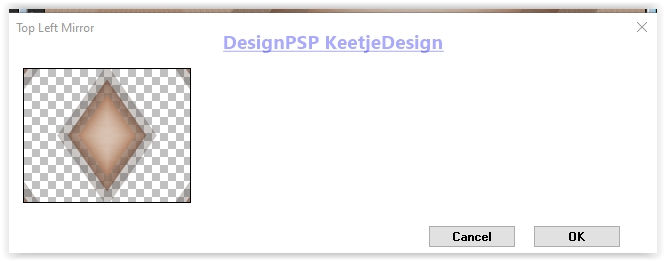
7
Effects – Image Effects – Seamless Tiling / Default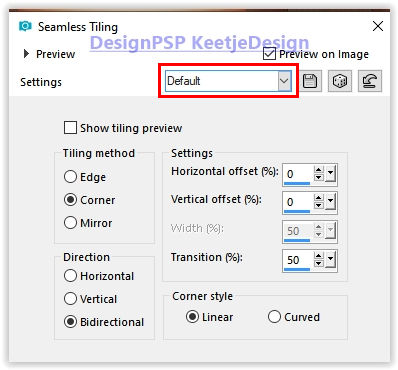
Effects – Filters Toadies – Plain Mosaic Blur / Default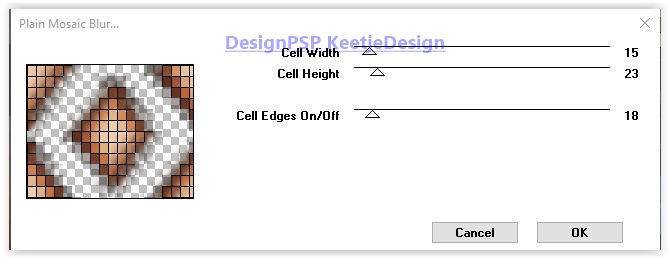
Layers – Properties – Blend Mode Overlay / Opacity 69
8
Layer palette – Activate the top layer (Copy 2 of Raster1)
Layers – Duplicate
Effects – Filter Unlimited 2.0 – & <Sandflower Specials “V” – Design Blinds / Default
With Red Green and Blue – you can adjust the values to your own color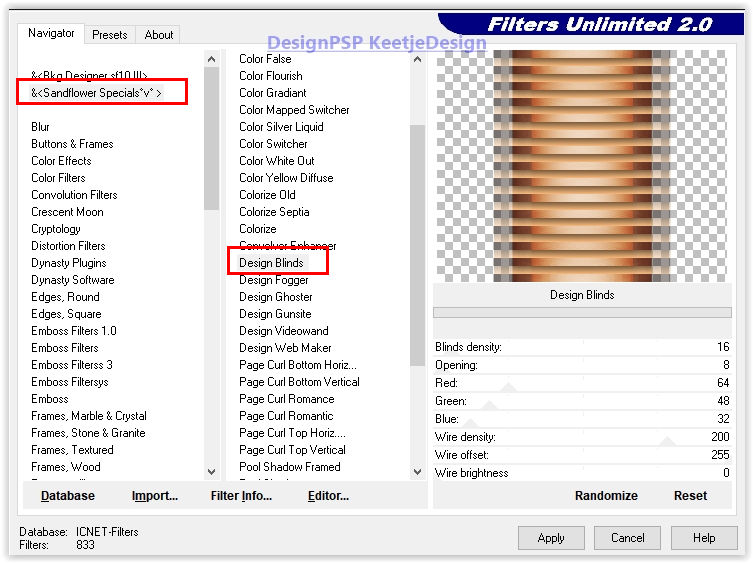
9
Effects – Reflection Effects – Rotating Mirror / Default
Effects – Plugins Mura’s Meister – Perspective Tiling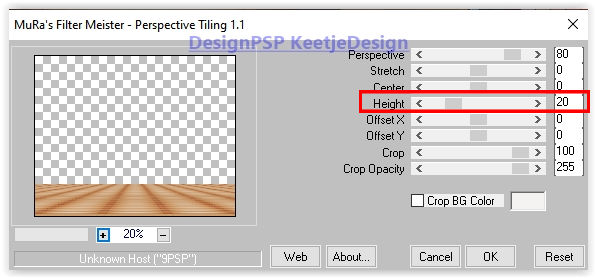
10
Material palette – Create a Sunburst gradient on the Foreground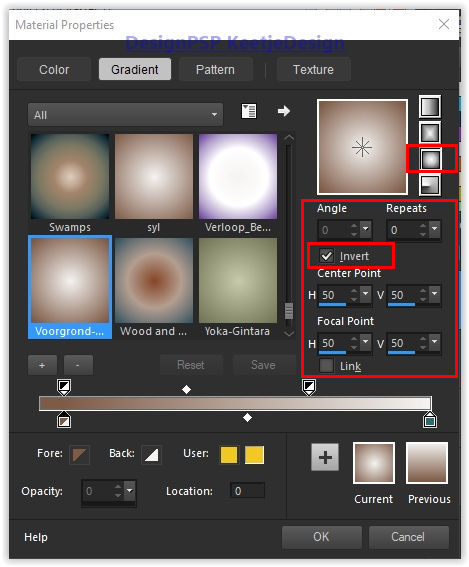
Layers – New raster layer
Selections – Load / Save – Load Selection from Alpha Channel Selection # 1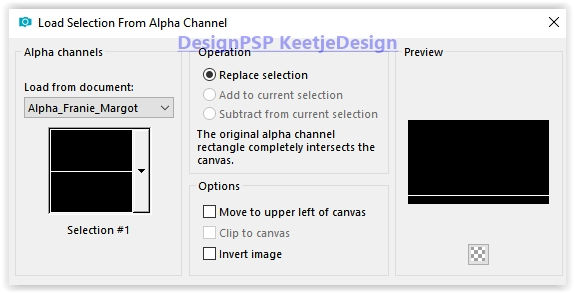
Fill in the gradient
Selections – Select none
11
Effects – Filter Mura’s Seamless – Emboss at Alpha / Default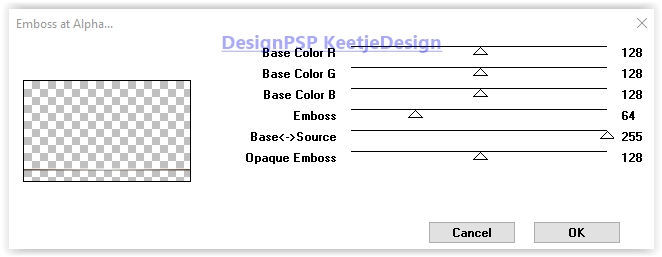
Effects – Reflection Effects – Feedback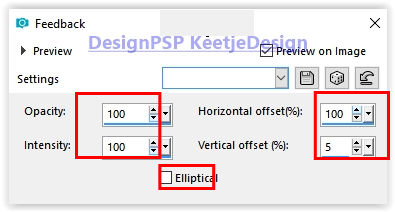
12
Selections – Load / Save – Load Selection from Alpha Channel Selection # 2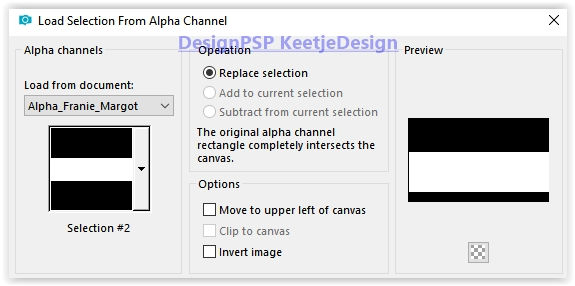
Edit – Cut the image is now in memory
Selections – Select none
Edit – Paste as a new layer
13
Image – Free rotate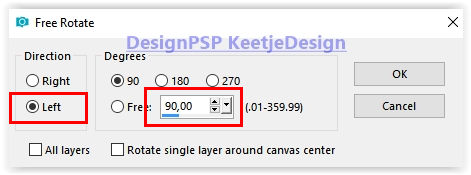
Effects – Distortion Effects – Wave
Image – Resize – Resize with 75% – Uncheck all layers
Objects – Align – Left
14
Effects – Filter Mura’s Seamless – Emboss at Alpha / Default
Layers – Duplicate
Image – Mirror – Mirror horizontal
Layers – merge – merge down
Effects – 3D Effects – Drop shadow / 0/0/50/30 / # 000000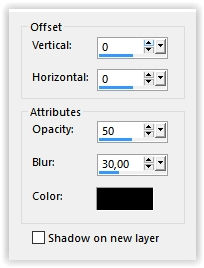
15
Selections – Load / Save – Load Selection from Alpha Channel Selection # 3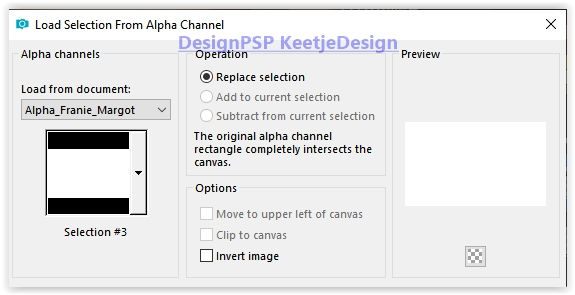
Image – Crop to selection
Layer palette – Activate the second layer from the bottom (Copy of Raster 1)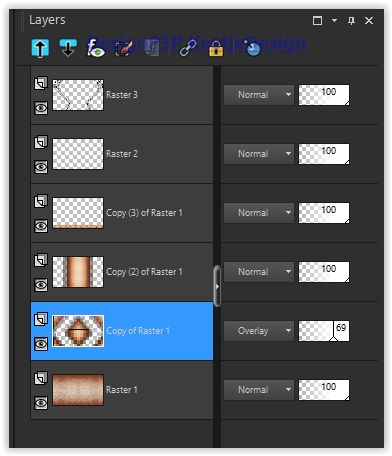
Effects – Reflection Effects – Rotating Mirror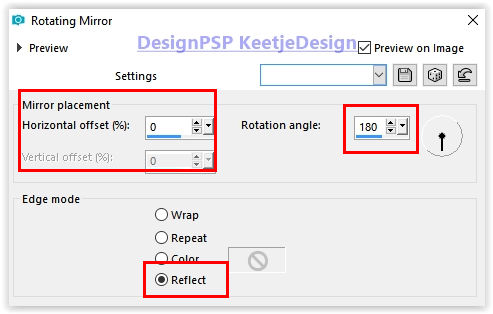
16
Layer palette – Activate the third layer from the bottom (Copy 2 of Raster 1)
Open the tube paysage_284_franiemargot – Copy – Paste as new layer
Layers – Load / Save Masks – Load mask from disk
Load the mask 20-20
Layers – Merge – Merge group
17
Place something up – See example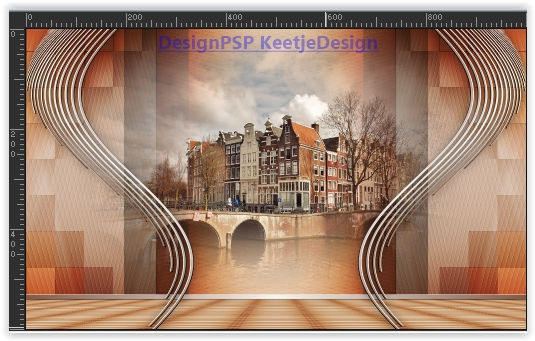
Effects – Filter FM Tile Tools – Saturation Emboss / Default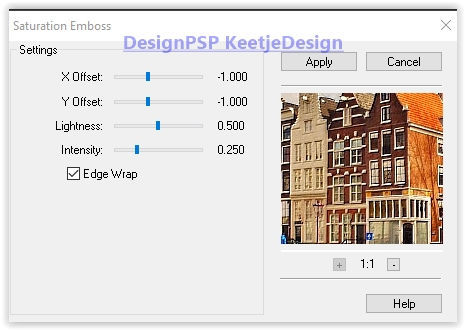
Layers – merge – merge down
18
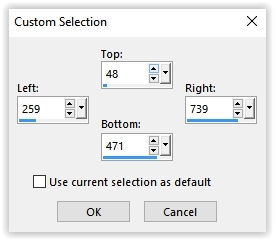
Activate Selection tool Rectangle – Custom selection
Selections – Promote selection to layer
Effects – Plugins AAA Frames – Foto Frame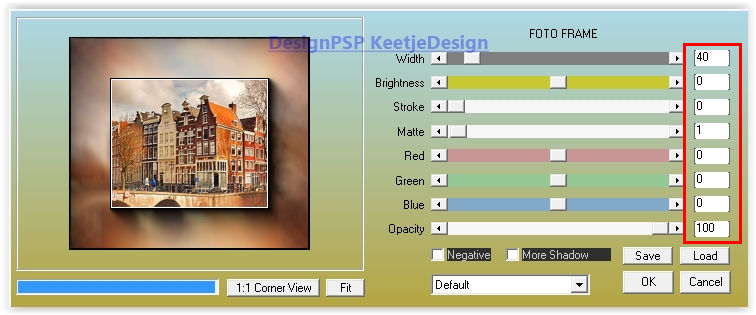
Effects – Plugins AAA Frames – Foto Frame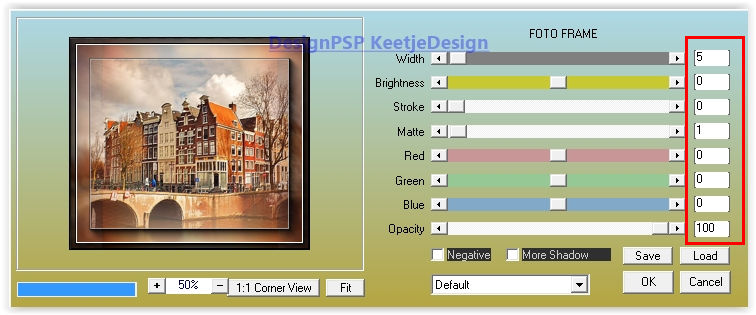
Selections – Select none
19
Layer palette – Activate the top layer (Raster 3)
Effects – Image Effects – Offset / 0/70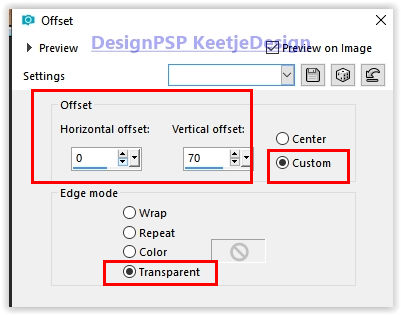
Layers – Duplicate
Image – Mirror – Mirror vertical
Effects – Image Effects – Offset / Same setting
20
The Layers Palette – Now looks like this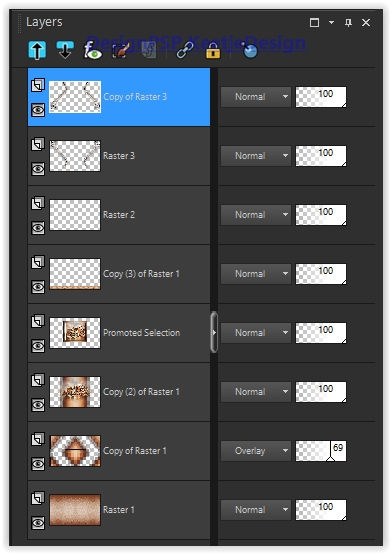
The work looks like this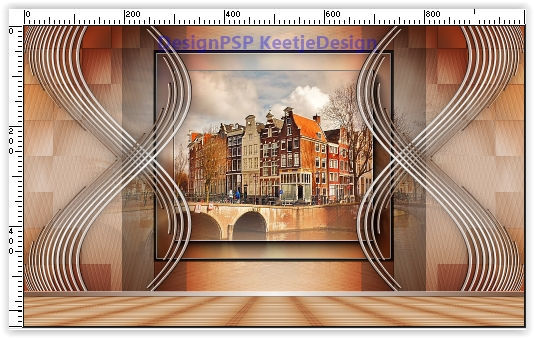
21
Layers – New raster layer
Selections – Load / Save – Load Selection from Alpha Channel Selection # 4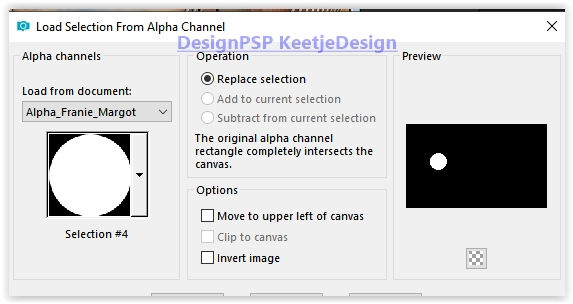
Fill inn the gradient (Sunburst)
Effects Filter Alien Skin Eye Candy 5 Impact – Glass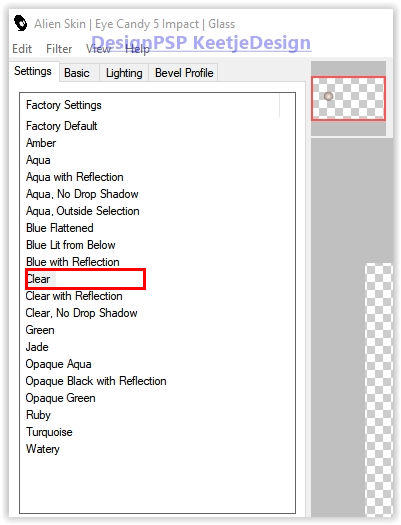
Selections – Modify – Contract 30 pixels
Effects again Filter Alien Skin Eye Candy 5 Impact – Glass / the same settings
Selections – Select none
Layers – Duplicate
Image – Mirror – Mirror horizontal
22
Open the tube woman_1359_franiemargot – Copy – Paste as new layer
Image – Resize – Change with 70% – Uncheck all layers
Activate Selection tool (K) / Position X 480 / Position Y 83
Type M to close the tool
23
Edit – Copy special – Copy merged
Edit – Paste as a new image (we’ll work with this image for a while)
Image – Resize – Change with 30% – Check all layers
Effects – Plugins AAA Frames – Foto Frame
we should have this now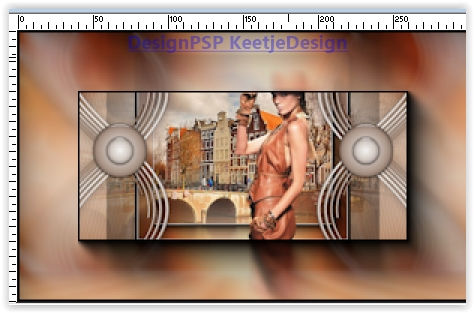
Note:If there is a difference because of your own tube then undo it until step 22
Adjust the position X and Y / so that the effect of Photo Frame is the same
24
Edit – Copy
Activate your work
Edit – Paste as a new layer
Activate Selection tool (K) / Position X 41 / Position Y 365
Type M to close the tool
25
Layers – Duplicate
Image – Resize – Resize with 80% – Uncheck all layers
Activate Selection tool (K) / Position X 174 / Position Y 36
Type M to close the tool
26
Layers – Duplicate
Image – Resize – Resize with 80% – Uncheck all layers
Activate Selection tool (K) / Position X 788 / Position Y 443
Type M to close the tool
Layers – Merge 2x Merge Down
Effects – 3D Effects – Drop Shadow / 0/0/50/30 / # 000000
27
Layer palette – Activate the second layer from the top (Raster 5)
Layers – Delete
28
Image – Add Borders – Symmetric
2 pixels color # 000000
Edit – Copy
Selections – Select all
Image – Add Borders – Symmetric
50 pixels color # ffffff
Selections – Invert
Edit – Paste into selection
Adjust – Blur – Gaussian Blur / Range 50
Effects – Plugins Carolaine and Sensibility – CS_DLines / Default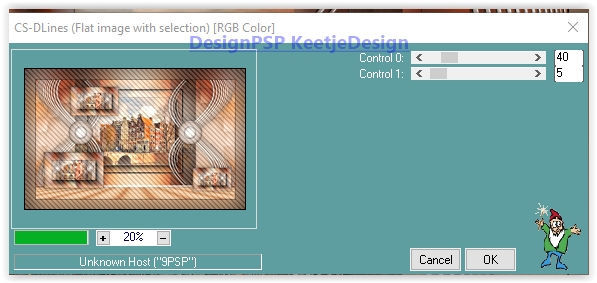
Selections – Invert
Effects – 3D Effects – Drop Shadow / 0/0/50/30 / # 000000
Selections – Select none
29
Open the tube woman_1359_franiemargot again – Copy – Paste as new layer
Image – Resize – Change with 95% – Uncheck all layers
Place the tube of your choice or as on the example crea
Effects – 3D Effects – Drop Shadow / 0/0/50/30 / # 000000
30
Place your Name / Watermark
Image – Add Borders – Symmetric
2 pixels color # 000000
Image – Resize to 1000 pixels width
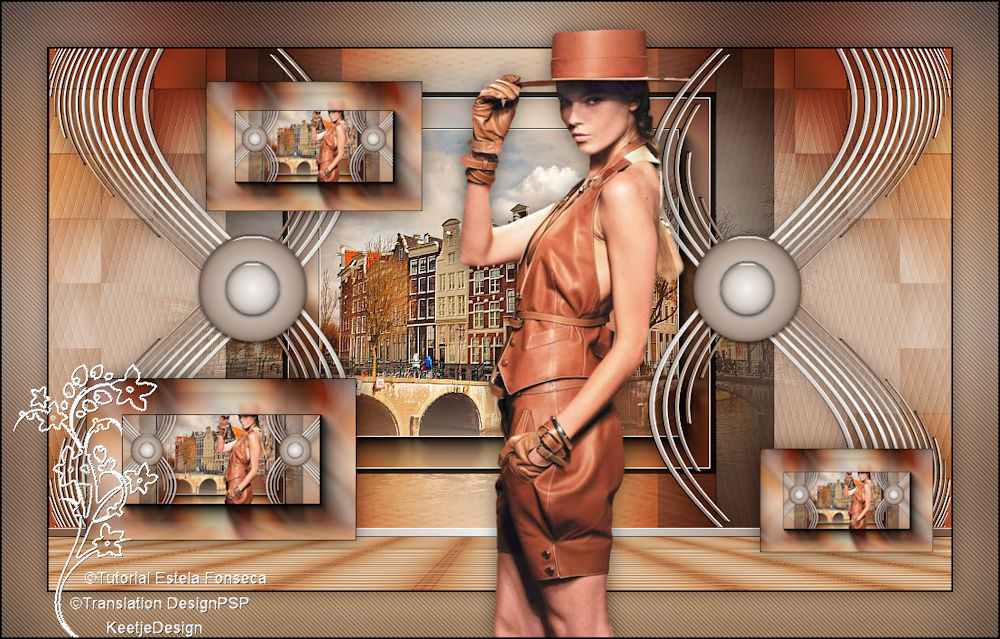
Save as Jpeg
We have finished the tutorial from Estela
This translation has been tested by Marianne , thank you very much for testing
© Translation Franie Margot DesignPSP KeetjeDesign