

Woman

This tutorial was created , written and translated by KeetjeDesign 22-07-2022, the © is mine.
It is not allowed to copy, link and / or place these or parts thereof without my permission.
If you want to use this tutorial on your own forum, club or group , please ask me for permission.
The tutorial is written with PSP 2020 but can also be made with other versions.
If this tutorial resembles another tutorial, it is purely coincidental
The © of the materials used is for the rightful owner and the tube maker.
I thank the tube maker SvB (Syl) and Yoka for the tubes and Castorke for the mask
Materials used:
Double click on the preset , it installs itself in the plugin
Plugins used:
Unlimited 2.0 – Scribe – 4 way mirror
Unlimited 2.0 – &<Bkg Kaleidoscope> – Kaleidoscope 5
Cybia – Screenworks – Fine Rule
Cybia – Screenworks – Close Knit
Cybia – Screenworks – Canvas Mesh
Alien Skin Eye Candy5 Impact – Motion Trail
Neology – Sinus Waves
AAA Frames – Texture Frame
Andromeda – Perspective
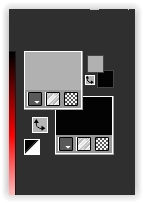
Colors Used:
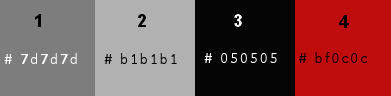
The tutorial is written with these colors and materials.
If you use your own colors and / or materials, you may have to play with the settings of Blend Mode and/or Opacity.
1
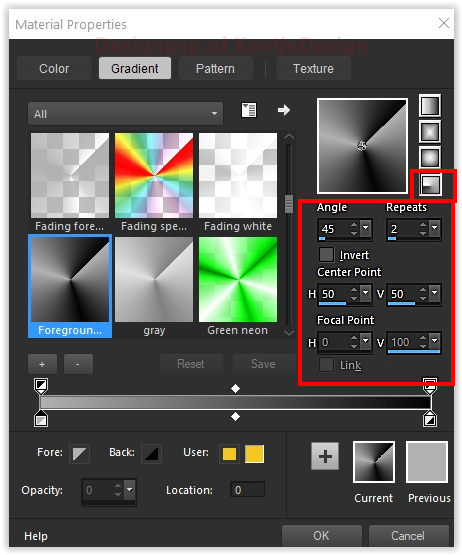
Materials palette – Foreground color 2 / Background color 3
Create the gradient Radial in the foreground
2
Open AlfaWoman2022 – Window – Duplicate (Or use Shift+D) Close the original we work on the copy.
This is not an empty layer, there are selections and a mask in the alpha channel.
Fill with the gradient
3
Layers – Duplicate
Image – Flip (Flip vertically)
Layers – Properties – Opacity 50
Layers – merge – merge down
4
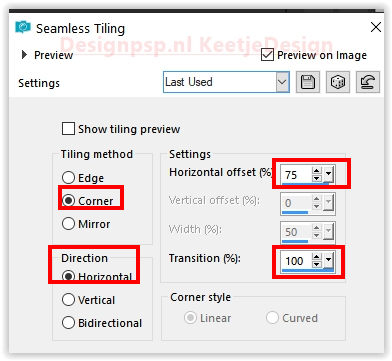
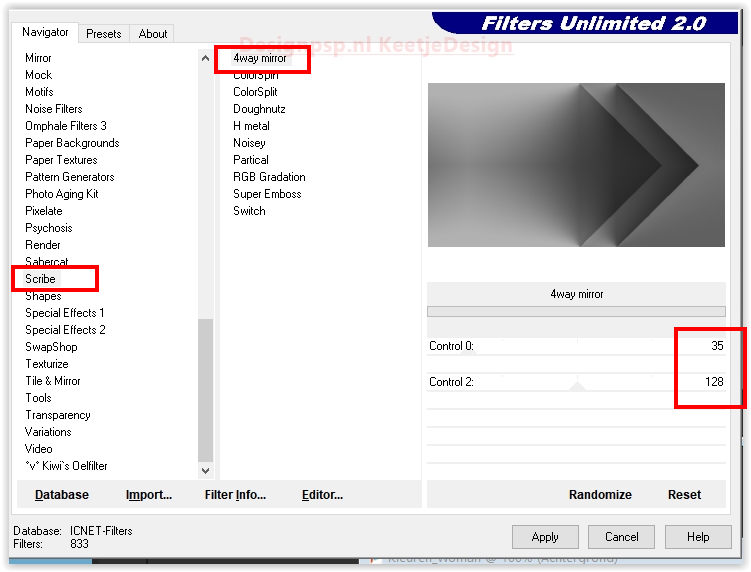
Effects – Image Effects – Seamless Tiling
Effects – Filter Unlimited 2.0 – Scribe – 4 way mirror
5
Layers – Duplicate
Image – Flip (horizontal)
Layers – Properties – Opacity 50
Layers – merge – merge down
6
Layers – Duplicate
Image – Resize 75% – Uncheck all layers
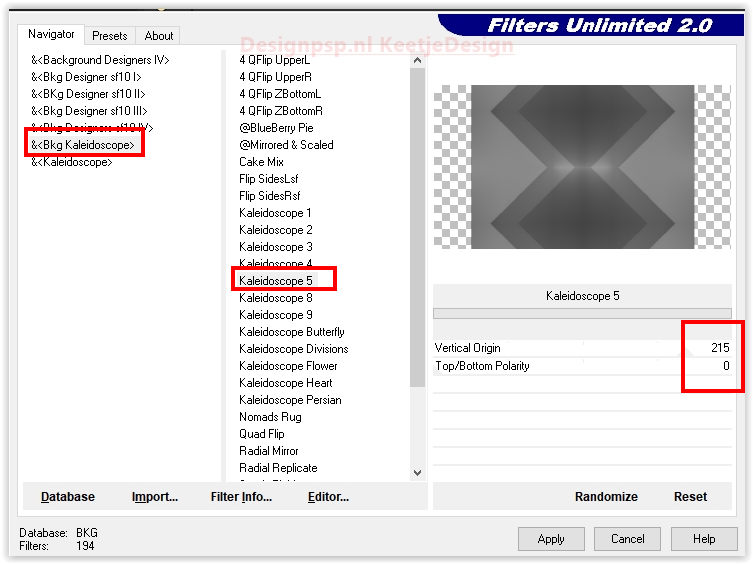
Effects – Filter Unlimited 2.0 – &<Bkg Kaleidoscope> – Kaleidoscope 5
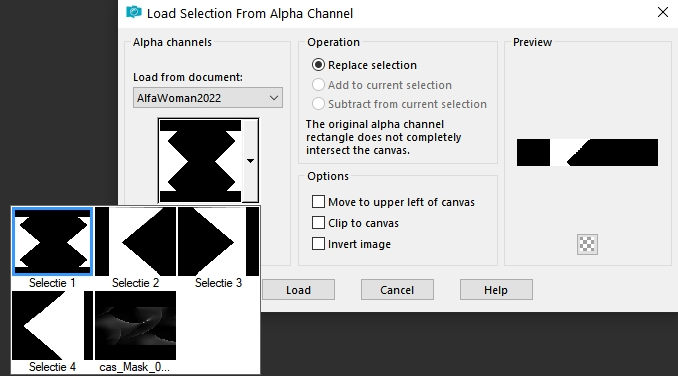
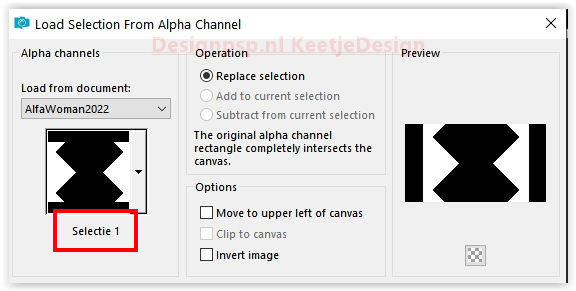
Selections – Load/Save Selection – Load Selection from Alpha Channel: Selection 1
Press Delete on the keyboard
Selections – Select none
7
Layer palette – Activate the bottom layer
Selections – Load/Save Selection – Load Selection from Alpha Channel: Selection 2
Selections – Layer selection
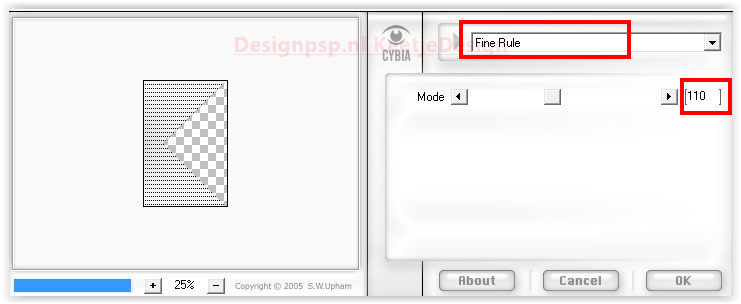
Effects – Filter Cybia – Screenworks – Fine Rule
Effects – 3D Effects – Drop Shadow / 0 / 0 / 85 / 35 / Color # 000000
Selections – Select none
Layers – Properties – Blend Mode Soft Light
8
Layer palette – Activate the bottom layer
Selections – Load/Save Selection – Load Selection from Alpha Channel: Selection 3
Selections – Layer selection
Effects – Filter Cybia – Screenworks – Close Knit
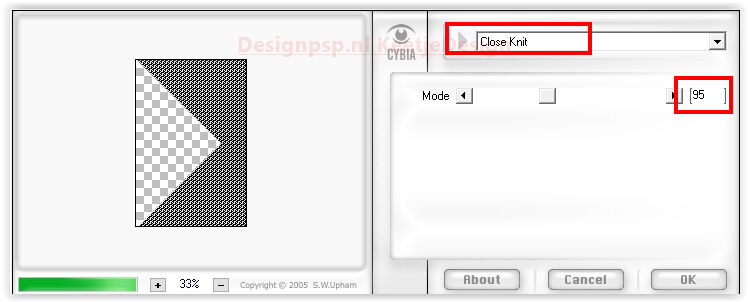
Effects – 3D Effects – Drop Shadow / 0 / 0 / 85 / 35 / Color # 000000
Selections – Select none
Layers – Properties – Blend Mode Soft Light
9
Layer palette – Activate the bottom layer
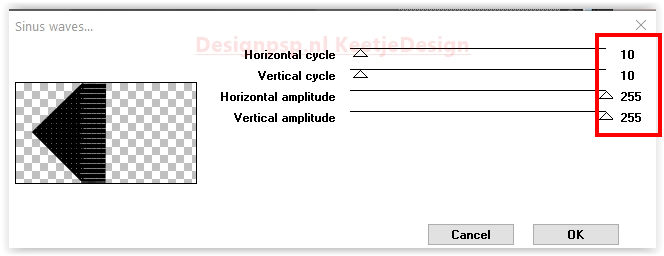
Selections – Load/Save Selection – Load Selection from Alpha Channel: Selection 4
Selections – Layer selection
Selections – Select none
Effects – Filter Neology – Sine Waves
10
Layers – Duplicate
Image – Flip (horizontal)
Layers – merge – merge down
Layers – Properties – Block Blend Mode (use a blend mode that suits your work)
11
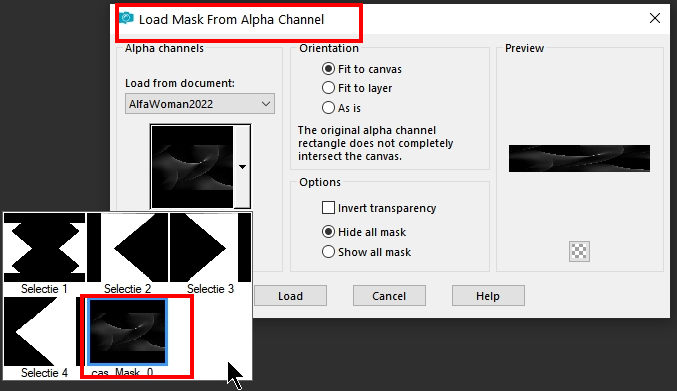
Layer palette – Activate the second layer from the top
Layers – New Raster Layer
Fill with color 4
Layers – Load/Save Mask – Load Mask from Alpha Channel: cas_Mask_0518_06
Effects – Edge Effects – Enhance More
Layers – Merge – Merge Group
Effects – Reflection Effects – Rotating Mirror / Default
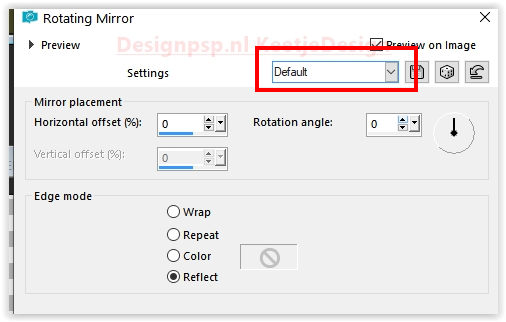
Image – Flip (Mirror vertical)
Layers – Properties – Opacity 65
12
Layer palette – Activate the top layer
Open the tube Tekst_Woman – Copy – Paste as new layer
don’t move
13
Layers – Duplicate
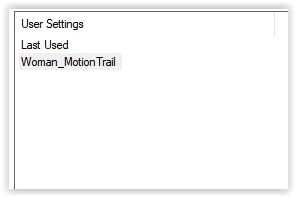
Effects – Filter Alien Skin Eye Candy5 Impact – Motion Trail / Preset: Woman_MotionTrail
Layers – Arrange – Down
Layers – Properties – Blend Mode Soft Light
14
Selections – Select all
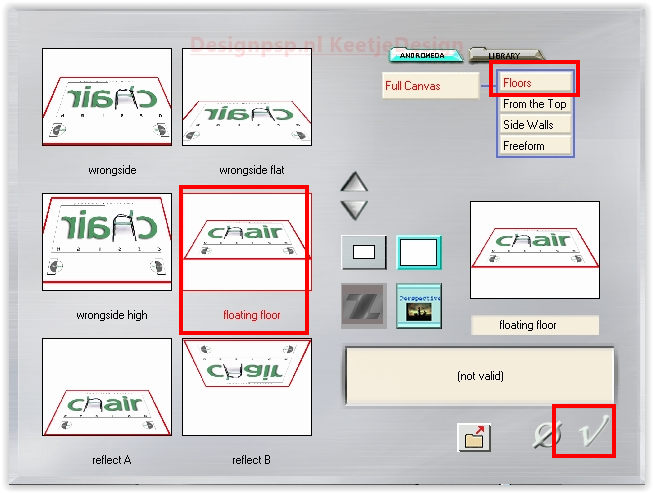
You have not the Plugin Andromeda after select all continue with point 15
You have the Andromeda – Perspective filter
Layer palette – Activate the bottom layer
Copy – Paste as new image
Minimize it we’ll use it later
15
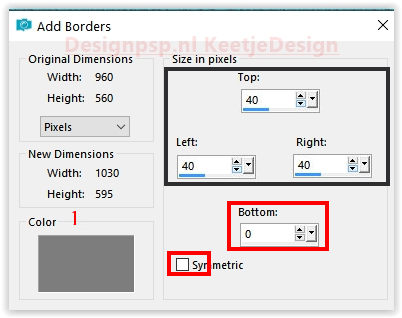
Image – Add Borders – Symmetric
1 pixel color 3
25 pixels color 2
Selections – Invert
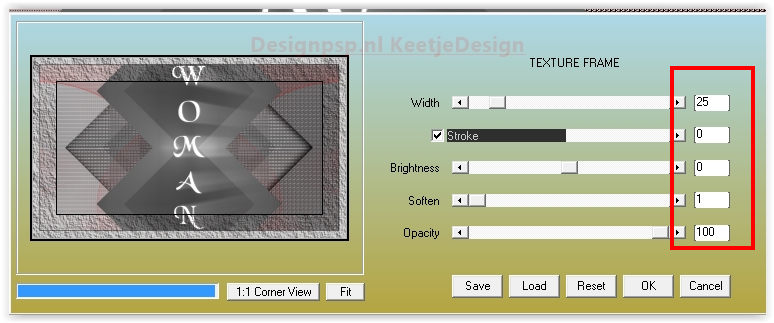
Effects – Filter AAA Frames – Texture Frame
Selections – Invert
Effects – 3D Effects – Drop Shadow / 0 / 0 / 85 / 35 / Color # 000000
Selections – Select none
Image – Add Borders – Symmetric
1 pixel color 3
3 pixels color 4
16
Selections – Select all
Image – Add Borders – Uncheck Symmetric / Color 1
Selections – Invert
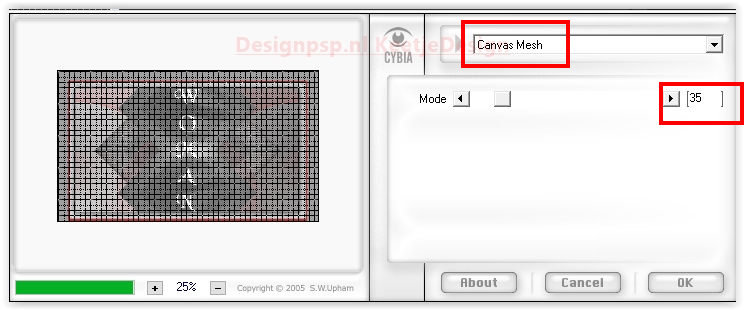
Effects – Filter Cybia – Screenworks – Canvas Mesh
Selections – Invert
Effects – 3D Effects – Drop Shadow / 0 / 0 / 80 / 35 / Color # 000000
Selections – Select none
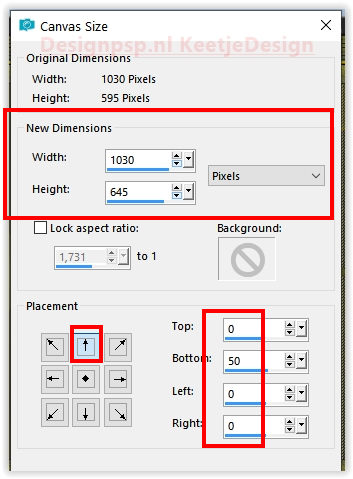
17
Image – Canvas Size
Do you have the Plugin Andromeda continue now with point 18
Don’t have the Andromeda filter
you can use the with the materials included the layer Andromeda effect
You can colorize this with your own color
Edit – Copy
Activate the work
Edit – Paste as new layer
Now continue with point 21
18
Selections – Select all
Layers – new raster layer
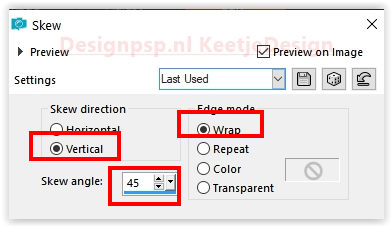
Activate what we have minimized
Effects – Geometric Effects – Skew
19
Edit – Copy
Activate the work
Edit – Paste into Selection
Selections – Select none
20
Effects – Edge Effects – Enhance More
Effects – Edge Effects – Rembrandt Dark
Effects – Filter Andromeda – Perspective
21
Effects – Reflection Effects – Rotating Mirror / Default
Objects – Align – Bottom
Activate Selection Tool (K)
Scroll from top to bottom to 550 pixels
22
Type M to close the tool
Layers – Arrange – Down
Layer palette – Activate the top layer
Layers – merge – merge down
Effects – 3D Effects – Drop Shadow / 0 / 0 / 85 / 35 / color # 000000
23
Layers – New Raster Layer
Fill with color 2
Layers – Arrange – Send to Back
24
Layer palette – Activate the top layer
Open the tube Yoka-MISTED-HandsomeGuy-4418 – Copy – Paste as new layer
Place to the left (See example crea)
Layers – Properties – Opacity 45
25
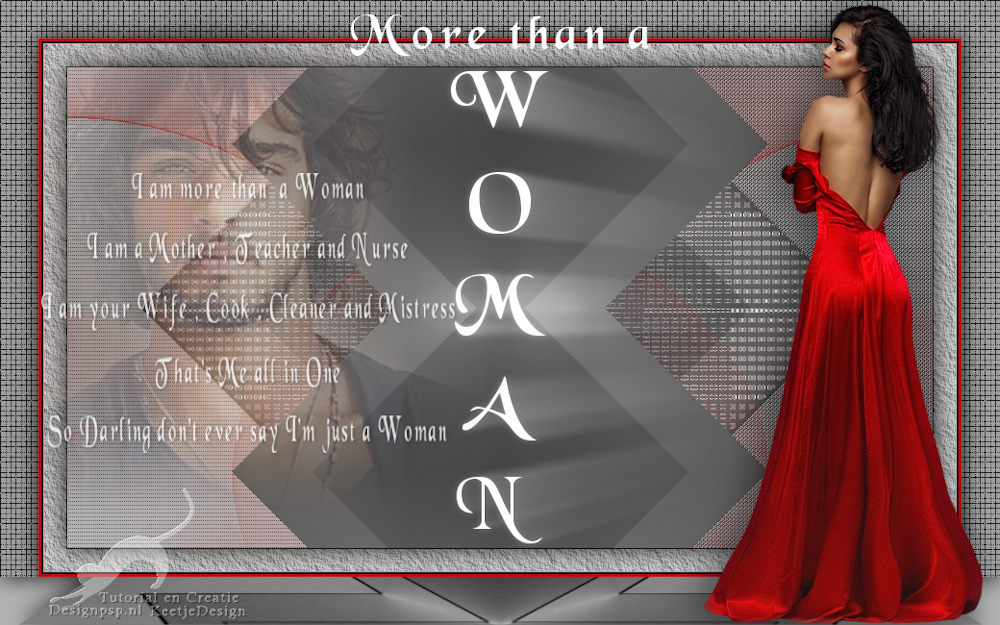
Open the tube Tekst_MorethanaWoman_KeDe – Copy – Paste as new layer
Place to the left (See example crea)
Objects – Align – Center Vertical
Layers – Duplicate
Effects – 3D Effects – Drop Shadow / 1 / 1 / 50 / 3 / Color # 000000
Layers – Arrange – Down
26
Open the tube Text rand_Morethana_KeDe – Copy – Paste as new layer
Place at the top
Objects – Align – Center Horizontally
27
Open the tube SvB (579) Beauty – Copy – Paste as new layer
Image – Resize – Resize with 95% – Uncheck all layers
Adjust – Sharpness – Sharpen
Place right
Effects – 3D Effects – Drop shadow of your choice
28
Place your Name/Watermark
Layers – Merge – Merge all layers
Image – Resize – Change to 1000 pixels width
Save as Jpeg
The tutorial has been tested by Marianne
Marianne thank you very much
© DesignPSP KeetjeDesign 22-07-2022