

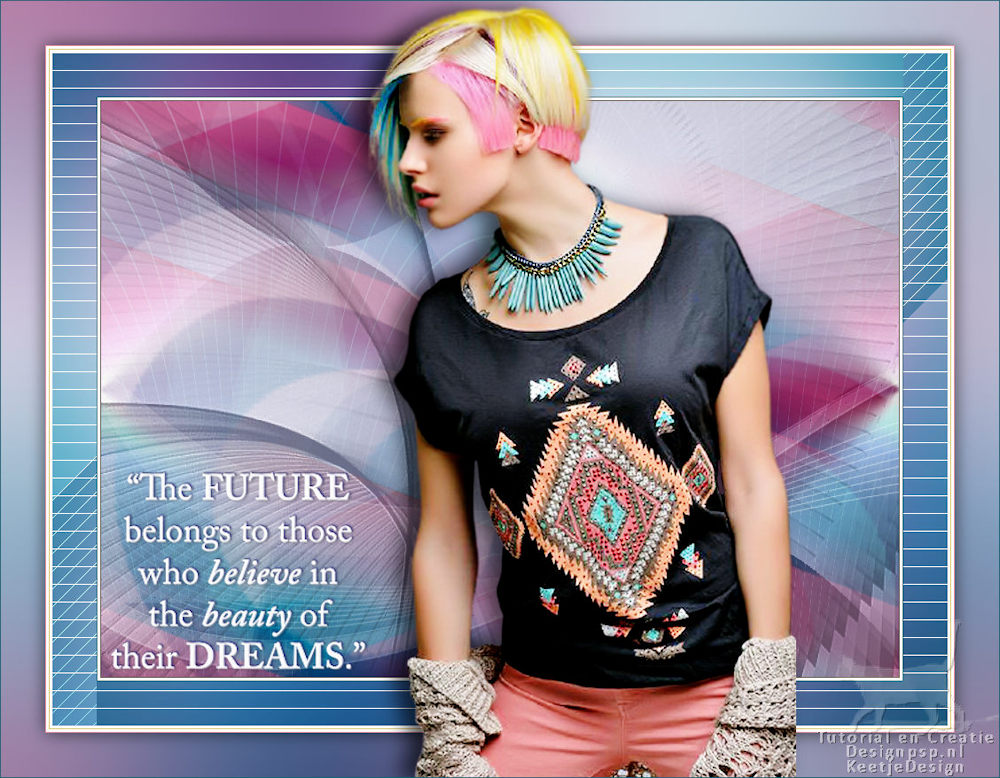
The Future Belongs

This tutorial was created , written and translated by KeetjeDesign 17-06-2022, the © is mine.
It is not allowed to copy, link and / or place these or parts thereof without my permission.
If you want to use this tutorial on your own forum, club or group , please ask me for permission.
The tutorial is written with PSP 2020 but can also be made with other versions.
If this tutorial resembles another tutorial, it is purely coincidental
The © of the materials used is for the rightful owner and the tube maker.
I thank the tube maker Luz Cristina for the tube and Narah for the masks
Materials used:
Plugins used:
Unlimited 2.0 – Alf’s Power Sines – Absolute 2 Sin Grad
MuRa’s Meister – Pole Transform
MuRa’s Seamless – Emboss at Alpha
Medhi – Sorting Tiles
VanDerLee – Unplugged X – Defocus
AP [LINES] – Lines SilverLining – Horizontal
Visual Manipulation – Transmission
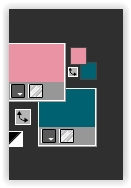
Colors used:

The tutorial is written with these colors and materials.
If you use your own colors and / or materials, you may have to play with the settings of Blend Mode and/or Opacity.
1
Materials palette – Foreground color 2 / Background color 1
Make the foreground gradient Linear with TheFutureBelongs
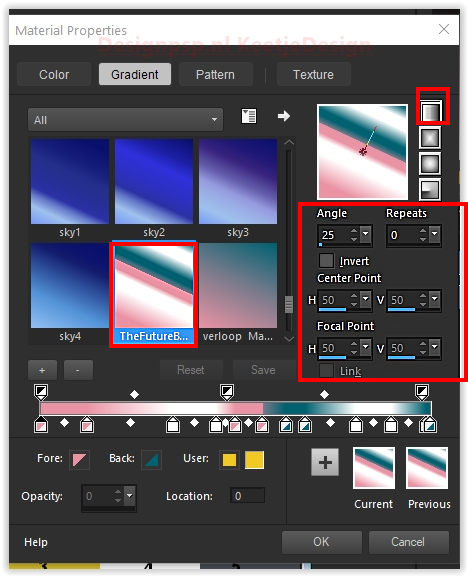
Open a new transparent image of 900 x 650 pixels
Fill with the gradient
2
Layers – Duplicate
Image – Mirror (horizontal)
Layers – Properties – Blend Mode Luminance / Opacity 38
Layers – Merge – Merge Visible
3
Layers – Duplicate 2x
Layer palette – Close the two top layers
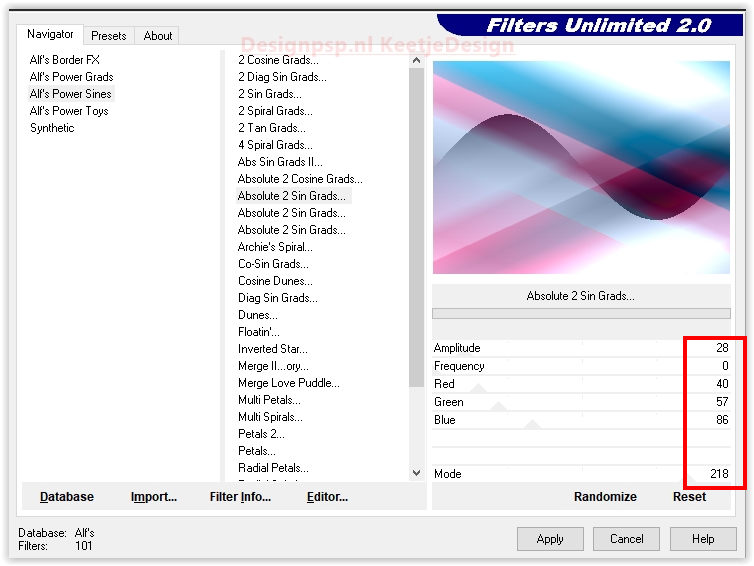
4
Layer palette – Activate the bottom layer
Effects – Plugin Unlimited 2.0 – Alf’s Power Sines – Absolute 2 Sin Grad
Note: With Red / Green / Blue you can adjust the color
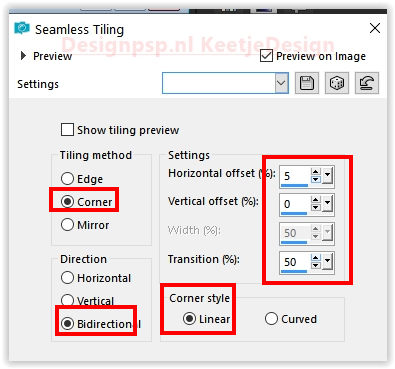
Effects – Image Effects – Seamless Tiling
Effects – Edge Effects – Erode
5
Layer palette – Open and Activate the middle layer
Image – Flip (Mirror vertical)
Image – Mirror (horizontal)
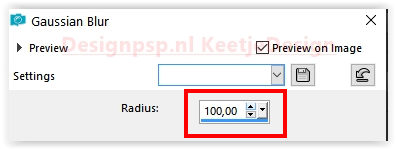
Adjust – Blur – Gaussian Blur / Range 100
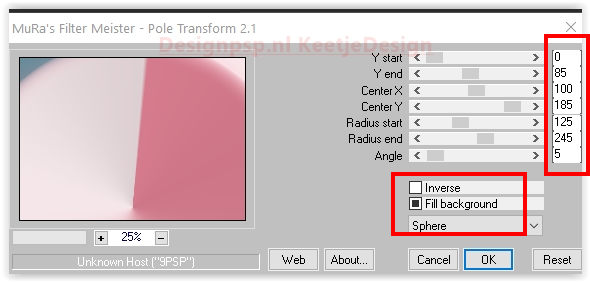
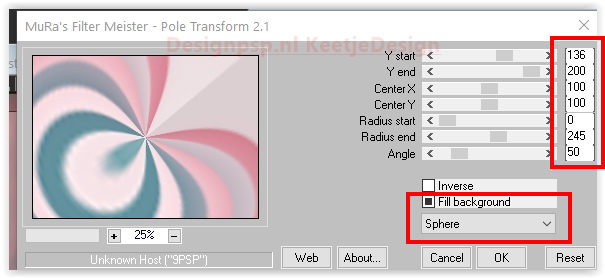
Effects – Plugin MuRa’s Meister – Pole Transform
Note: Click 2x Fill Background
Effects – Edge Effects – Erode
6
Image – Flip (horizontal)
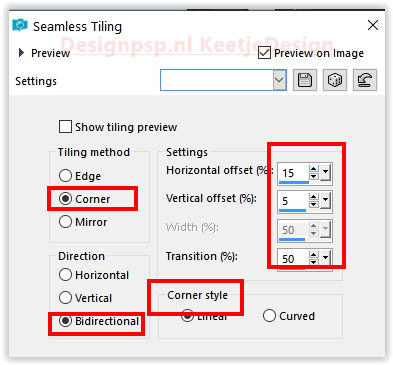
Effects – Image Effects – Seamless Tiling
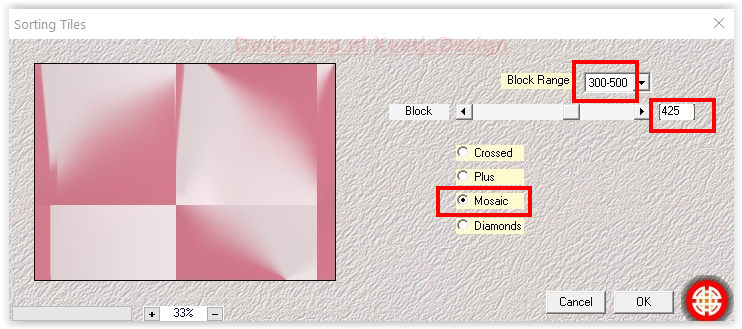
Effects – Filter Medhi – Sorting Tiles
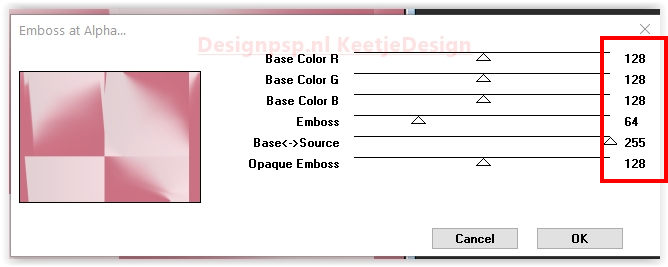
Effects – Filter MuRa’s Seamless – Emboss at Alpha 2x / Default setting
7
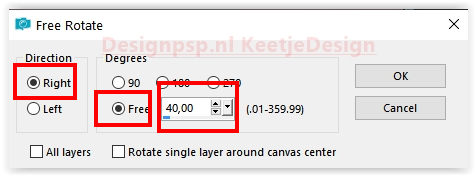
Image – Free Rotate
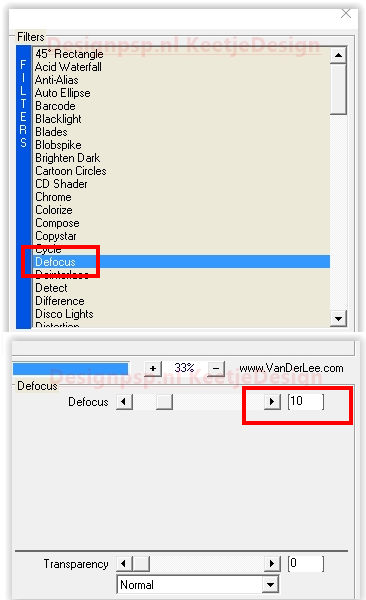
Effects – Filter VanDerLee – Unplugged X – Defocus
8
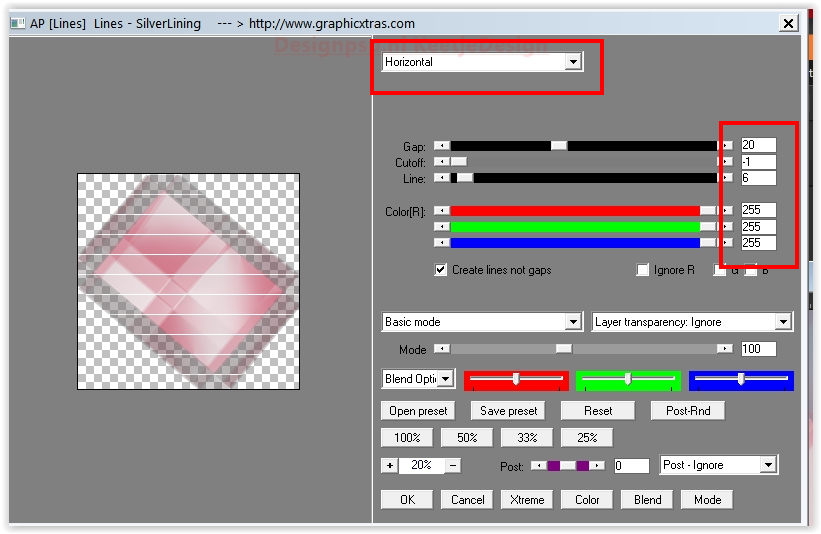
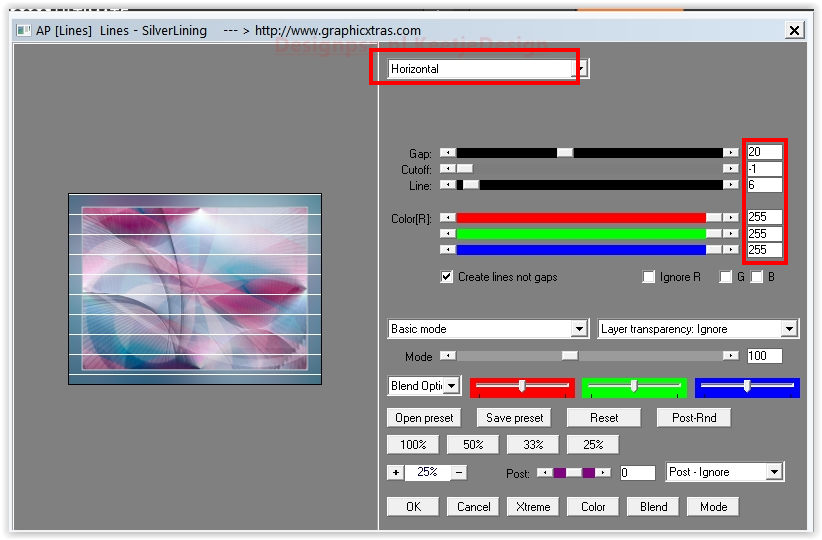
Effects – Filter AP [LINES] – Lines SilverLining – Horizontal
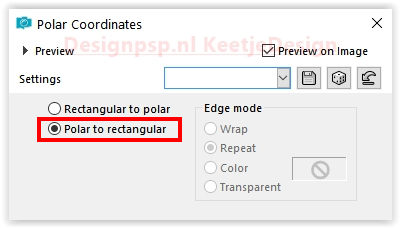
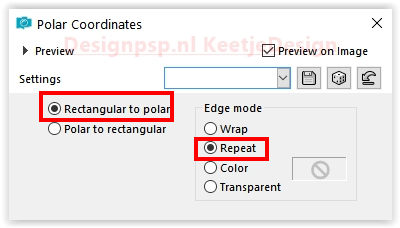
Effects – Distortion Effects – Polar Coordinates
Features – Blend Mode Soft Light
9
Layer palette – Activate the top layer
Adjust – Blur – Gaussian Blur / Range 100
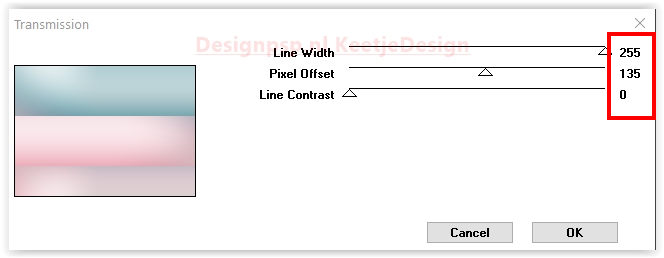
Effects – Filter Visual Manipulation – Transmission
10
Effects – Distortion Effects – Polar Coordinates
Effects – Filter MuRa’s Meister – Pole Transform
Effects – Filter MuRa’s Seamless – Emboss at Alpha / Default
Layers – Properties – Opacity between 30 and 50 Depends on the colors
11
Layers – New Raster Layer
Fill with color 1
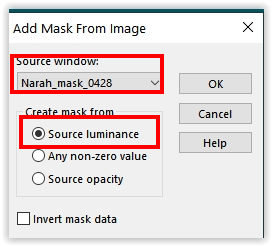
Layers – New Mask Layer – From Image: Narah_mask_0428
Effects – Edge Effects – Enhance
Layers – Merge – Merge Group
Effects – Edge Effects – Erode
Layers – Properties – Blend Mode Luminance / Opacity 65
12
Layers – New Raster Layer
Fill with color 4
Layers – New Mask Layer – From Image: Narah_mask 0296
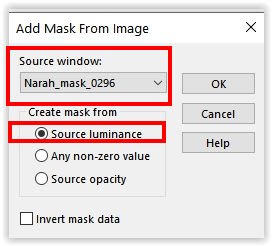
Effects – Edge Effects – Enhance
Layers – Merge – Merge Group
Layers – Properties – Blend Mode Soft Light
Effects – Filter AP [LINES] – Lines SilverLining – Dotty grid

13
Image – Add Borders – Symmetric
1 pixel color 5
3 pixels color 4
1 pixel color 1
Selections – Select all
Edit – Copy
Image – Add Borders – Symmetric
50 pixels color 4
Selections – Invert
Edit – Paste into Selection
Selection – Hold
14
Adjust – Blur – Gaussian Blur / Range 100
Note:f you are not satisfied with the color, you can adjust the border after Gausian Blur,
hue and saturation, colorize with color from your work or tube
Effects – Filter AP [LINES] – Lines SilverLining – Horizontal
Selections – Layer selection
Effects – Geometric Effects – Skew
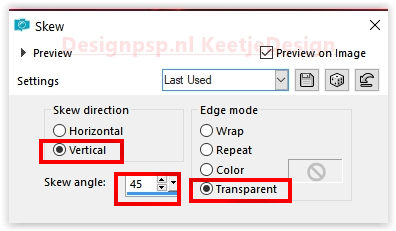
Selections – Select all
Selections – Modify – Contract 50 pixels
Press Delete on the keyboard
Selections – Select none
Layers – Properties – Blend Mode Overlay
15
Image – Add Borders – Symmetric
3 pixels color 4
1 pixel color 3
3 pixels color 4
1 pixel color 2
Selections – Select all
Image – Add Borders – Symmetric
50 pixels color 4
Selections – Invert
Edit – Paste into Selection
Adjust – Blur – Gaussian Blur / Range 100
Selections – Invert
Effects – 3D Effects – Drop Shadow / 0 / 0 / 60 / 30 / Color # 000000
Selections – Select none
16
Open the tube Yoka-TEXT_TheFuture-110316 – Copy – Paste as new layer
Place of your choice
Effectebn – 3D Effects – Drop Shadow / 1 / 1 / 50 / 3 / Color # 000000
Layers – Duplicate
Layers – Properties – Blend Mode Screen
17
Open the tube 7049-Luz Cristina – Copy – Paste as new layer
Effects – 3D Effects – Drop shadow of your choice
Place to the right
18
Sign your work
Image – Add Borders – Symmetric
1 pixel color 1
Image – Resize – Resize the width to 1000 pixels
Save as Jpeg
The tutorial has been tested by Marianne
Marianne thank you
© DesignPSP KeetjeDesign 17-06-2022