

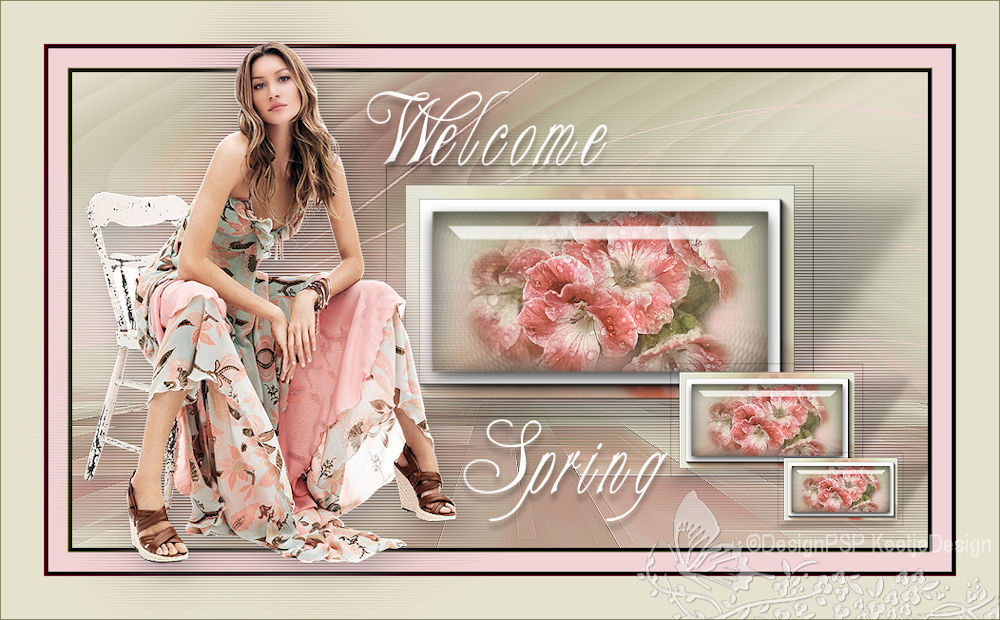
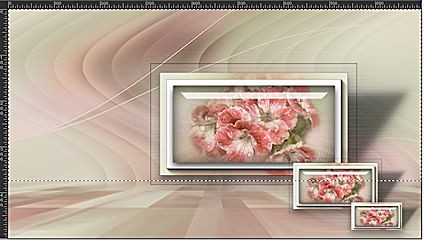
Welcome Spring

This tutorial was created , written and translated by KeetjeDesign 13 -02-2021, the © is mine.
It is not allowed to copy, link and / or place these or parts thereof without my permission.
If you want to use this tutorial on your own forum, club or group , please ask me for permission.
The tutorial is written with PSP 2020 but can also be made with other versions.
If this tutorial resembles another tutorial, it is purely coincidental
The © of the materials used is for the rightful owner and the tube maker.
I thank the tube maker Jewel for the tube and Narah and Ildiko for the masks
Materials used:

Double-click on the WelcomeSpring_Glass and WelcomeSpring_Shadow presets, they will be in the correct filter
Open the other material in PSP / Duplicate with Shift + D / Close the original material / Minimize mask
Plugins used:
Unlimited 2.0 – Lens Effects – Vertical Slices
Unlimited 2.0 – VM Distortion – Radial Pox
AAA Frames – Foto Frame
AAA Frames – Transparant Frame
Medhi – Weaver
Medhi – Sorting Tiles
Mura’s – Pespective Tiling
Alien Skin Eye Candy 5 – Impact – Glass
Alien Skin Eye Candy 5 – Impact – Perspective Shadow
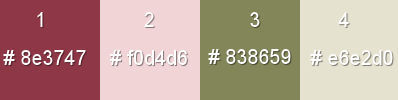
The tutorial is written with these colors and materials.
If you use your own colors and / or materials, you may have to play with the settings of Blend Mode and/or Opacity.
1
Material palette – Foreground color 3 / Background color 4
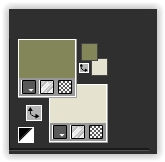
Create on the Foreground the Gradient Sunburst
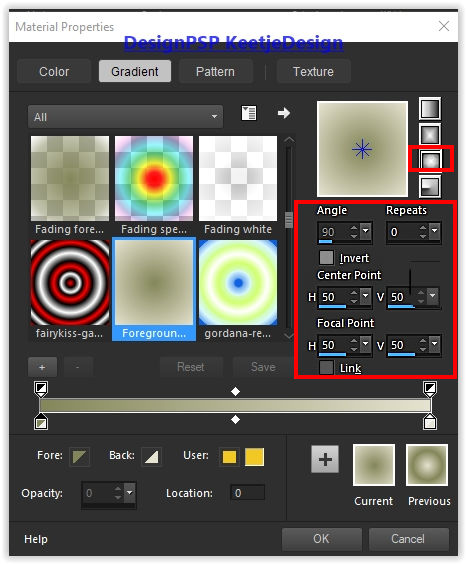
Open a new transparent image of 900 x 500 pixels
Fill with the gradient
2
Selections – Select all
Open the tube LD-model-320 – Remove the watermark
Copy – Paste into selection (minimize tube)
Selections – Select none
3
Adjust – Blur – Gaussian Blur / Range 40
Layers – Duplicate
Layer palette – Close the top layer (click eye)
4
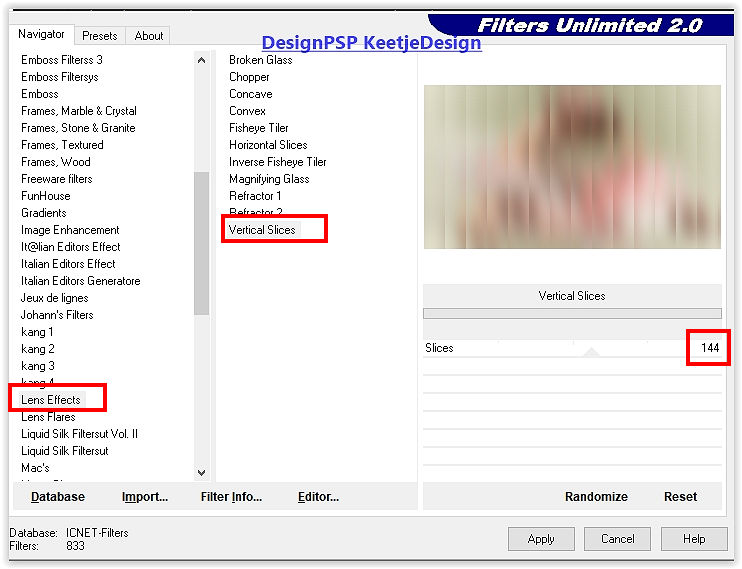
Layer palette – Activate the bottom layer
Effects – Filter Unlimited 2.0 – Lens Effects – Vertical Slices
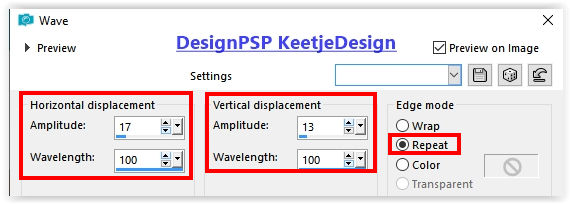
Effects – Distortion Effects – Wave
5
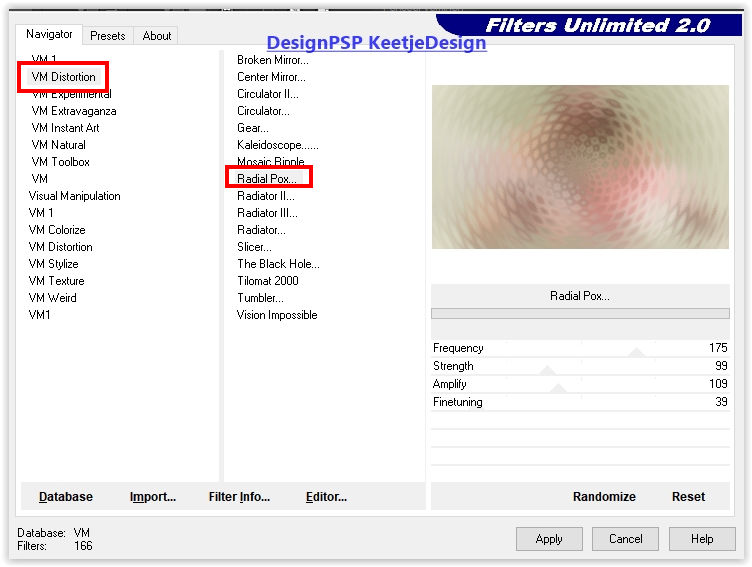
Layer palette – Open and activate the top layer
Effects – Filter Unlimited 2.0 – VM Distortion – Radial Pox / default
6
Open the tube after the rain – Remove the watermark
Copy – Paste as a new layer
Adjust – Sharpness – Sharpen
Layers – merge – merge down
7
Effects – Plugins AAA Frames – Foto Frame
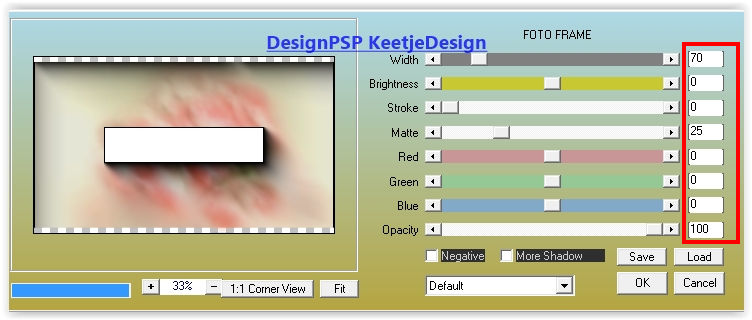
Effects – Filter AAA Frames – Transparent Frame

8
Image – Resize – Resize with 50% – Uncheck all layers
Adjust – Sharpness – Sharpen
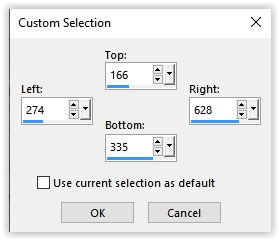
Activate Selection tool Rectangle (S) – Custom selection

9
Layers – New raster layer
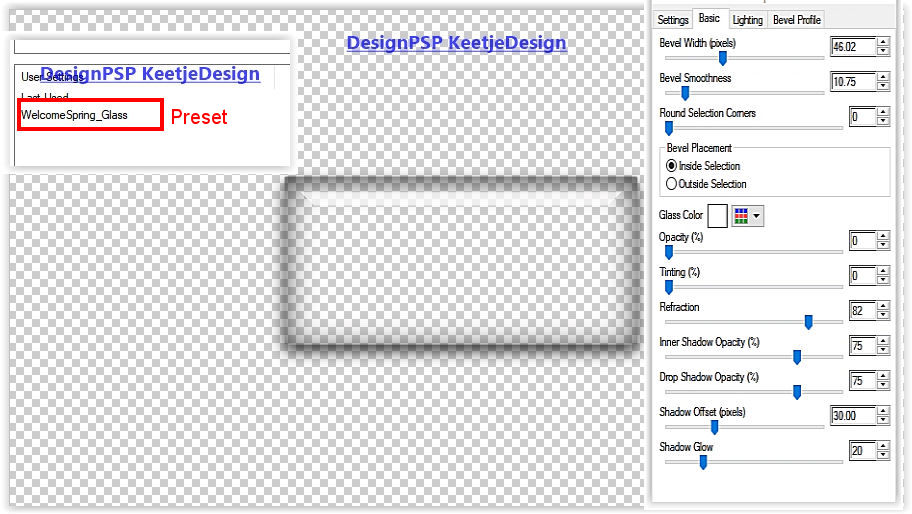
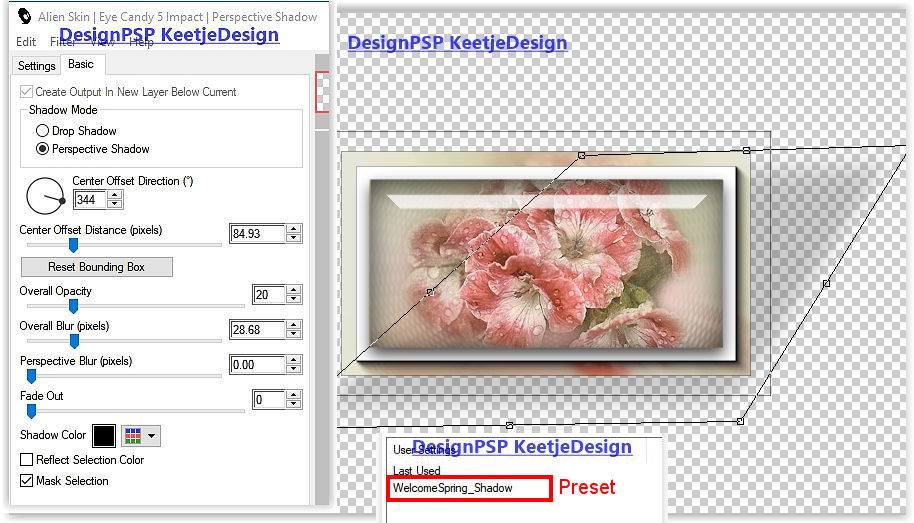
Effects – Plugins Alien Skin Eye Candy 5 – Impact – Glass / Preset WelcomeSpring_Glass (Or enter the settings)
Selections – Select none
Layers – merge – merge down
10
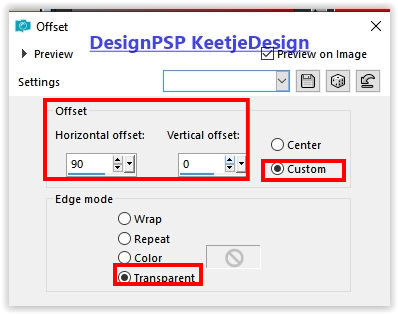
Effects – Image Effects – Offset / 90/0
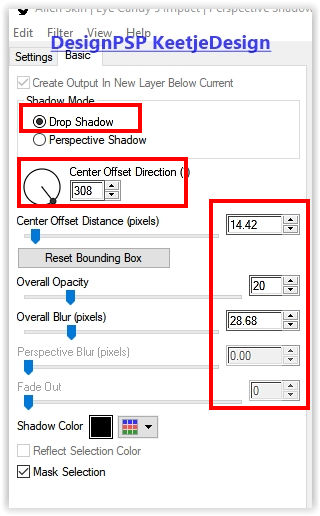
Effects – Plugins Alien Skin Eye Candy 5 – Impact – Perspective Shadow / Preset WelcomeSpring_Shadow (Or enter the settings )
11
Layers – Duplicate
Image – Resize – Resize with 45% – Uncheck all layers
Adjust – Sharpness – Sharpen
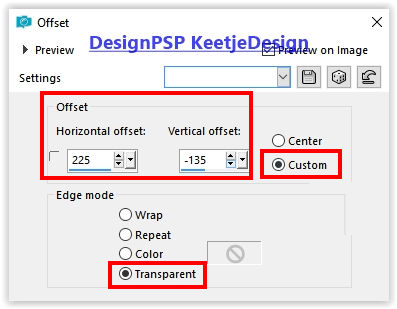
Effects – Image Effects – Offset / 225 / min 135
12
Layers – Duplicate
Image – Resize – Resize with 65% – Uncheck all layers
Adjust – Sharpness – Sharpen
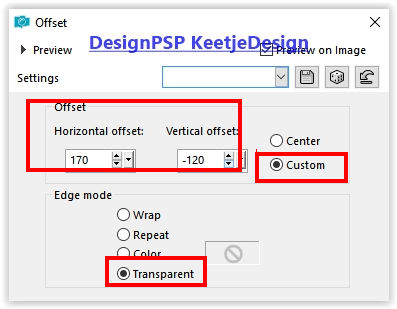
Effects – Image Effects – Offset / 170 / min 120
13
Layers – Merge – Merge Down 2x
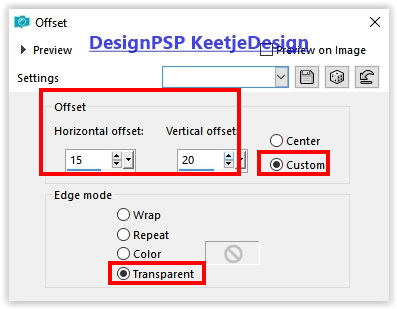
Effects – Image Effects – Offset / 15 / 20
Layers – Duplicate
Adjust – Blur – Gaussian Blur / Radius 40
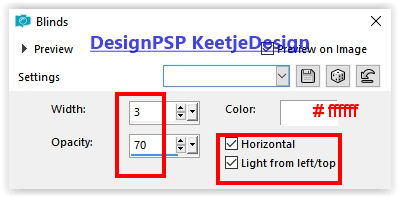
Effects – Texture Effects – Blinds – Color # ffffff
Layers – Arrange – Move Down
Effects – Edge Effects – Enhance
14
Layer palette – Activate the bottom layer
Layers – Duplicate
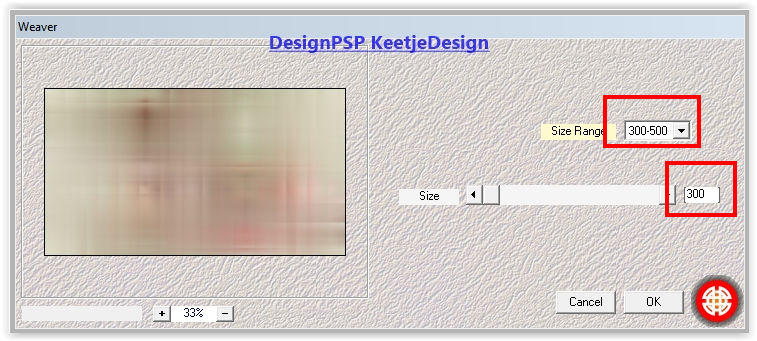
Effects – Plugin Medhi – Weaver
15
Effects – Plugin Medhi – Sorting Tiles

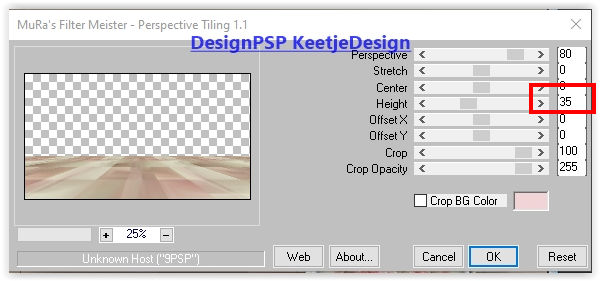
Effects – Plugin Mura’s – Pespective Tiling
16
Activate Magic Wand tool

Select the transparent part of this layer
Press 4x Delete on the keyboard
Selections – Select none
Effects – Edge Effects – Enhance
17
Layer palette – Activate the bottom layer
Layers – New raster layer
Fill with color 2
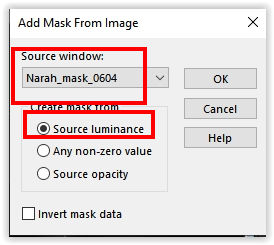
Layers – New Mask Layer – From Image: Narah_mask_0604
Effects – Edge Effects – Enhance more
Layers – Merge – Merge group
18
Layer palette – activate the top layer
Open the tube WelcomeSpring – Copy – Paste as new layer
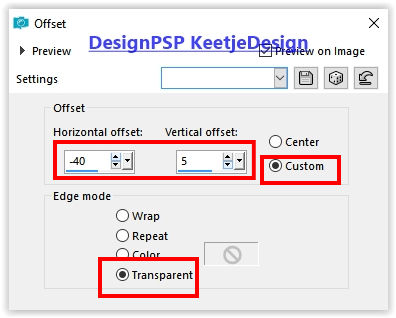
Effects – Image Effects – Offset / minus 40 / 5 (Or set it manually as on the example crea)
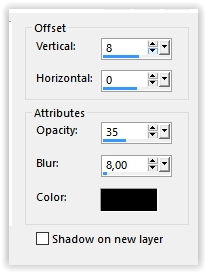
Effects – 3D Effects – Drop Shadow / 8/0/35/8 / # 000000
19
Layers – Merge – Merge visible layers
Selections – Select all
Image – Add Borders – Symmetric
5 pixels color 3
20 pixels color 2
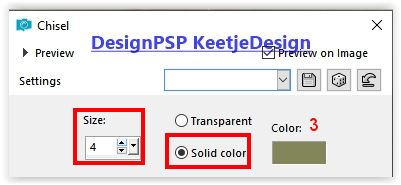
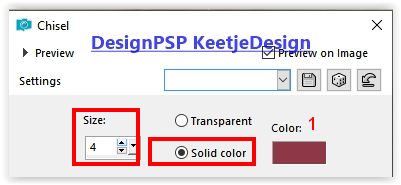
Effects – 3D Effects – Chisel Color 3
20
Selections – Select all
Image – Add Borders – Symmetric
5 pixels color 1
45 pixels color 4
Effects – 3D Effects – Chisel Color 1
Selections – Select none
21
Activate the tube LD-model-320 – Copy – Paste as a new layer
Image – Resize – Resize with 75% – Uncheck all layers
Place on the left – See example crea
Effects – Plugins Alien Skin Eye Candy 5 – Impact – Perspective Shadow
Layers – Duplicate
Adjust – Blur – Gaussian Blur / Radius 40
Effects – Texture Effects – Blinds – Color # ffffff / same setting
22
Sign your work
Image – Add Borders – Symmetric
1 pixel color 3
Image – Resize – Resize to 1000 pixels width
Adjust – Sharpness – Sharpen
Save as Jpeg
The tutorial has been tested by Marianne
Marianne thank you
© DesignPSP KeetjeDesign 21-03-2021