

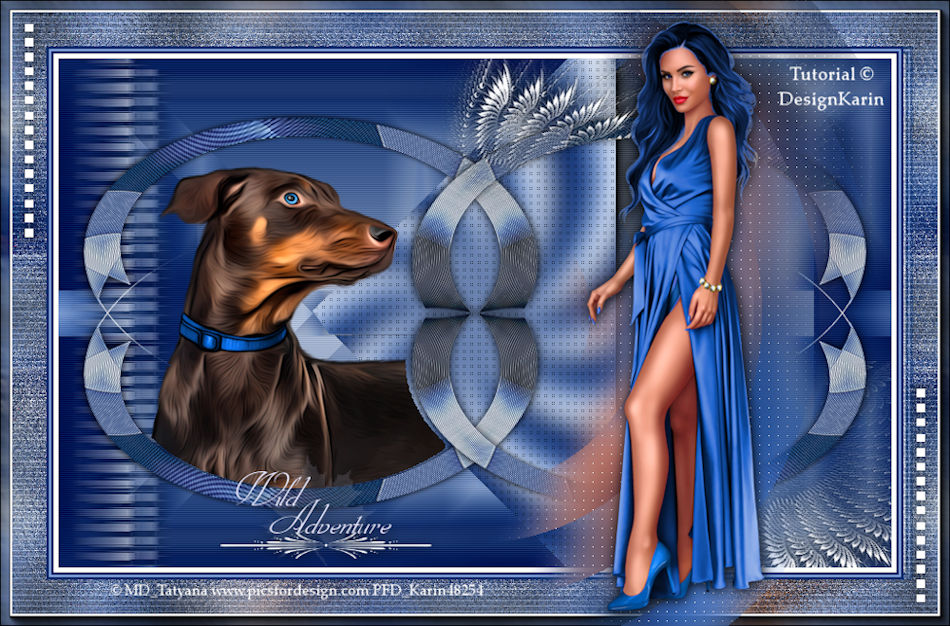
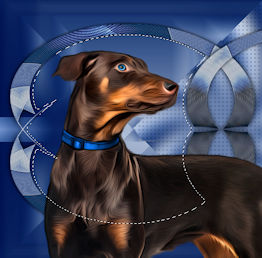
Wild Adventure
This tutorial was conceived and written by Karin 03-08-2021, the © is mine.
It is not allowed to copy it or parts of it, link it or put it somewhere else without my permission.
The tutorial is written with PSP19 (X9) but can also be made with other versions.
If this tutorial looks like another tutorial it is just a coincidence.
The © of the used materials is for the rightful owners and the tube makers.
The text is from Riet
The mask is unknown to me. The lines are from me.
Open the material in PSP / Duplicate with Shift+D / Close the originals.
Used Filters:
Carolaine And Sensibility – CS Texture and Halloween2
Simple – Pizza slice mirror, Quick tile, Top bottom wrap
Cybia – Screenworks
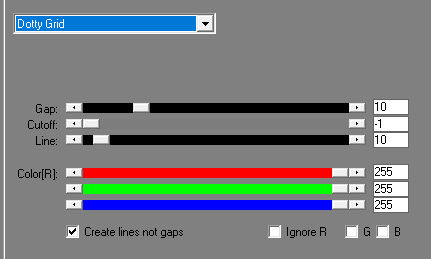
AP Lines – Silverlining
Mehdi – Wavy Lab 1.2 and Sorting tiles
Toadies – Motion Trail
AAA Frames – Photo Frame
Filters Unlimited – &<Bkg Designers sf10IV – @THE BLAST
ALien skin Eye Canduy 5 – Impact – Motion trail.
VM Distortion – SLicer
If you use your own colors and/or materials you may have to play with the Blend Mode and/or Layer Opacity.
—-
Download your materials here:

You only need your own woman and animal tube. My tube is from MD_Tatyana.
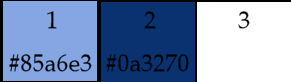
Color palette:
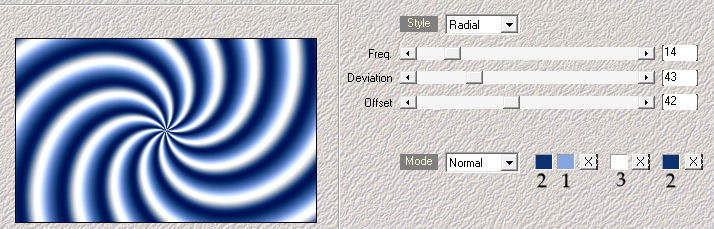
Point 1.
Open the Alpha file Alpha_Wild Adventure – Window – Duplicate (or use Shift+D).
Effects – Plugins – Mehdi – Wavy Lab 1.1. with the following setting.
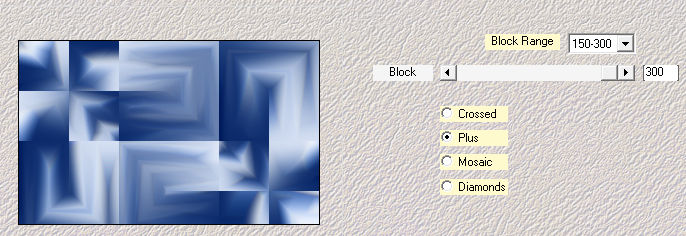
Point 2.
Layers – Duplicate.
Adjust – Gaussian Blur – Range at 15.
Effects – Plugins – Mehdi – Sorting tiles with the following setting.
Point 3.
Selections – Load/Save selections – Load selection from alpha channel (1).

Edit – Clear.
Effects – 3D Effects – Drop shadow.

Repeat with Horizontal and Vertical on -1.
Selections – Select none.
Point 4.
Effects – Plugins – Simple – Pizza slice mirror
Selections – Load/Save selections – Load selection from alpha channel (2).

Edit – Clear.
Selections – Select none.
Effects – Plugins – Carolaine And Sensibility – CS_Halloween2
Point 5.
Selection tool – Custom selection  with the following setting:

Selections – Promote selection to layer.
Effects – Edge effects – Enchance.
Selections – Select none.
Effects – 3D Effects – Drop shadow.
Point 6.
Effects – Distortion effects – Wave with the following setting.

Effects – Geometric effects – Skew with the following setting.

Effects – Distortion effects – Polar coordinates,
Rectangle to Polar and wrap checked.
Point 7.
Effects – Image effects – Offset.

Layers – Duplicate.
Image – Mirror – Mirror horizontal.
Layers – Merge – Merge down.
Layers – Duplicate.
Image – Mirror – Mirror vertical.
Layers – Merge – Merge down.
Point 8.
Activate in your layer palette the bottom layer.
Adjust – Gaussian Blur – Radius at 15.
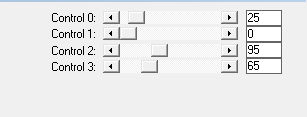
Effects – Plugins – Cybia – Screenworks with the following setting.
Point 9.
Activate again the top layer in your layer palette.
Click with your magic tool in the middle of the circle on the left.
Selections – Modify – Expand with 4.
Open your own animal tube and resize if necessary and place it in the middle of the circle.
Selections – Invert
Edit – Delete.
Selections – Select none.
Point 10.
Layers – New raster layer.
Flood Fill with white.
Layers – New mask layer – From image.

Layers – Merge – Merge group.
Layers – Resize – 50%. Resize all layers NOT checked.
Effects – Image effects – Offset.

Effects – Edge effects – Enchance.
Layers – Duplicate.
Image – Mirror – Mirror vertical.
Effects – Image effects – Offset.

Point 11.
Layers – Merge – Merge down.
Activate the 3rd layer from the bottom (selection made to layer) in your layer palette.
Click with your magic wand in the right circle.
Selections – Modify – Expand with 4.
Activate again your top layer in your layer palette.
Edit – Clear.
Selections – Select none.
Effects – 3D Effects – Drop shadow.
Point 12.
Open your line big. Edit – Copy.
Edit – Paste as new layer.
Effects – Image effects – Offset.

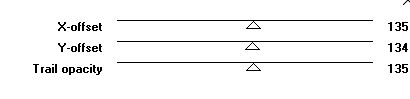
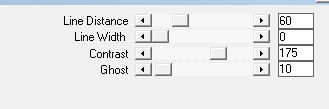
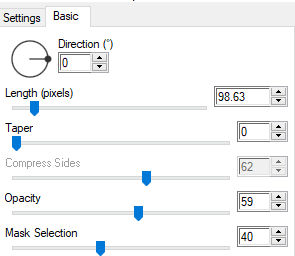
Effects – Plugins – Toadies – Motion Trail with the following setting.
Effects – Distortion effects – Wind, from Right – 100
Effects – Edge effects – Enchance.
Layers – Duplicate.
Layers – Merge – Merge down.
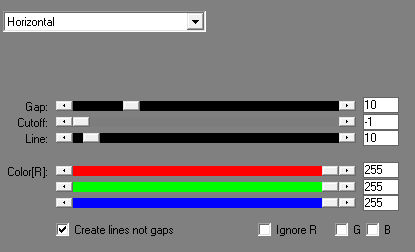
Effects – Plugins – AP Lines – Silverlining.
Layers – Arrange – Down.
Repeat this 2 more times.
Point 13.
Image – Add borders – Symmetric:
5 pix color white.
3 pix color 2.
2 pix color 1.
3 pix color 2.
50 pix color white.
Point 14.
Click with your magic wand in the 50 pix white border.
Effects – plugins – Simple – Top Bottom wrap
Effects – Plugins – Simple – Quick tile
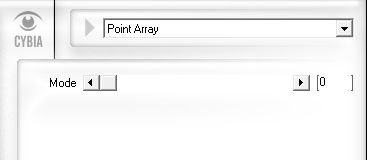
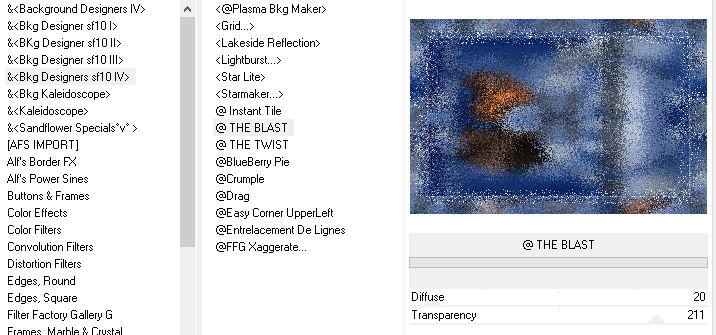
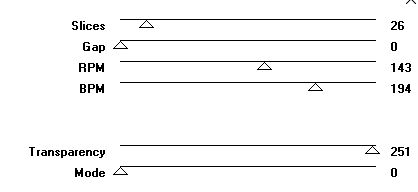
Effects – Plugins – Filters Unlimited – &<Bkg Designers sf10IV – @THE BLAST with the following setting.
Effects – Plugins – Carolaine And Sensibility – CS Texture with the following setting.
Point 15.
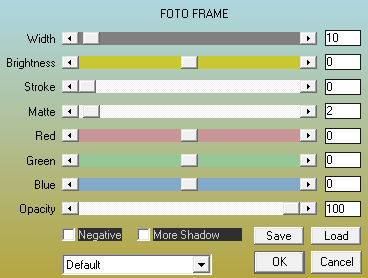
Effects – Plugin Filters – AAA Frames – Photo Frame with the following setting.
Selections – Select none.
Point 16.
Open your woman tube and resize if necessary.
Put this one on the right as my example.
Layers – Duplicate.
Activate in your layer palette the middle layer.
Adjust – Blur – Gaussian blur – radius at 25.
Point 17.
Effects – Plugins – ALien skin Eye Candy 5 – Impact – Motion trail with the following setting.
Effects – Plug-in filters – VM Distortion – SLicer with the following setting.
Effects – Plugins – AP Lines – Silverlining.
Point 18.
Activate the upper layer.
Effects – 3D Effects – Drop shadow.
Open your line short. Edit – Copy.
Edit – Paste as new layer.
Move to the left top like my example.
Layers – Duplicate.
Image – Mirror – Mirror horizontal.
Image – Mirror – Mirror vertical
Point 19.
Open your text and remove the watermark.
Put your text at a nice place on your image.
Image – Negative.
Give a drop shadow as you like.
Put your watermark and any ©.
Layers – Merge – Merge all layers.
© DesignKarin 2021-08
Here is another image
