Nature Beauty

This tutorial was devised and written by Karin 31/05/2021, the © is mine
It is not Allowed to copy, link and / or place any parts thereof without my permission
The tutorial is written with PSP19 (X9) but can also be made with other versions
If this lesson resembles another lesson, it is purely coincidental
The © of the materials used is for the rightful owners and the tube makers
The Masks are from Narah and Casiop
Tubes from Azalee. Yoka and Maryse
The Brush is unknown to me
Filters used:
Alien Skin Eye Candy 5: Impact / (Perspective Shadow)
Cybia / Screenworks
Flaming Pear / Flood and Flexify
AFAS Import / sqborder2
AAA Frames / Foto Frame
———
The tutorial is written with these Colors and Materials
If you use your own Colors and / or Materials, you may have to play with Blend Mode and or Opacity
———
Download the Materials here:

Open the Materials in PSP and minimize
Step 1
Open the Alpha file Alfa_Nature Beauty / Window / Duplicate (or use Shift + D)
Close the original we will work on the copy
Step 2
In the Materials Palette, set the Foreground Color to Black / Background Color to White
Make a Rectangular Gradient Foreground/Background
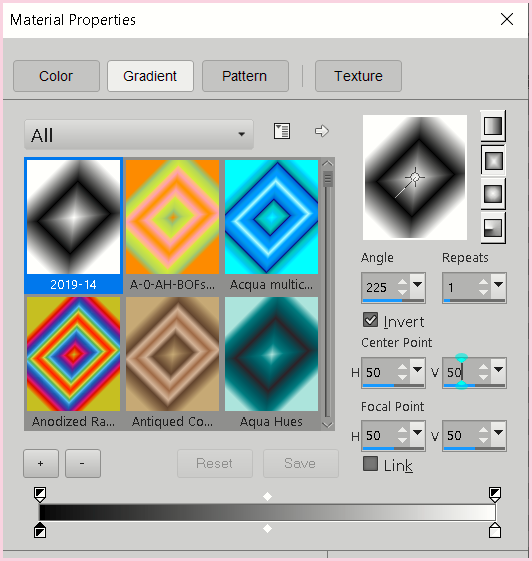
Flood Fill the Image with the Gradient
Layers / Duplicate
Step 3
Image / Mirror / Mirror Horizontal
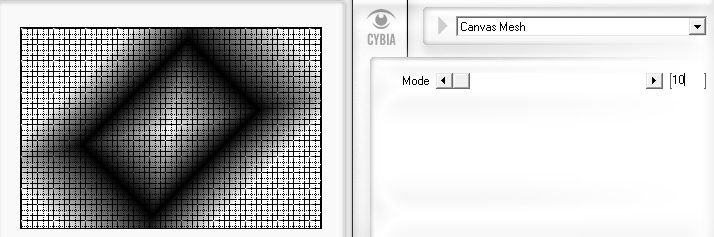
Effects / Plugins / Cybia / Screenworks (with the following settings)
Layers / Properties / Blend Mode Lighten
Layers / Merge / Merge Down
Step 4
Layers / Duplicate
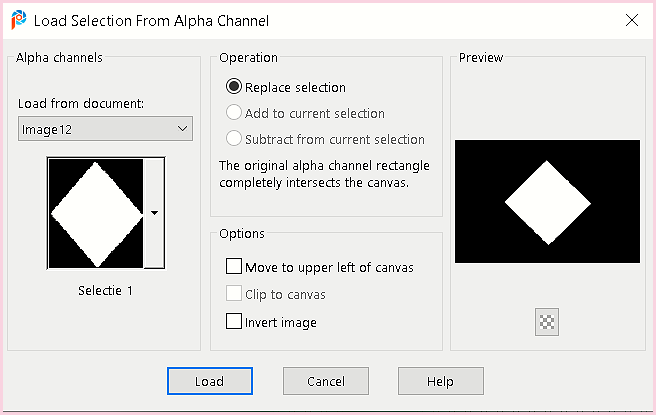
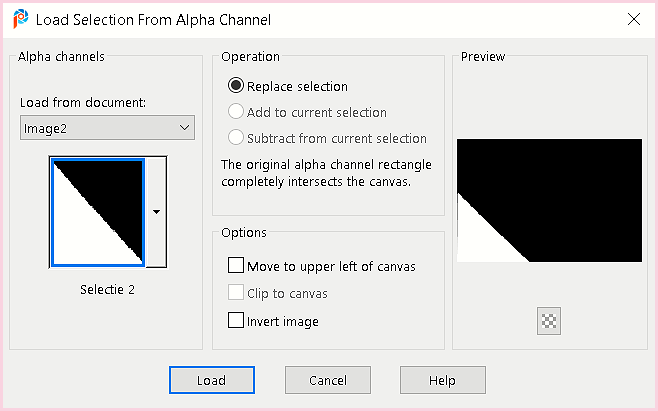
Selections / Load/Save Selection / Load Selection from alpha channel (Selection 1)
Layers / New Raster Layer
Open the Tube pays-314-Azalee
Edit / Copy
Edit / Paste into Selection
Layers / Properties / Blend Mode / Luminance (Legacy)
Keep the Selection
Step 5
Layers / New Raster Layer
Flood Fill with Black
Selections / Modify / Contract by 8
Press the Delete Key on the Keyboard
Step 6
Selections / Select None
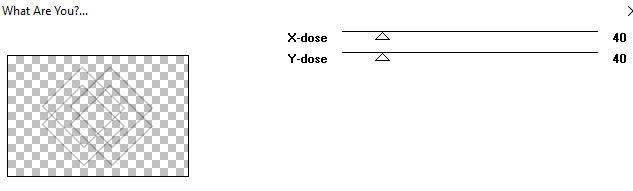
Effects / Plugins / Toadies / What are You? (with the following settings)
 Selections / Load/Save Selection / Load Selection from alpha channel (again Selection 1)
Press the Delete Key on the Keyboard
Step 7
Effects / Edge Effects / Enhance More
Layers / Duplicate
Layers / Merge / Merge Down
Layers / Properties / Blend Mode / Hard Light
Step 8
Layers / New Raster Layer
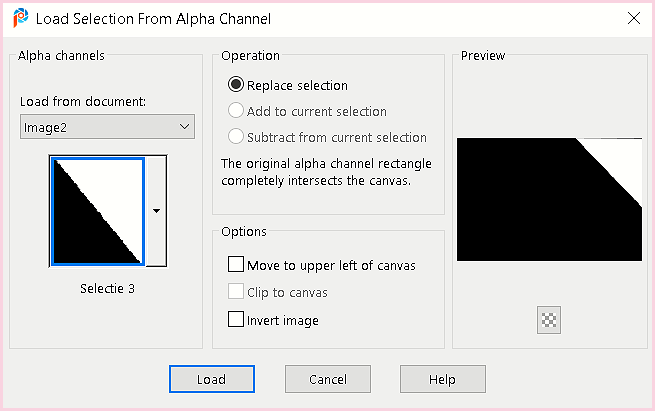
Selections / Load/Save Selection / Load Selection from alpha channel (Selection 2)
Open the Tube pays-314-Azalee
Edit / Copy
Edit / Paste into Selection
Layers / Properties / Blend Mode Luminance (Legacy)
Step 9
Layers / New Raster Layer
Selections / Load/Save Selection / Load Selection from alpha channel (Selection 3)
Open the tube pays-314-Azalee
Edit / Copy
Edit / Paste into Selection
Layers / Properties / Blend Mode / Luminance (Legacy)
Layers / Merge / Merge Down
Selections / Select None
Step 10
Layers / New Raster Layer
Selections / Load/Save Selection / Load Selection from alpha channel (Selection 2)
Flood Fill with Black
Selections / Modify / Contract by 8
Press the Delete Key on the Keyboard
Step 11
Selections / Load/Save Selection / Load Selection from alpha channel (Selection 3)
Flood Fill with Black
Selections / Modify / Contract by 8
Press the Delete Key on the Keyboard
Selections / Select None
Step 12
Activate Raster 1 in the Layers Palette (3rd Layer from the Bottom)
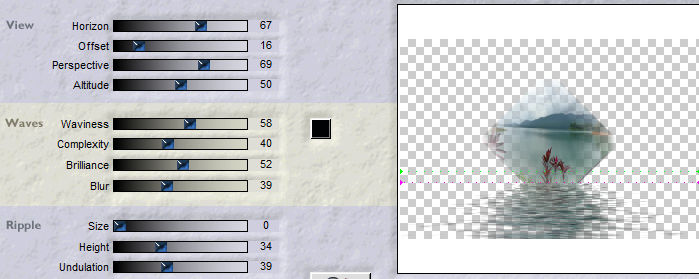
Effects / Plugins / Flaming Pear / Flood Fill (with the following settings)
 Activate the Top Layer in the Layers Palette
Layers / Duplicate
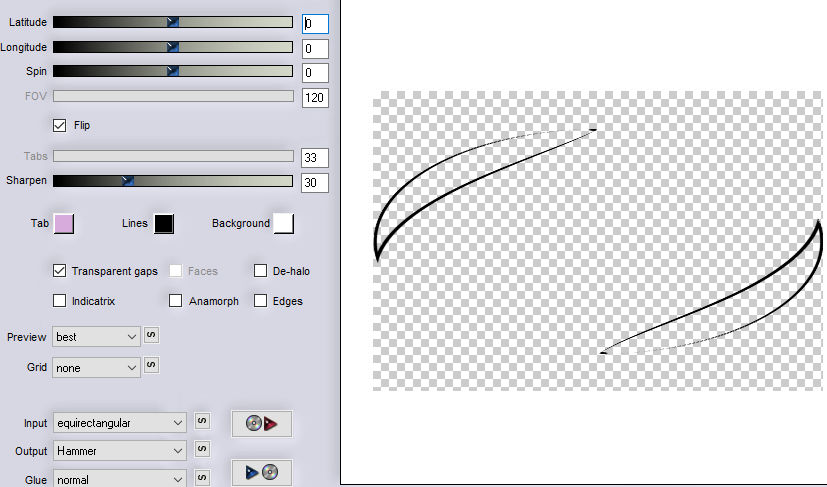
Effects / Plugins / Flaming Pear / Flexify (with the following settings)
Layers / Merge / Merge Down
Step 13
Layers / Duplicate
Effects / Distortion Effects / Wind from the Right / Wind force 100
Repeat but with Wind from the Left
Effects / Edge Effects / Enhance
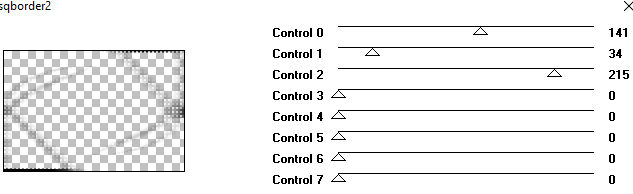
Effects / Plugins / AFAS Import / sqborder2 (default setting)
 Layers / Merge / Merge Down
Step 14
Layers / New Raster Layer
Open the azurylipfesStock_trees & branches 69 jpg
File / Export / Custom Brush
Enter a name so that you can easily find it
Step 15
Open the Brush Tool and find the Image you just saved with the following settings (Size 500)
 Stamp 1x on the Image by clicking with the Left Mouse Button (Black)
Image / Mirror / Mirror Horizontal
Slide neatly into the left corner
Step 16
Layers / Duplicate
Image / Resize / 50% (resize All Layers unchecked)
Image / Mirror / Mirror Horizontal
Slide neatly into the right corner
Layers / Merge / Merge Down
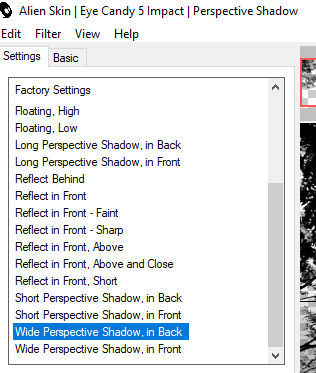
Effects / Eye Candy 5: / Impact / Perspective Shadow (with the following settings)
Step 17
Layers / New Raster Layer
Flood Fill with White
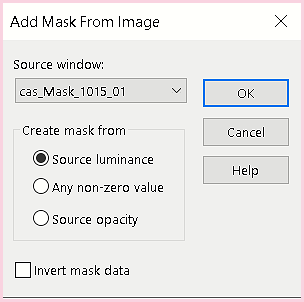
Layers / New Mask Layer / From Image
Layers / Merge / Merge Group
Layers / Duplicate
Image / Mirror / Mirror Horizontal
Layers / Merge / Merge Down
Layers / Properties / Opacity 80 / Blend Mode / Soft Light
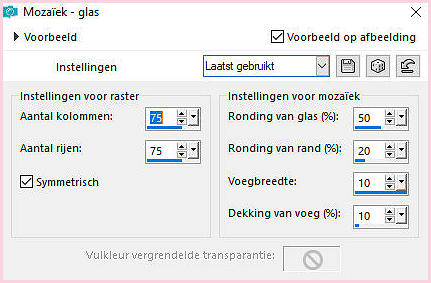
Effects / Texture Effects / Mosaic Glass (with the following settings)
 Effects / Edge Effects / Enhance
Step 18
Layers / New Raster Layer
Foreground Color Black again on Gradient as in Step 2
Flood Fill Flood Fill with the Gradient
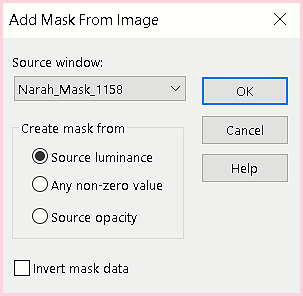
Layers / New Mask Layer / From Image / Narah Mask_1158
Layers / Merge / Merge Group
Effects / Edge Effects / Enhance
Step 19
Layers / Duplicate
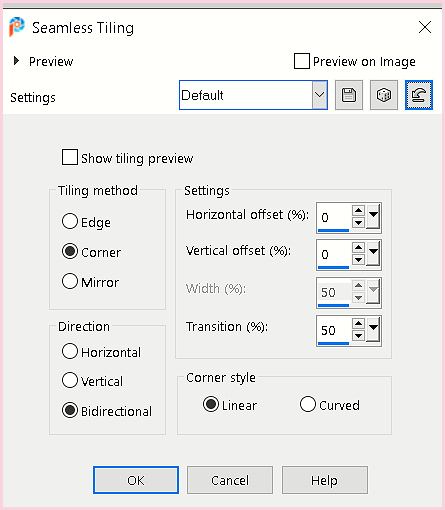
Effects / Image Effects / Seamless Tiling (default settings)
Layers / Merge / Merge Down
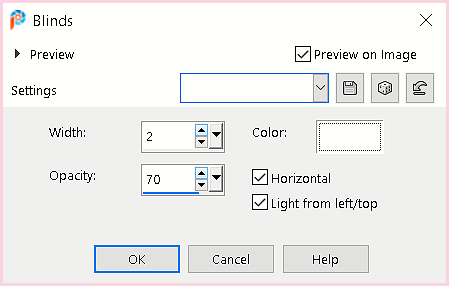
Effects / Texture Effects / Blinds (with the following settings)
Step 20
Open the tube MR_Shorebirds Remove the watermark
Image / Resize 20% (Resize All Layers Unchecked)
Edit / Copy
Edit / Paste as a New Layer
Effects / Image Effects / Offset
Horizontal -320 / Vertical -180 (transparent and custom checked)
Step 21
Layers / Duplicate
Image / Mirror / Mirror Horizontal
Effects / Image Effects / Offset
Horizontal 50 / Vertical 310 (transparent and custom checked)
Layers / Merge / Merge Down
Effects / Eye Candy 5: / Impact / Perspective Shadow / Settings Drop Shadow Blurry
Adjust / Sharpness / Sharpen
Step 22
Open the Yoka woman tube
Edit / Copy
Edit / Paste as a New Layer
Effects / Image Effects / Offset
Horizontal 130 / Vertical -120 (transparent and custom checked)
Layers / Duplicate
Layers / Merge / Merge Down
Add a Drop Shadow as you see fit
Adjust / Sharpness / Sharpen
Item 23
Open the text nature beauty
Edit / Copy
Edit / Paste as a New Layer
Effects / Image Effects / Offset
Horizontal -70 / Vertical 240 (transparent and custom checked)
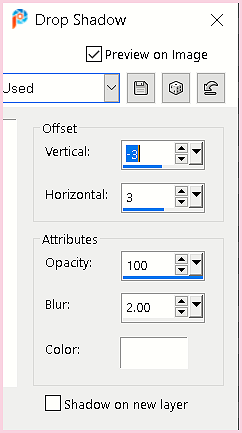
Effects / 3D Effects / Drop Shadow (with the following settings)
Item 24
Image / Add Borders / Symmetric / 1-pixel Black
Image / Add Borders / Symmetric / 1-pixel White
Image / Add Borders / Symmetric / 1-pixel Black
Edit / Copy
Step 25
Selections / Select All
Image / Add Borders / Symmetric / 40-pixels White
Selections / Invert
Edit / Paste into Selection
Adjust / Blur / Gaussian Blur 30
Selections / Select None
Step 26
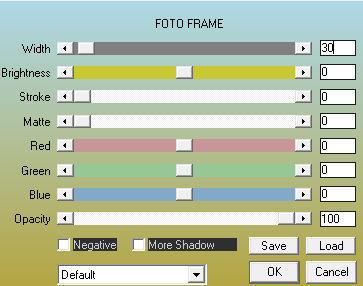
Effects / Plugins / AAA Frames / Foto Frame (with the following settings)
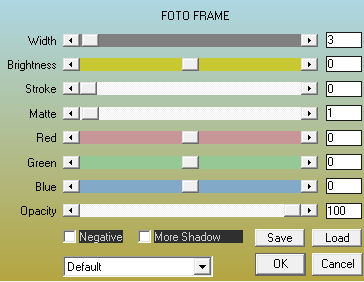
 Repeat again but set the width to 20
Repeat again and set the width to 10
Repeat AAA frames again with the following settings
Item 27
Add you name or watermark
Save as jpg
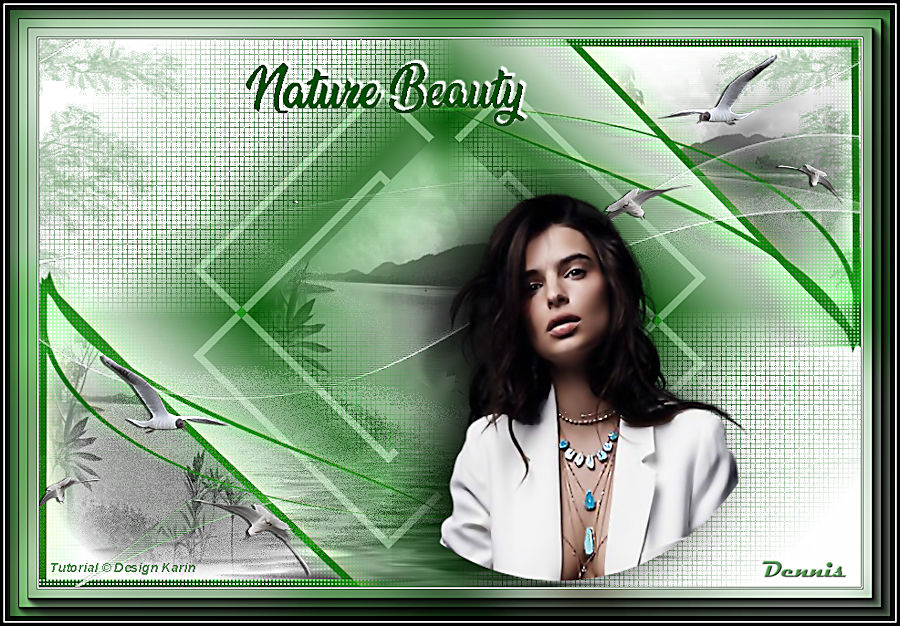
My version: