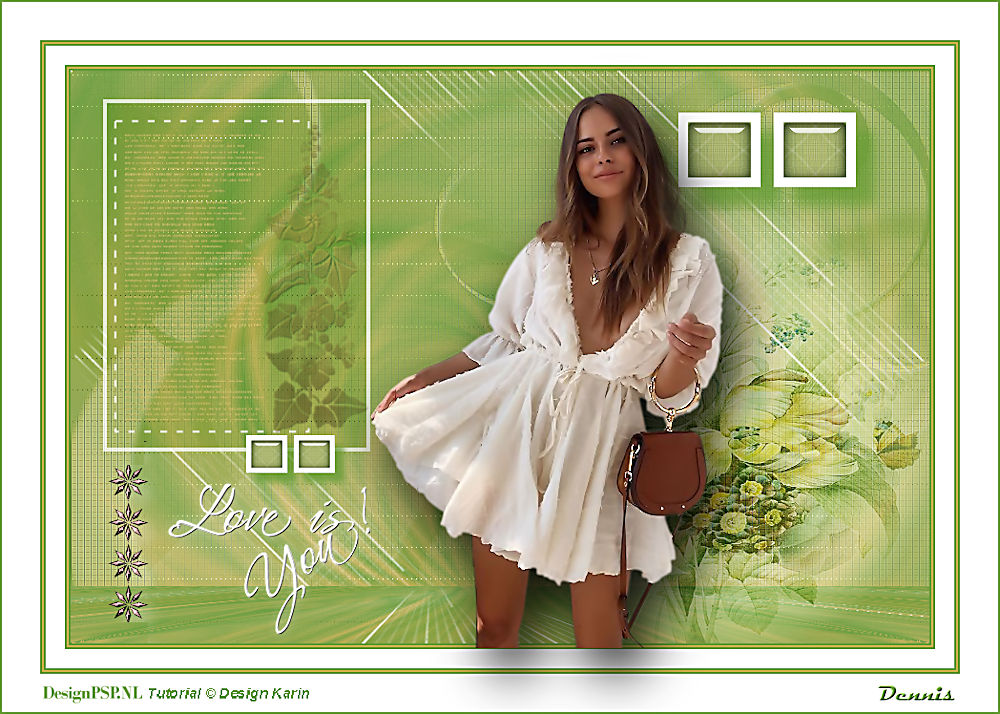
Love is You

This tutorial was created and written by Karin 11-02-2021,
the © for translation is mine Dennis.
It is not allowed to copy, link and / or place these or parts thereof without my permission.
The tutorial is written with PSP19 (X9) but can also be made with other versions.
If this lesson looks like any other lesson, it is purely coincidental.
The © of the materials used is for the rightful owners.
The mask is from Narah and Creation tine.
Open the material in PSP / Duplicate with Shift + D / Close the originals.
Filters used:
Alien skin Eye Candy 5 Impact – Glass
Mura meister – Perspective Tiling and Pole Transform
Tramages – Tow the Line
Carolaine & Sensibility – CS Halloween2
& Background Designers IV – Splish
Simple – 4way Average
L & K Landsiteofwonders – Zitah
———-
The tutorial is written with these Colors and materials.

If you use your own Colors and / or Materials you may have to play with Blend Mode and / or Opacity.
———-
Download your materials here:
Find a main tube yourself. I used a tube from: Fiodorova Maria
1
Open the Alpha file Alfa_Loveisyou
Window / Duplicate (or use Shift + D).
Close the original we will work on the copy.
2
In your Color Palette, set the Foreground Color to Color 1 #6a2424 and the Background to Color 2 #abb196
See Color Palette
Set your Foreground Gradient / Rectangular / 43 / 6 / Invert checked / Center
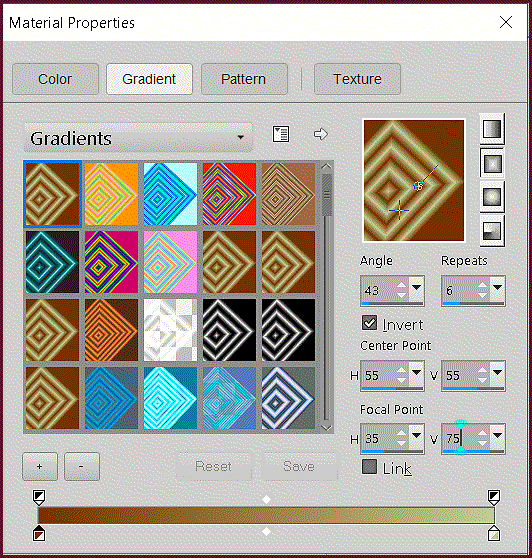
Point 50/50 / Focal Point 35/75
Fill Image with the Gradient
3
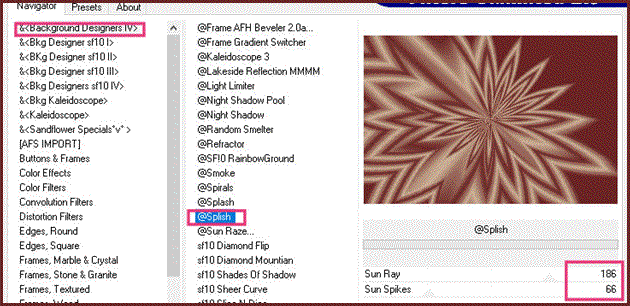
Effects – Plugins – Filters Unlimited 2.0 – & Background Designers IV / @Splish (default)
Effects / Plugins / Simple / 4way Average
Effects / Plugins / MuRa’s Meister / Pole Transform (default)
![]()
Effects / Edge Effects / Enhance
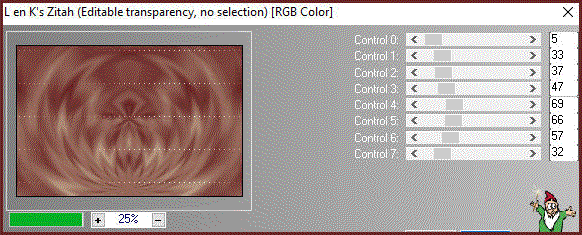
Effects / Plugins / L & K Landsiteofwonders / Zitah
4
New Raster Layer
Flood Fill with the Color White
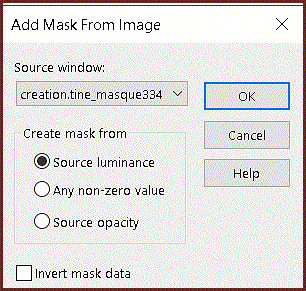
Layers – New Mask Layer – From Image – Creation tine mask
Layers / Merge / Merge Group
Effects / Image Effects / Seamless Tiling (default)
.png)
5
Edit / Copy / Copy Special / Copy Merged
Edit / Paste as a New Layer
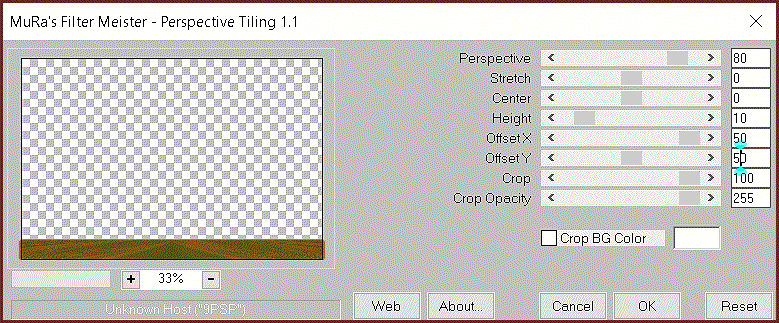
Effects / Plugins / MuRa’s Meister / Perspective Tiling
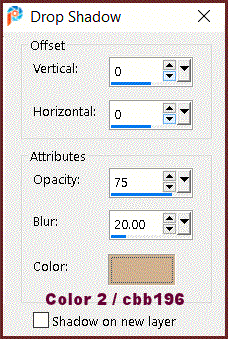
Effects / 3D Effects / Drop Shadow
6
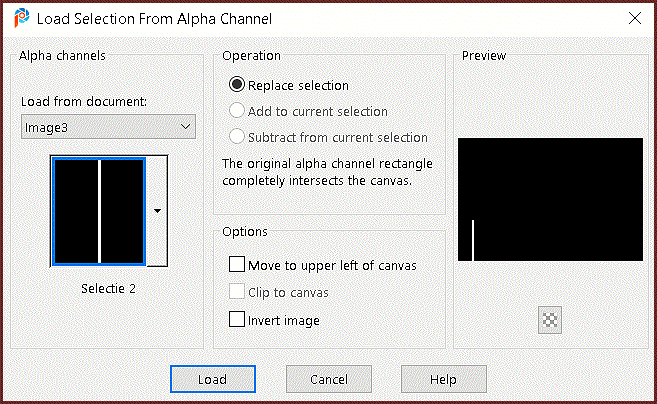
Selections / Load/Save Selection / Load Selection from Alpha Channel / Selection 1

New Raster Layer
Flood Fill with White
Selections / Modify / Contract by 4
Press Delete on the Keyboard
Activate in your Layers Palette the Second Layer from the Bottom (Group Raster 1)
Press Delete on the Keyboard
Activate your Top Layer in the Layers Palette
Selections / Select None
7
Edit / Copy / bloemtext (flower text)
Edit / Paste as a New Layer
Effects / Image Effects / Offset
Horizontal -260 / Vertical 85 / Custom and transparent checked.
Layers / Merge / Merge Down
Layers / Properties / Blend Mode / Lighten
8
Activate the Second Layer from the Bottom (Group Raster 1)
Layers / New Raster Layer
Flood Fill with Color 2 #cbb196
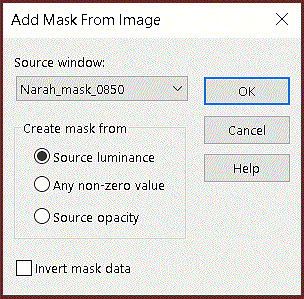
Layers / New Mask Layer / From Image / Narah Mask 0850
Layers / Merge / Merge Group
9
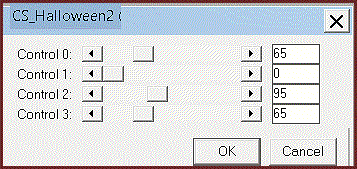
Effects / Plugins / Carolaine & Sensibility / CS Halloween2
Effects / Plugins / Tramages / Tow the Line (default)

Effects / Edge Effects / Enhance
Effects / 3D Effects / Drop Shadow
Horizontal and Vertical at 2 / Opacity 80 / Blur 2 / Color White
Layers / Merge / Merge Visible
10
Layers / New Raster Layer
Selections / Load/Save Selection / Load Selection from Alpha Channel / Selection 2
Flood Fill the Selection with Color white
Selections / Select None
Open your Star
Edit / Copy
Edit / Paste as a New Layer
Effects / Image Effects / Offset
Horizontal -379 / Vertical -130 / Custom and Transparent checked.
11
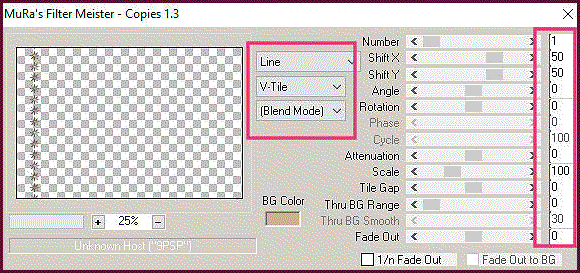
Effects / Plugins / MuRa’s Meister / Copies
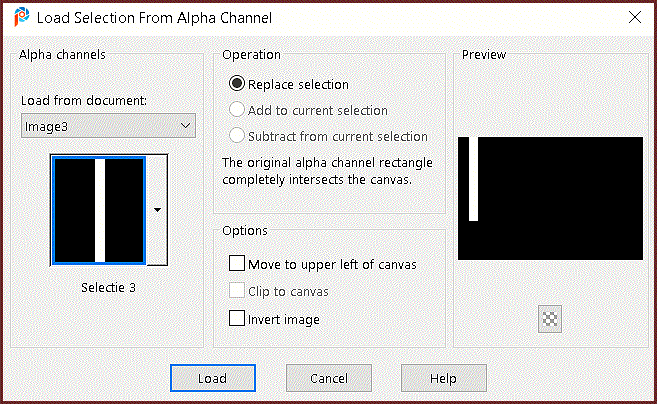
Selections – Load/Save Selection – Load Selection from Alpha Channel, Selection 3
Press Delete on the Keyboard.
Selections / Select None
Layers / Merge / Merge Down
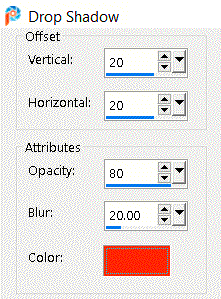
Effects / 3D Effects / Drop Shadow
Horizontal and Vertical 10 / Opacity 40 / Blur 20 White
12
Edit / Copy your flower tube
Edit / Paste as a New Layer
Effects / Image Effects / Offset
Horizontal on 245 / Vertical on -40 / Custom and Transparent checked
Adjust / Sharpness / Sharpen More
Layers / Merge / Merge Visible
13
Selections / Load/Save Selection / Load Selection from Alpha Channel, Selection 4
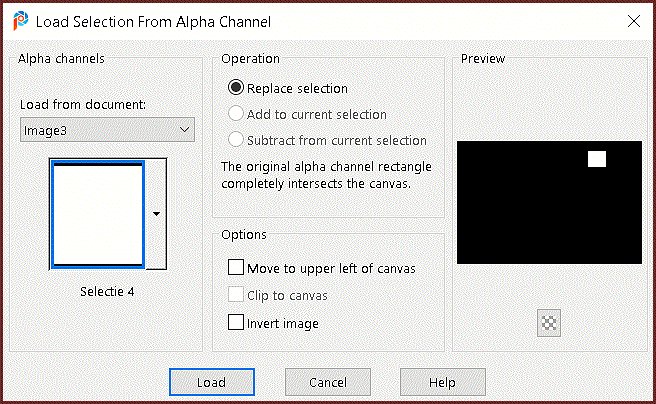
Layers / New Raster Layer
Flood Fill with White
Selections / Modify / Contract by 10 pixels
Press Delete on the Keyboard
Keep Selected
14
Activate the Bottom Layer
Selections / Promote Selection to Layer
Effects / Plugins / Simple / 4way Average
Effects / Plugins / Alien Skin Eye Candy 5 Impact / Glass
Settings Tab / Clear / Ok
Selections / Select None
Activate the Top Layer
Layers / Merge / Merge Down
15
Layers / Duplicate
Effects / Image Effects / Offset
Horizontal 100 / Vertical 0 / Custom and Transparent Checked.
Layers / Merge / Merge Down
Effects / 3D Effects / Drop Shadow / Color 1
16
Layers / Duplicate
Image / Resize 50% / Resize all Layers NOT checked
Effects / Image Effects / Offset
Horizontal -360 / Vertical -210 / Custom and Transparent Checked.
17
Image / Add Borders / Symmetric
2 pixels Color 1 #6a2424
2 pixels Color 2 #cbb196
2 pixels Color 1 #6a2424
20 Pixels White
2 pixels Color 1 #6a2424
2 pixels Color 2 #cbb196
2 pixels Color 1 #6a2424
40 pixels White
2 pixels Color 1 #6a2424
18
Edit / Copy your own main tube (Adjust the size if necessary)
Edit / Paste as a New Layer
Place against the bottom of your Image (see Example)
Add a Drop Shadow as you see fit
19
If necessary, add another text or mine
I applied Image / Negative to my text
Layers / Merge all Visible
Add your name or watermark
Save as jpg
Hope you enjoyed it again!
My version