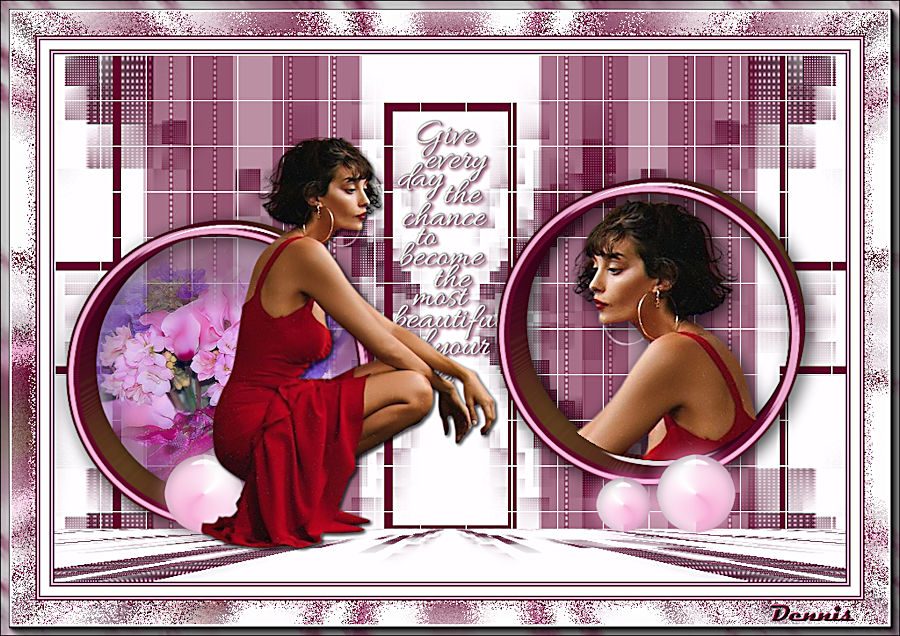
Every Day
This tutorial was devised and written by Karin 27-04-2021, the © for the translation is Dennis.
It is not allowed to copy, link and / or place any part of it without my permission.
The tutorial is written with PSP19 (X9) but can also be made with other versions.
If this lesson looks like any other lesson, it is purely coincidental.
The © of the materials used is for the rightful owners and the tube makers.
I would like to thank the tube maker Animabelle and Yokalicious for the text
The mask is by Tine.
Open the material in PSP / Duplicate with Shift + D / Close the originals.
Filters used:
AAA Frames – Photo frame
DSB – Flux
Filters Unlimited 2.0 – & BKG Kaleidoscope
Filters Unlimited 2.0 – & BKG Designer -SF10I – Corner half wrap
Filters Unlimited 2.0 – & BKG Designers -SFIV – Grid
Filters Unlimited 2.0 – VM Stylize – Zoom Blur
Flaming pear – Flexify
Alien skin Eyecandy 5 – Impact glass and Motion Trail
Mura meister – Perspective Tiling
———-
The tutorial is written with these colors and materials.
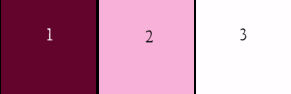
If you use your own colors and / or materials you may have to play with Blend Mode and / or Opacity.
———-
Download your materials here:
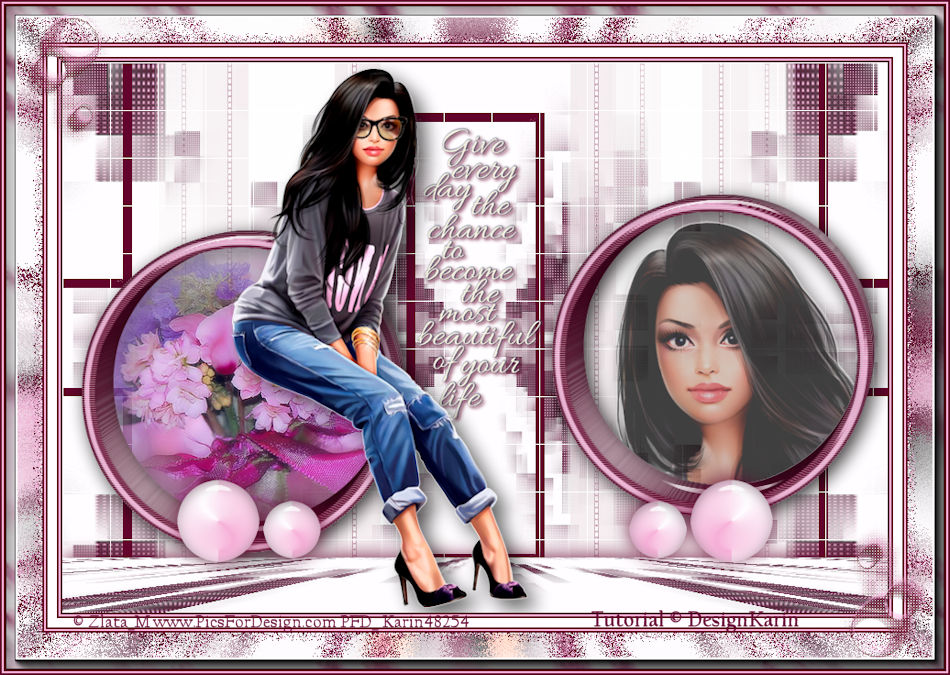
You only need your own female tube. My tube is from Zlata_M.
Point 1
Open the Alpha file Alfa_Every_day – Window – Duplicate (or use Shift + D).
Close the original we are working on the copy.
Point 2
Edit – Copy – Everyday_Desigkarin
Selections – Select all
Edit – Paste into selection.
Selections – Select none
Duplicate layer
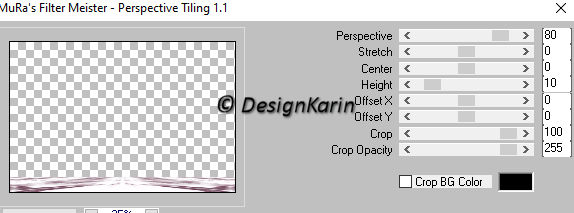
Effects – Plugins – Mura meister – Perspective Tiling
Effects – 3D Effects – Drop Shadow
Horizontal -2 , Vertical 2 , Opacity 80 , Blur 30 , Color 1
Point 3
Layers – New raster layer
Foreground on color 2 and background on white
Make a gradient with foreground color
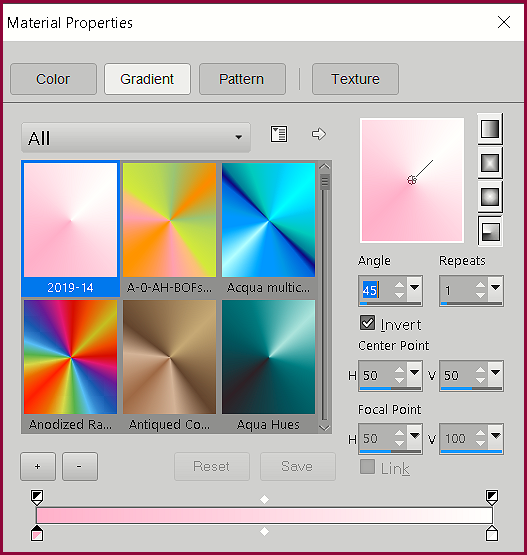
Fill with gradient.
Effects – Plugins – Flaming pear – Flexify2
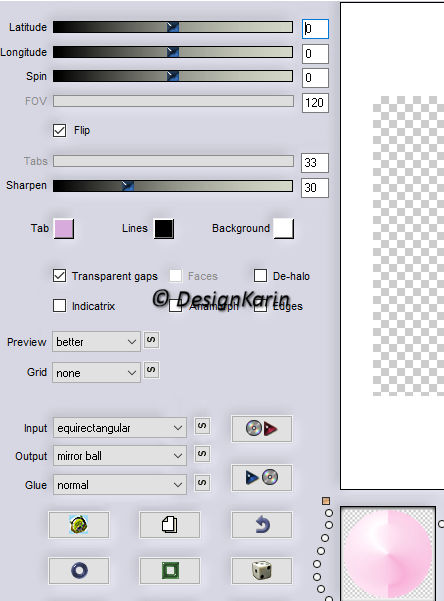
Image – Resize – 15% , Resize all layers NOT checked.
Effects – Image Effects – Offset
Horizontal (minus) -280 and vertical (minus) -200 , Transparent and Custom checked.
Point 4
Layers – Duplicate.
Image – Resize – 70% , Resize all layers NOT checked.
Place right next to the large sphere as above example.
Layers – Merge – Merge Down
Effects – Plugins – Alien skin Eyecandy 5 – Impact – Glass
Tab setting – Clear, no drop shadow
Effects – 3D Effects – Drop shadow
Horizontal -2 , Vertical 2 , Opacity 80 , Blur 30 , color 1
Layers – Duplicate
Image Effects – Mirror – Mirror horizontally.
Layers – merge – merge down
Point 5
Selections – Load / Save – Load selection from Alpha channel (sel 1)

Layers – New raster layer
Fill with color 1
Selections – Modify – Contract with 5
Fill with color 2
Selections – Modify – Contract with 5
Fill with color 1
Press delete on your keyboard
Selections – Select none
Point 6
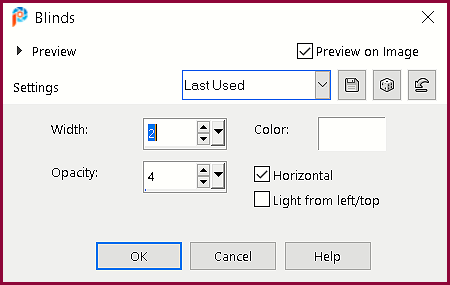
Effects – Texture Effects – Blinds.
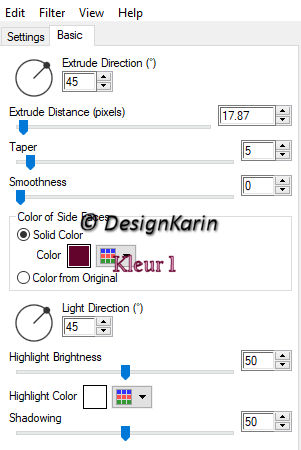
Effects – Plugins – Alien skin Eyecandy 5 – Impact – Extrude
Effects – Plugins – Alien skin Eyecandy 5 – Impact – Glass
Tab setting – Clear, no dropshadow
Effects – Image Effects – Shift
Horizontal (minus) -260 and vertical (minus) -60 , Transparent and Custom checked.
Point 7
Activate your magic wand and click in the middle of the circle.
Selections – Modify – Expand with 5
Open the flower, remove the watermark and resize with 60%
Edit – Copy – Paste as new layer.
Move the flower in the middle of the circle.
Selections – Invert.
Press delete on your keyboard – Select none
Layers – Arrange – Move Down
Point 8
Activate the top layer (circle)
Edit – Copy. (this will remain in memory for a while)
Layers – Merge – Merge Down
Point 9
Edit – Paste as new layer (circle from your memory)
Activate your magic wand and click in the middle of the circle.
Selections – Modify – Expand with 5
Open your woman tube and select a part of the tube. (I took face)
If necessary, resize and put nicely in the circle.
Selections – Invert.
Press delete on your keyboard.
Selections – Select none.
Layers – Properties – Opacity 70
Layers – Arrange – Move Down
Activate the layer circle above it in your layer palette.
Layers – merge – merge down.
Effects – Image Effects – Offset
Horizontal 260 and vertical 0 , Transparent and Custom checked.
Layers – Merge – Merge Down
Layers – Arrange – Down
Effects – 3D Effects – Drop Shadow
Horizontal 5 , Vertical 5 , Opacity 80 , Blur 30 , color black
Point 10
We now have these layers.
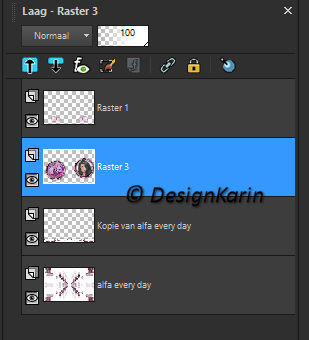
Activate the bottom layer in your layer palette.
Layers – New raster layer.
Fill with color 1.
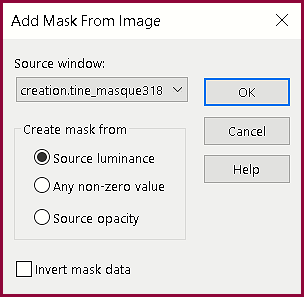
Layers – New mask layer – From image – Creatine mask.
Layers – Duplicate.
Layers – Merge – Merge group.
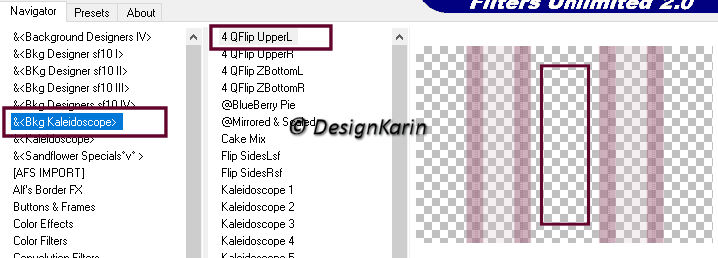
Effects – Plugins – Filters Unlimited 2.0 – & BKG Kaleidoscope – 4QFlip upperL
Point 11
Layers – Duplicate
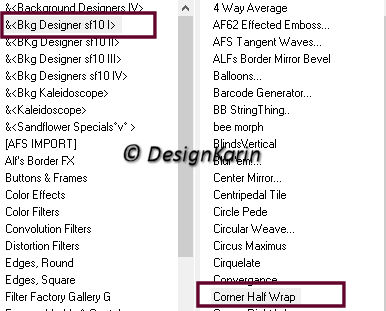
Effects – Plugins – Filters Unlimited 2.0 – & BKG Designer -SF10I – Corner half wrap
Activate your Eraser tool.
Set the setting to 50.

Erase the lines from the face.
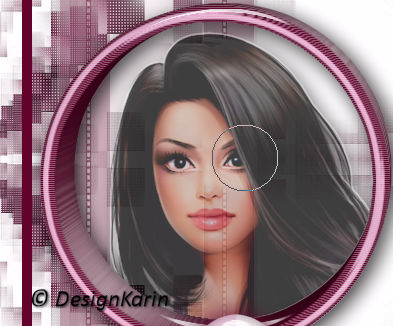
Layers – Merge Down
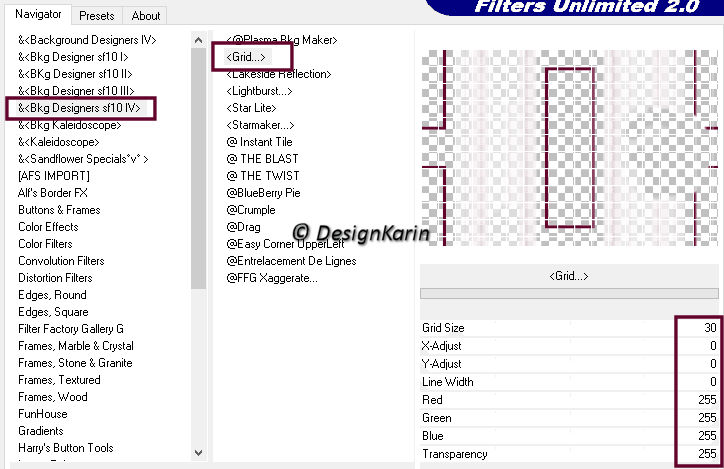
Effects – Plugins – Filters Unlimited 2.0 – & BKG Designers -SFIV – Grid
Point 12
Open your text.
Image – Resize – 60% , Resize all layers not checked.
Edit – Copy – Paste as a new layer.
Place the text at the top in the middle oblong rectangle.
Effects – 3D Effects – Drop Shadow
Horizontal 2 , Vertical 2 , Opacity 80 , Blur 5 , Color 1.
Point 13
Copy your woman tube and paste as a new layer.
Layers – Arrange in front.
Put it in a nice place. I put her on the flowers.
Optionally give a drop shadow at your own discretion.
Point 14
Image – Add Borders – Symmetric
2 pixels color 1
2 pixels color 2
2 pixels color 1
10 pixels white
2 pixels color 1
2 pixels color 2
2 pixels color 1
Select all
Point 15
Image – Add Borders – Symmetric
40 pixels white.
Selections – Invert
Effects – Plugins – Filters Unlimited 2.0 – VM Stylize – Zoom Blur

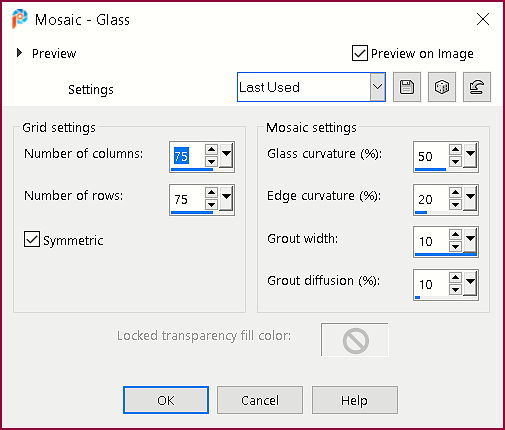
Effects – Texture Effects – Mosaic glass.
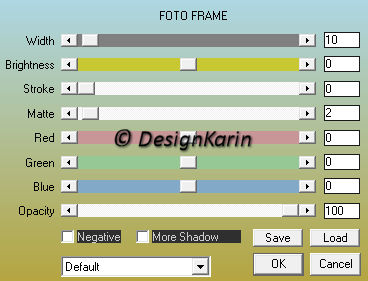
Effects – Plugins – AAA Frames – Photo frame
Selections – Select none
Point 16
Image – Add borders – Symmetric
2 pixels color 1
2 pixels color 2
2 pixels color 1
Copy Ball_DesignKarin layer and paste as a new layer.
Point 17
Layers – merge – merge down.
Adjust – Sharpness – Sharpen.
Place your watermark and any ©.
Save your image as jpg.
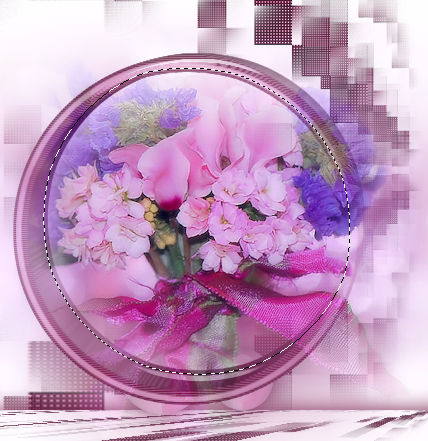
My version