

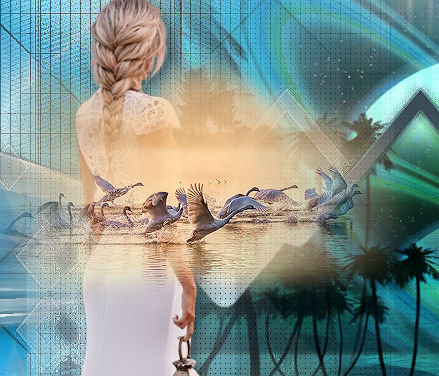
Beauty by Nature
This tutorial was conceived, translated and written by Karin 25-06-2021, the © is mine.
It is not permitted to copy, link and/or place these or parts elsewhere without my permission.
The tutorial is written with PSP19 (X9) but can also be made with other versions.
If this lesson resembles any other lesson, it is purely coincidental.
The © of the materials used is for the rightful owners and the tube makers.
Ik bedank de tubemaaksters Grisi , Lisa T en Maryse voor de tubes
De maskers zijn van Narah, Tiny en Carinne Vicaire
Background I found on the internet..
Open the material in PSP / Duplicate with Shift+D / Close the originals.
First check if you have all the filters below because there are many different filters used.
Otherwise you have to install these filters before you start the lesson.
Used Filters:
Mehdi – Sorting Tiles – Kaleidoscope 2.1
[AFS IMPORT] – CRISCROS
Filter Factory G – Double Image (importeer in Filters Unlimited)
Simple – Top Bottom Wrap, 4 Way Average
Visman Experimental – Guess what?
Transparency – Eliminate black
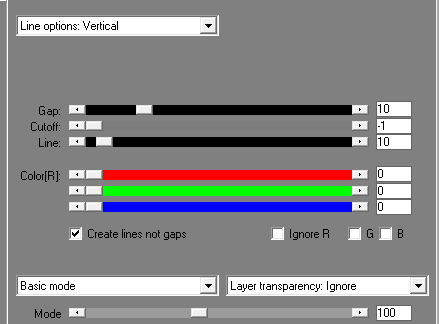
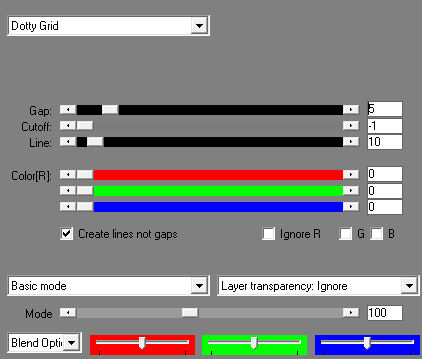
AP1 Lines – Silverlining
VM Stylize – Zoom Blur (importeer in Filters Unlimited)
Graphic Plus – Emboss
Flaming pear – Flood
If you use your own colors and/or materials, you may have to play around with the Blend Mode and/or Layer Opacity.
———-
Download your materials here:

Point 1.
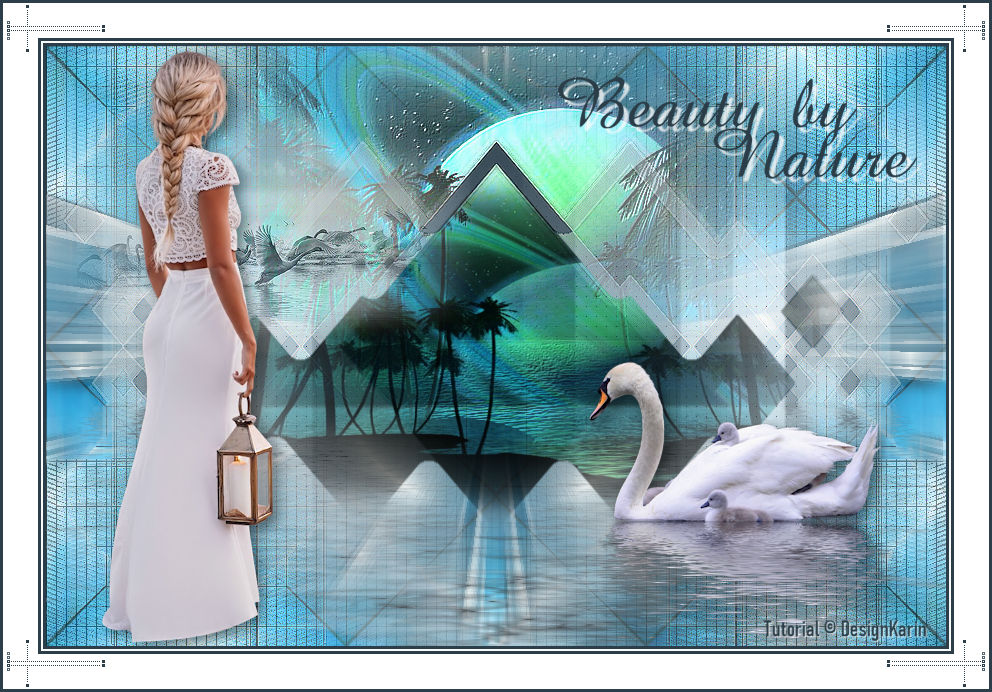
Open a new transparant image 900 x 600 pix
Selections – Select all
Open your wallpaper 5HzDEL.
Edit – Copy, Paste into selection.
Selections – Select none.
Point 2.
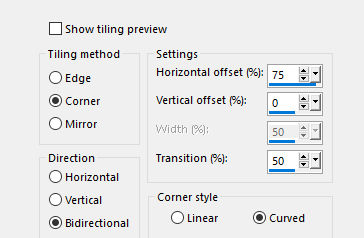
Effects – Image Effects – Seamless Tiling.
Effects – Plugins – Mehdi – Sorting Tiles.
Point 3.
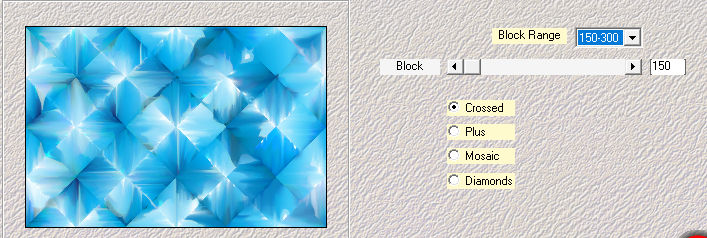
Effects – Plugins – Mehdi – Kaleidoscope 2.1.
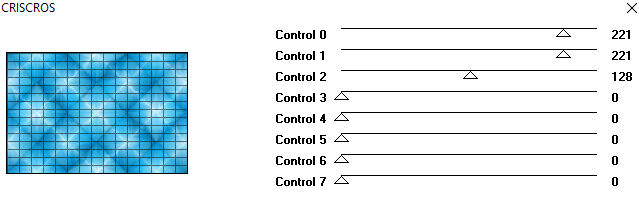
Effects – Plugins – [AFS IMPORT] – CRISCROS.
Point 4.
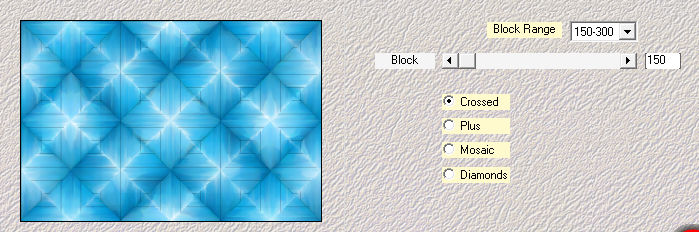
Effects – Plugins – Mehdi – Sorting Tiles.
Layers – Duplicate.
Point 5.
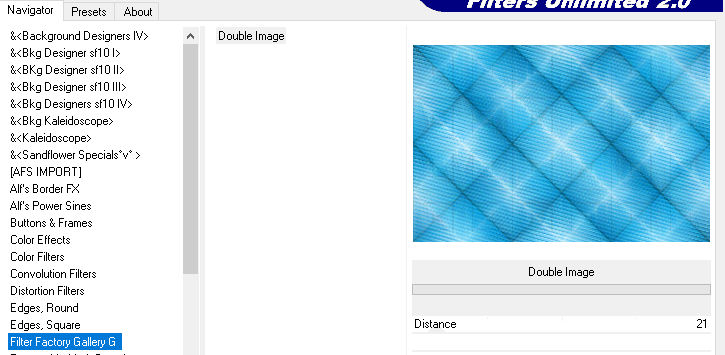
Effects – Plugins – Filters Unlimited – Filter Factory G – Double Image.
Effects – Plugins – Simple – Top Bottom Wrap.
Point 6.
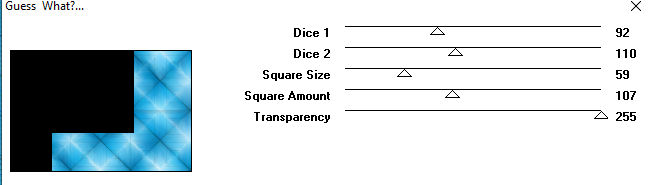
Effects – Plugins – Visman Experimental – Guess what?
Effects – Plugins – Transparency – Eliminate black.
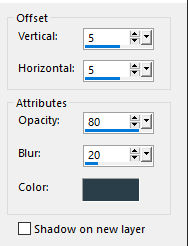
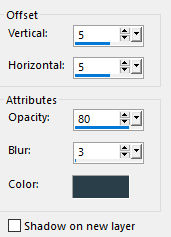
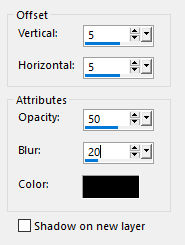
Effects – 3D Effects – Drop Shadow, color #2b3e49.
Repeat with Horizontal and Vertical on -3.
Point 7.
Effects – Plugins – Simple – 4 Way Average.
Effects – Edge Effects – Enhance More.
Effects – Plugins – AP1 Lines – Silverlining.
Point 8.
Layers – New raster layer.
Flood Fill with white.
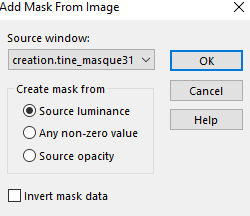
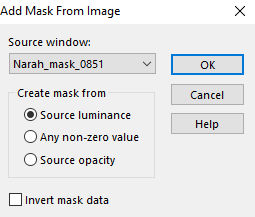
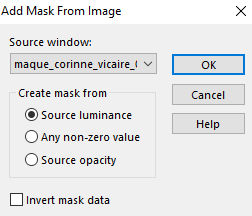
Layers – New Mask Layer – From Image (Creation tine mask)
Layers – Merge – Merge Group.
Layers – Duplicate.
Layers – merge – merge down
Point 9.
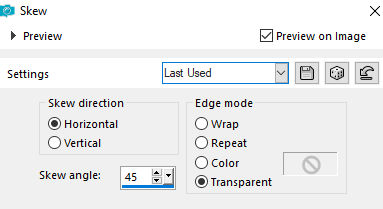
Effects – Geometric Effects – Skew.
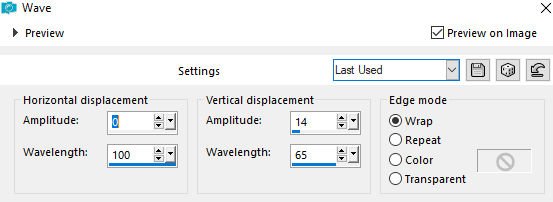
Effects – Distortion Effects – Wave.
Point 10.
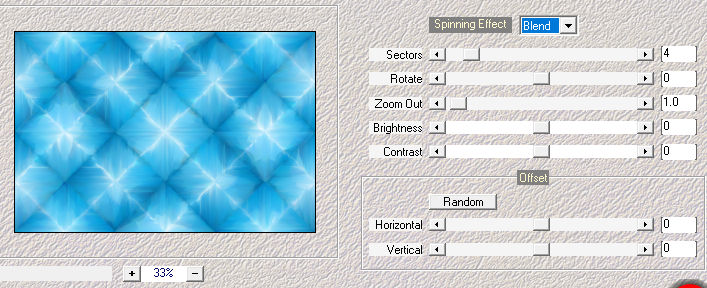
Effects – Plugins – Filters Unlimited -VM Stylize – Zoom Blur.
Default setting 39 – 60
Effects – 3D Effects – Drop Shadow, color #2b3e49.
Layers – Duplicate.
Image – Mirror – Mirror Horizontal
Layers – merge – merge down.
Effects – 3D Effects – Drop Shadow, color #2b3e49.

Point 11.
Layers – New raster layer.
Flood Fill with the color #2b3e49
Layers – New Mask Layer – From Image (Narah mask)
Layers – Merge – Merge Group.
Point 12.
Selections – Select all.
Selections – Float.
Selections – Defloat.
Selections – Modify – Contract – Number of pixels 15.
Press delete on your keyboard.
Selections – Modify – Expand – Number of pixels 2.
Keep selection.
Point 13.
Open your paysage from LisaT. Remove the watermark.
Layers – New raster layer.
Edit – Copy – Paste into selection.
Layers – Properties – Blend Mode on Multiply.
Selections – Select none.
Point 14.
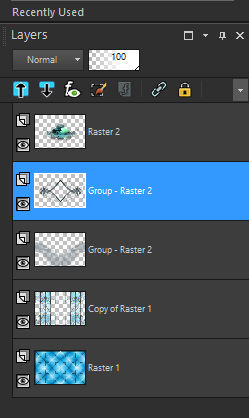
Activate in your layer palette the 2nd layer from the top (Group -Raster 2).
Effects – 3D Effects – Drop Shadow, color #2b3e49.
Effects – Plugins – Simple – 4 Way Average.
Effects – Edge Effects – Enhance.
Repeat again.
We now have the following layers.
Point 15.
Activate the second bottom layer in your layer palette (Copy of Raster 1)
Layers – New raster layer.
Selections – Select all.
Open your LisaT paysage again.
Edit – Copy – Paste into selection.
Selections – Select none
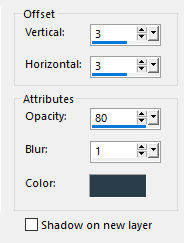
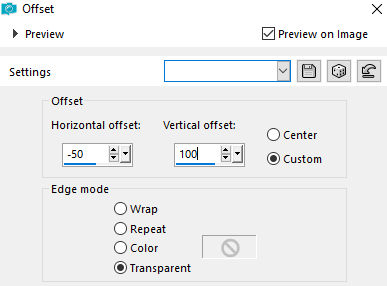
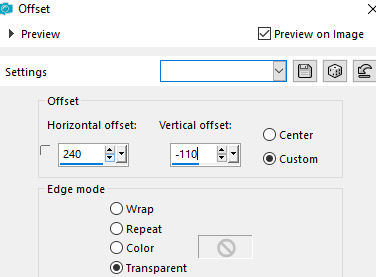
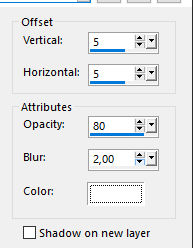
Effects – Image Effects – Offset.
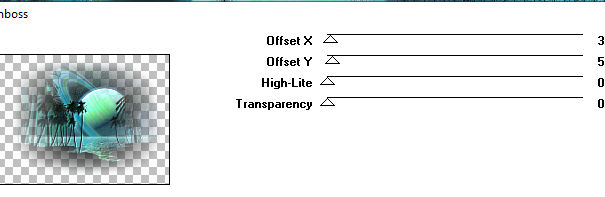
Effects – Graphic Plus – Emboss.
Point 16.
Activate in your layer palette the 2nd layer from the top (Group -Raster 2).
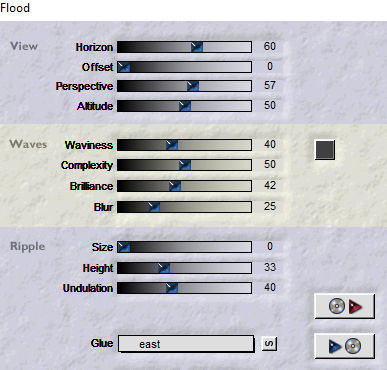
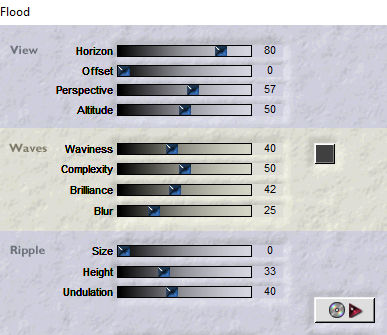
Effects – Plugins – Flaming Pear – Flood
Point 17.
Open your MR_Swan.
Remove the watermark.
Edit – Copy and paste as new layer.
Image – Resize – 40%. Resize layers NOT checked.
Image – Mirror – Mirror Horizontal.
Layers – Arrange – Bring to top.
Effects – Image Effects – Offset.
Effects – Plugins – Flaming Pear – Flood.
Effects – 3D Effects – Drop shadow, color black
Point 18.
Open your Grisi woman tube.
Edit – Copy and Paste as new layer.
Image – Resize – 60%. Resize all layers NOT checked.
Image – Mirror – Mirror Horizontal.
Place to the left like my example.
Effects – 3D Effects – Drop shadow, color black
Point 19.
Layers – New raster layer.
Flood Fill this layer with white.
Layers – New Mask Layer – From Image (maque corinne)
Layers – Merge – Merge Group.
Effects – Plugins – AP1 Lines – Silverlining.
Point 20.
Effects – Plugins – Simple – 4 Way Average.
Layers – Arrange – Move Down
Repeat 2 more times.
Layers – Properties – Luminance (Legacy).
Point 21.
Open the tube birds from LisaT. Remove the watermark.
Image – Resize – 50%. Resize all layers NOT checked.
Adjust – Sharpness – Sharpen.
Edit – Copy.
Activate the top layer in your layer palette.
Paste as new layer.
Place like the example.
Layers – Arrange – Move Down.
Layers – Properties – Luminance (Legacy) and Opacity at 80.
Point 22.
Open the text.
Activate the top layer in your layer palette.
Edit – Copy.
Paste as new layer.
Slide up to the right.
Effects – 3D Effects – Drop shadow color white
Point 23.
Image – Add Borders – Symmetric – 3 pix color #2b3e49
Image – Add Borders – Symmetric – 2 pix color white
Image – Add Borders – Symmetric – 3 pix color #2b3e49
Image – Add Borders – Symmetric – 35 pix color white.
Open your frame Rand_DK
Edit – Paste as new layer
Image – Add Borders – Symmetric – 3 pix color #2b3e49
We are ready and I hope you like the tutorial.