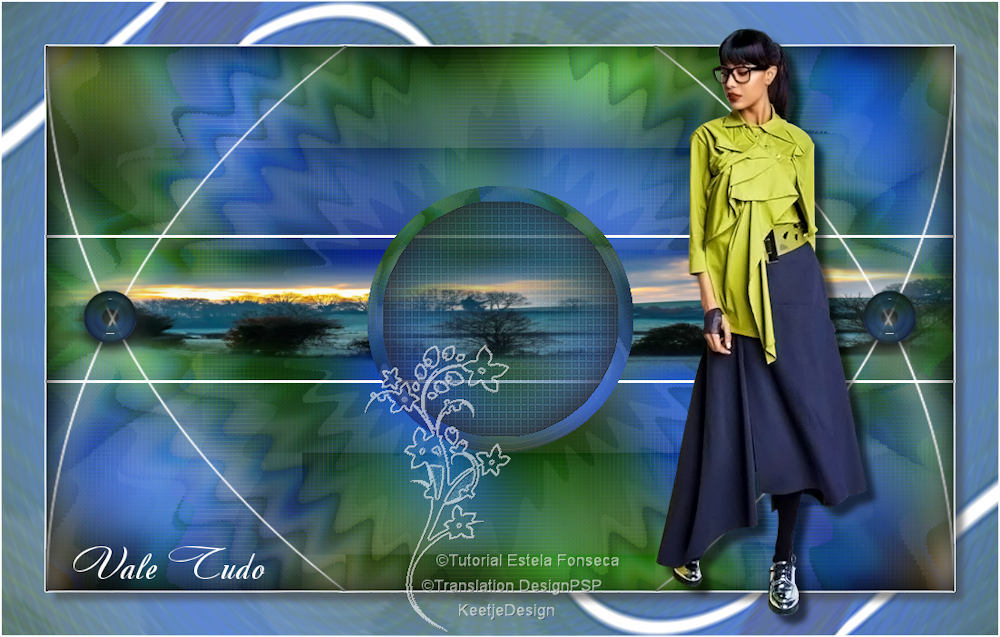
Vale Tudo
Original tutorial Here
This tutorial is written by Estela Fonseca the © is from her.
It is not allowed to copy, link and / or place these or parts of it without her permission.
The © ️ of the materials wich are used is for the rightful owner.
If you want to use this tutorial on your own forum, club or group, you have to request permission from the writer herself.
We have permission to translate Estela Fonseca’s tutorials into English.
Thank you Estela for the permission to translate your tutorials.
Temos permissão para traduzir os tutoriais da Estela Fonseca para o inglês.
Obrigado Estela pela tradução dos tutriais.
Materials Used:
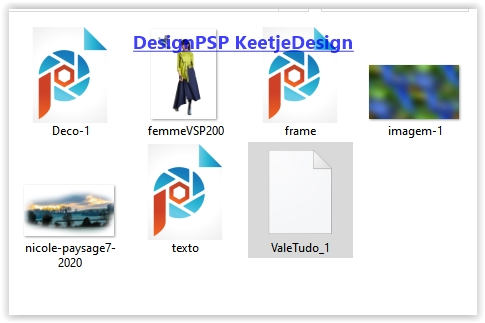
Place the selection mat_vale_tudo in your PSP folder Selections
Open the other material in PSP / Duplicate with Shift + D / Close the originals
Plugins Used:
Unlimited 2.0 – Sapphire Filters 03 – SaphirePlugin_0238
Unlimited 2.0 – Toadies – Weaver
Unlimited 2.0 – VM Distortion – Gear
Unlimited 2.0 – VM Distortion – Circulator
Alien Skin Eye Candy 5 – Impact / Glass
The translation was made with PSP 2020 , but can also be done with other versions.
Note : When working with your own colors , play with the Blend Mode and/or Opacity at your own discretion
1
Open imagem-1 – Window – Duplicate (or use Shift + D) / Close the original we work on the copy
You can now adjust it with Adjust – Hue and Saturation – Colorize to your own color
2
Layers – Duplicate
Effects – Plugin Unlimited 2.0 – Sapphire Filters 03 – SaphirePlugin_0238
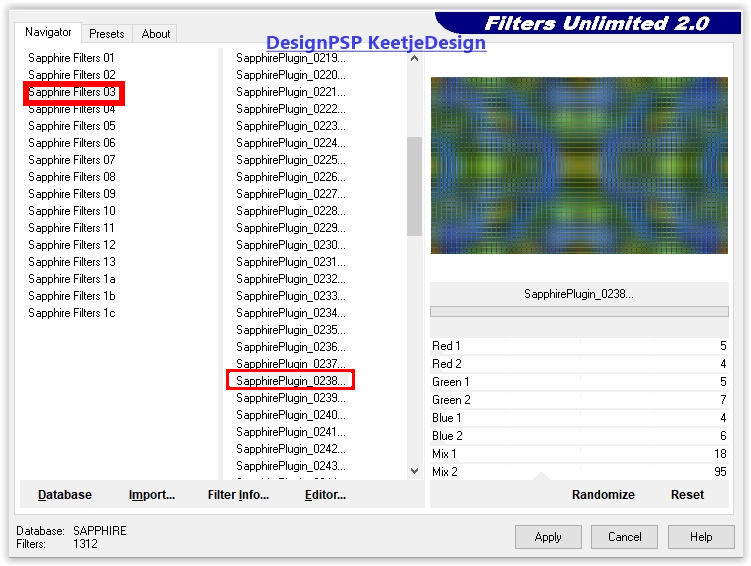
Layers – Properties – Blend Mode Soft Light / Opacity 65
Layers – merge – merge down
3
Open the tube Deco-1 – Copy – Paste as new layer
4
Layer palette – Activate the bottom layer
Selections – Load / Save – Load selection from disk: ValeTudo_1
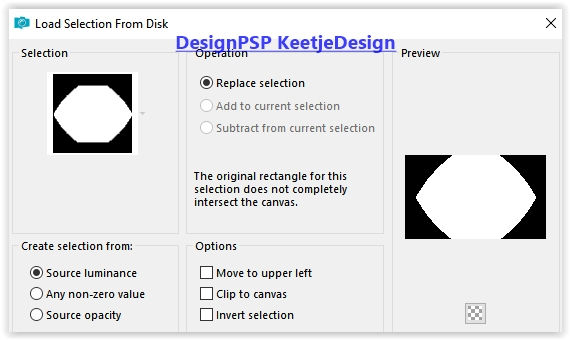
Selections – Promote selection to layer
Selections – Select none
5
Material palette – Background color # ffffff / Because the filter takes over the color that is in the background
Effects – Plugin Unlimited 2.0 – Toadies – Weaver
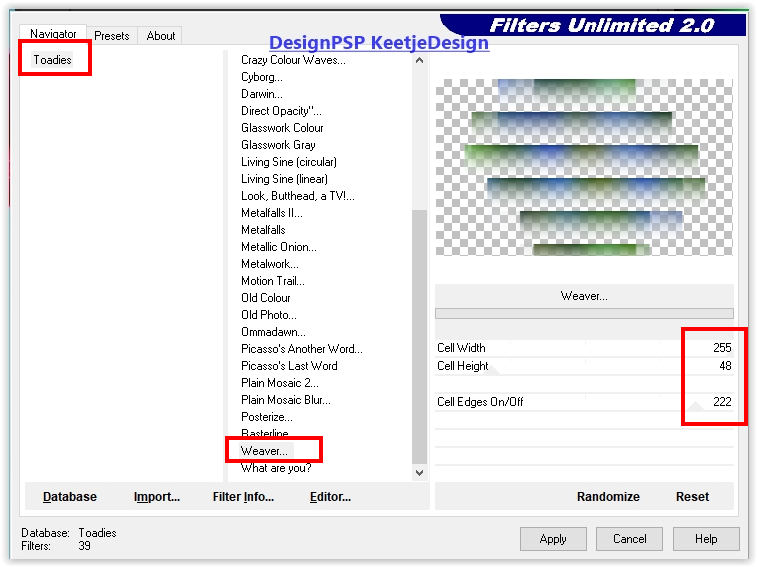
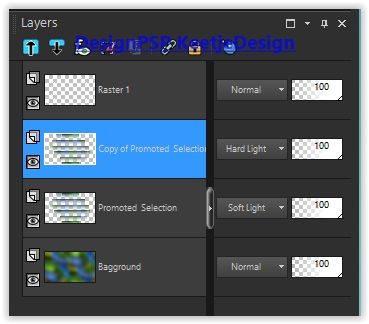
Layers – Properties – Blend mode Soft light
Layers – Duplicate
Layers – Properties – Blend mode Hard light
6
Effects – Distortion Effects – Warp
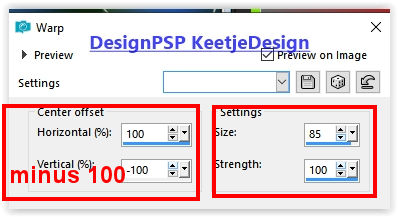
Objects – Align – Left
7
Layers – Duplicate
Image – Mirror (horizontal)
Layers – merge – merge down
8
Effects – Plugin Unlimited 2.0 – VM Distortion – Gear
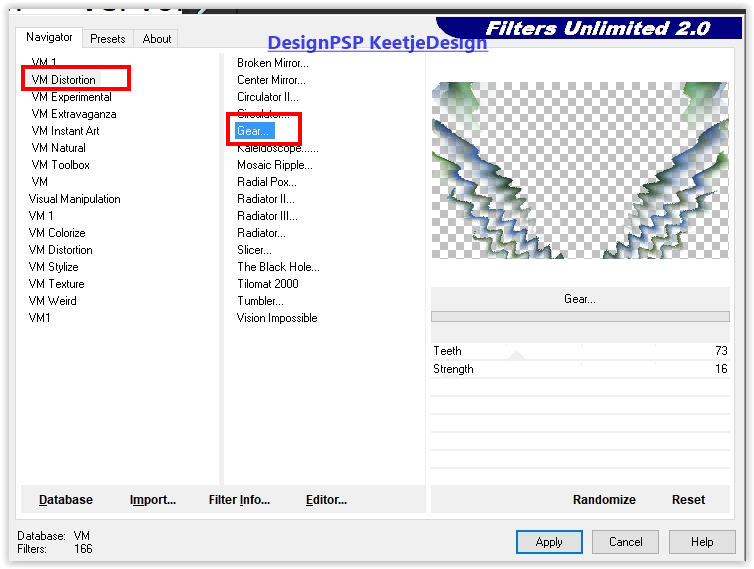
Layers – Duplicate
Image – Flip (flip vertical)
Layers – merge – merge down
Layers – Properties – Blend Mode Hard Light / Opacity 40
9
Layer palette – Close the top layer (click eye)
Layers – Merge – Merge visible layers
Layers – Duplicate
Effects – Plugin Unlimited 2.0 – VM Distorition – Circulator
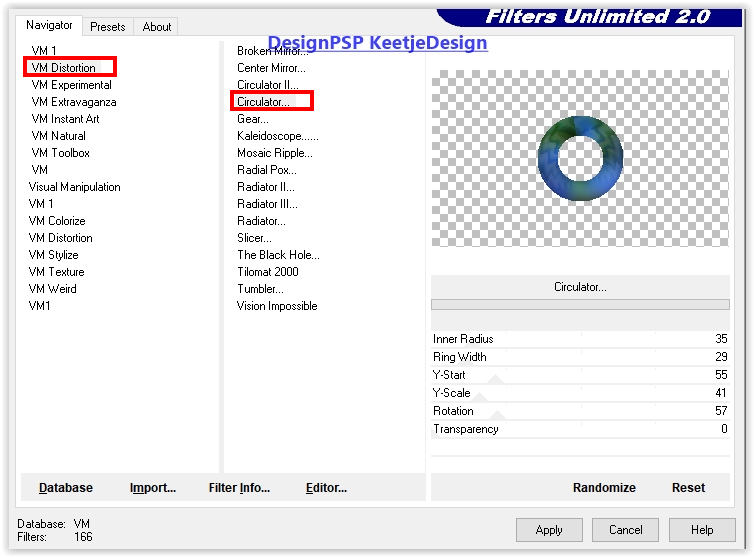
10
Activate Magic Wand Tool – Click in the middle of the circle
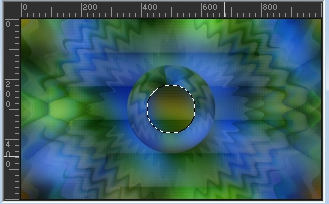
Selections – Modify – Expand 50 pixels
Adjust – Blur – Gaussian Blur / Range 40
Effects – Artistic Effects – Halftone
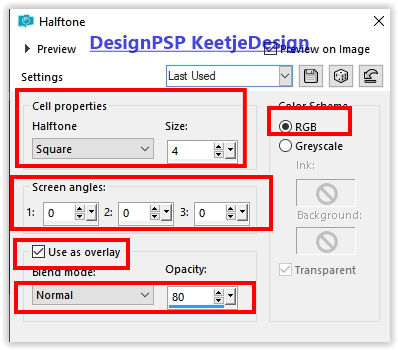
Layers – New raster layer
11
Effects – 3D Effects – Cutout
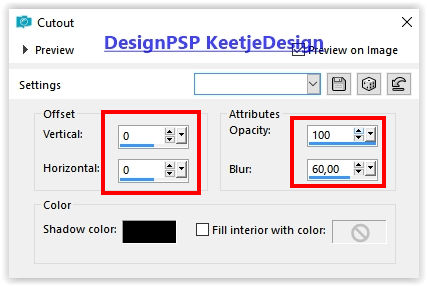
Selections – Select none
Layers – merge – merge down
12
Layers – Duplicate
Image – Resize – Resize with 20% – Uncheck all layers
Adjust – Sharpness – Sharpen
Layers – Arrange – Bring to the front
Activate The Pick tool (K) Position X 41 / Position Y 269

Type M to close the Pick tool
13
Layers – Duplicate
Layers – merge – merge down
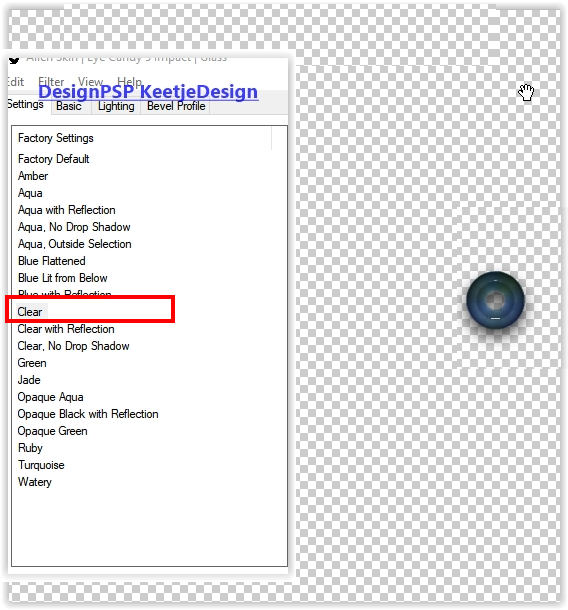
Effects – Plugins Alien Skin Eye Candy 5 – Impact / Glass
14
Layers – Duplicate
Image – Mirror (horizontal)
Layers – merge – merge down
15
Layer palette – Activate the layer Raster 1
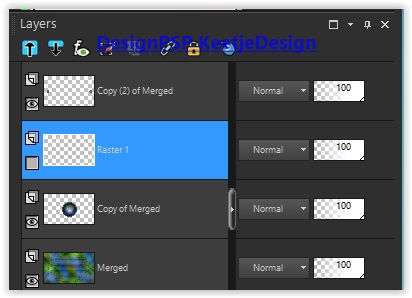
Layer palette – Click on the eye to open the layer
Layers – Duplicate
Layers – Arrange – Move Down
Adjust – Blur – Gaussian Blur / Range 15
Layers – Duplicate
Layers – Properties – Blend mode Screen
16
Layer palette – Activate the bottom layer
Activate Selection tool (S) – Custom selection

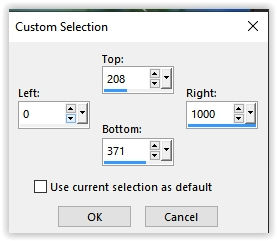
Selections – Promote selection to layer
Open the tube nicole-paysage7-2020 – Copy – Paste into selection
Selection – Hold
17
Layers – New raster layer
Fill with the color # ffffff
Activate Selection tool (S) – Custom selection
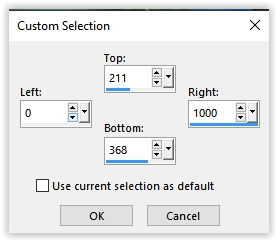
Press Delete on the keyboard
Selections – Select none
Layers – merge – merge down
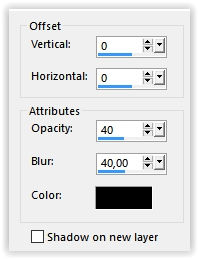
Effects – 3D Effects – Drop shadow / 0/0/40/40 / # 000000
18
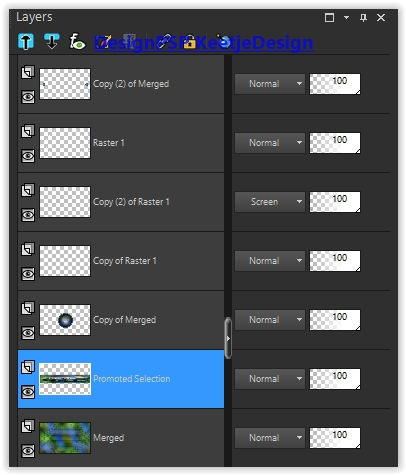
The layerpalette looks now like this
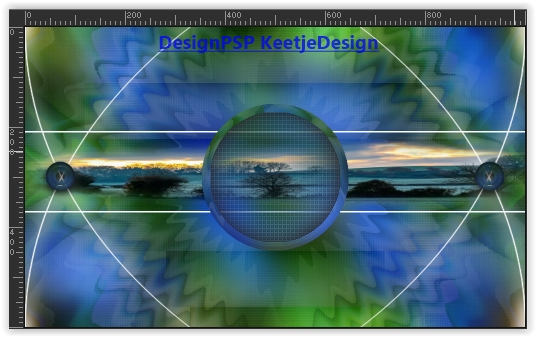
Your work looks now like this
19
Image – Add Borders – Symmetric
1 pixel color # ffffff
Edit – Copy
Image – Add Borders – Symmetric
50 pixels of color that is not in your work
20
Activate Magic Wand Tool – Select the border
Edit – Paste into selection
Adjust – Blur – Gaussian Blur / Range 40
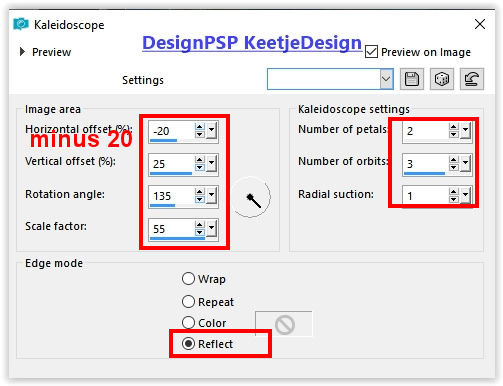
Effects – Reflection Effects – Kaleidoscope
Selections – Invert
Effects – 3D Effects – Drop shadow / 0/0/40/40 / # 000000
Selections – Select none
21
Open the tube frame – Copy – Paste as new layer
22
Open the tube texto – Copy – Paste as new layer
Place to the left
23
Open the tube femmeVSP200 – Remove the watermark – Copy – Paste as new layer
Image – Resize – Resize with 85% – Uncheck all layers
Place to the right of the circle
Effects – 3D Effects -0 Drop Shadow / 0/0/40/40 / # 000000
24
Sign your work
Layers – Merge – Merg All
Image – Resize – Resize to 1000 pixels width
Save as Jpeg
We have finished the tutorial from Estela
This translation has been tested by Marianne.
Marianne thank you
© Translation DesignPSP KeetjeDesign 12-03-2021


