Meilleurs Voeux 2020

Original tutorial Here
This tutorial is written by Valy Scrap Passion the © is from her.
You’re not allowed to copy, link and / or place these or parts of it without her permission.
The © of the materials wich are used is for the rightful owner.
If you want to use this tutorial on your own forum, club or group, you have to request permission from the writer herself.
If this tutorial looks like another, it is purely coincidental.
We have permission to translate Valy Scrap Passion tutorials into English.
Thank you Valy for the permission to translate your tutorials.
Nous avons la permission de traduire les tutoriels de Valy Scrap Passion en anglais.
Merci Beaucoup Valy , que je pouvez traduire vos tutoriels en anglais.
Materials Used:

If necessary, Import the plugins in the Filtres folder into the plugin Unlimited
Download Materials Hier
Plugins Used:
[AFS IMPORT] – sqborder2
Alien skin eye candy 5 impact
L in K landksiteofwonders – L in K’s Zitah
Unlimited 2.0 – Graphics Plus – Cross Shadow
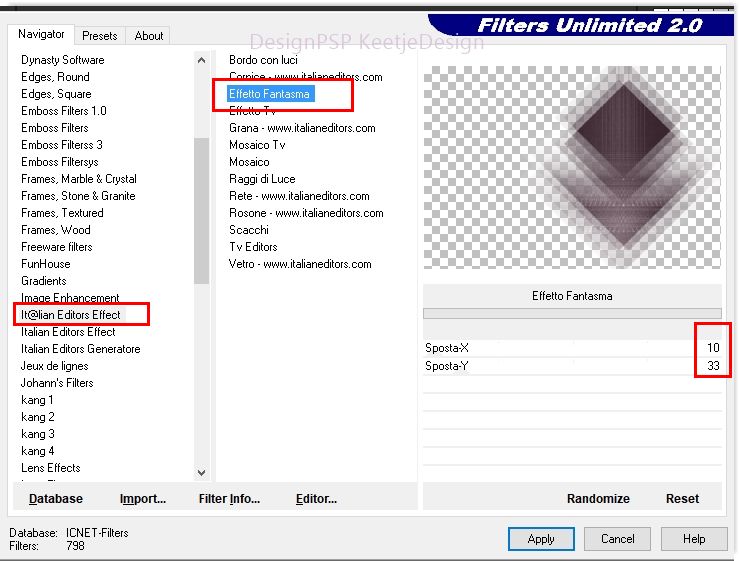
Unlimited 2.0 – It @ lian Editors Effect – Effetto Fantasma
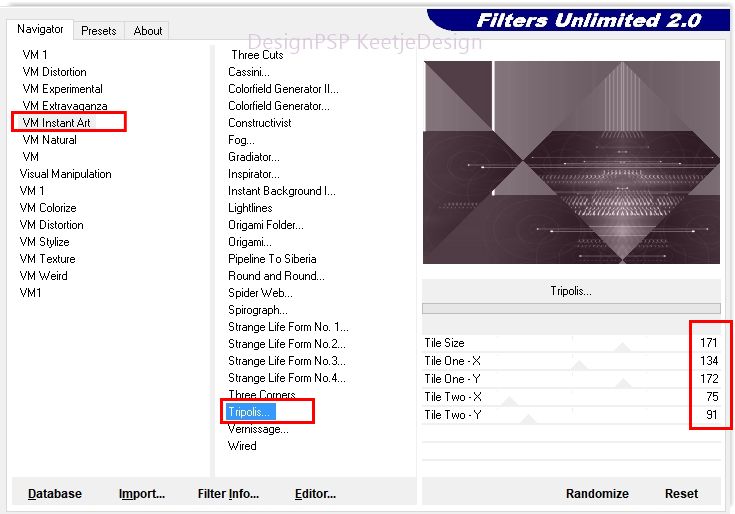
Unlimited 2.0 – VM Instant Art – Tripolis
Unlimited 2.0 – VM Natural – Speed
Unlimited 2.0 – VM Natural – Weave Distortion
Unlimited 2.0 – VM Toolbox – MirrororriM
You can find the plugins Here
The translation is written with PSP 2018, but can also be made with other versions.
Colors Used

Note : When working with your own colors , play with the Blend Mode and/or Opacity at your own discretion
1
To do only if you use other colors:
Open the tube fond
Layers – Promote background layer
Layers – New raster layer
Fill with your color
Layers Arrange – Move Down
Activate the layer at the top of the stack
Layers – Properties – Blend Mode Luminance (inherited)
Layers – Merge – Merge Visible
2
Material palette – Foreground color 1 / Background color 2

Open the Alphafile Alpha-MeilleursVoeux2020-VSP – Window – Duplicate (or use Shift+D shortcut) / Close the original file, we working on the duplicate
Selections, Select all
Open the tube Fond or use your colored image if you work with your own colors – Copy – Paste into selection
Selections – Select None
3
Effects – Plugin Unlimited 2.0 – VM Instant Art – Tripolis

Effects – Plugin Unlimited 2.0 – VM Natural – Speed

4
Layers – Duplicate
Effects – Plugin Unlimited 2.0 – VM Natural – Weave Distortion

Effects – Plugin [AFS IMPORT] – sqborder2

Layers – Properties – Blend Mode Overlay / Opacity 28
Effects – 3D Effects – Drop Shadow / minus 5 / minus 10 / 65 /15 / # 000000

5
Layer palette – Click the bottom layer
Selections- Load / save selection- Load selection from alpha channel,Selection # 1

Selections – Promote selection to layer
Effects – Plugins Unlimited 2.0 – VM Toolbox – MirrororriM

Selections – Select None
6
Effects – Plugin Unlimited 2.0 – It @ lian Editors Effect, Effetto Fantasma

Layers – Properties – Blend Mode Overlay
Layers – Merge – Merge Visible
7
Open the tube Deco1-MV2020-VSP – Copy – Paste as new layer
Effects – Image Effects – Offset / 280 / minus 26

8
Layers – New raster layer
Selections – Load / save selection – Load selection from alpha channel Selection # 2

Fill in color 1
Effects – Plugins – [AFS IMPORT] – sqborder2

Selections – Select None
Effects – Plugin Alien Skin – Eye Candy 5 – Impact – Perspective Shadow – Drop Shadow Blurry

Layers – Properties – Opacity 55
9
Open the tube NoelVSP83 – remove the watermark – Copy – Paste as new layer
Image – Resize – Resize with 60%,- Resize All layers not checked
Effects – Image effects – Offset / 150 / minus20

10
Only if you use the tube NoelVSP83 provided in the material
Selections – Load / save selection – Load selection from alpha channel Selection # 3

Edit – Copy
Layers, New raster layer
Edit – Paste in the selection
Selections – Select Non
Objects – Align – Top
Layers – Merge – Merge Down
Effectes – Plugin
Alien skin – eye candy 5 impact – Perspective Shadow / Drop Shadow Blurry
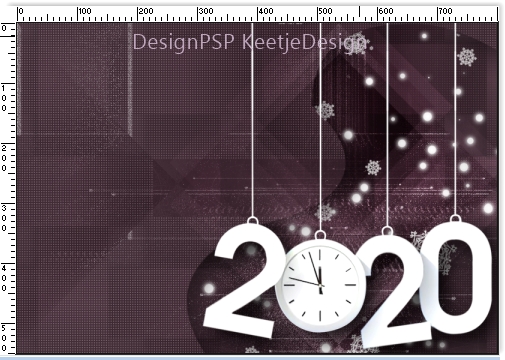
The Layer palette now looks like this

Your work now looks like this

11
Layers – New raster layer
Selections – Load / save selection – Load selection from alpha channel Selection # 4

Fill in the color 1
Effects – Plugin L en K landksiteofwonders – L in K’s Zitah

Selections – Select None
Alien skin – eye candy 5 impact – Perspective Shadow / Drop Shadow Blurry
Layers – Properties – Opacity 65
12
Material palette – Create a Radial gradient on the Foreground

Layers – New raster layer
Selections – Load / save selection – Load selection from alpha channel Selection # 5

Fill in the gradient
Effects – Plugin Unlimited 2.0 – Graphics Plus – Cross Shadow

Effects – Texture effects – Weave

Selections – Select None
Alien skin – eye candy 5 impact – Perspective Shadow / Drop Shadow Blurry
13
Open the tube Deco2-MV2020-VSP – Copy – Paste as new layer
Objects – Align – Bottom
14
Open the tube Deco3-MV2020-VSP – Copy – Paste as new layer
Objects – Align – Top
Objects – Align – Left
15
Open the tube Deco4-MV2020-VSP – Copy – Paste as new layer
Effects – Image effects – Offset / minus 120 / 79

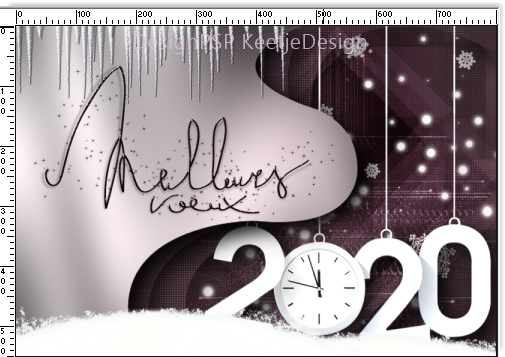
The layer palette now looks like this

Your work now looks like this

16
Image – Add Borders – Symmetric checked
2 pixels color 1
2 pixels color 2
2 pixels color 1
Edit – Copy
Selections – Select All
Image – Add Borders – Symmetric checked
50 pixels color 2
Selections – Invert
Edit – Paste into selection ( the work is in the memory)
hold selection
17
Adjust – Blur – Motion blur

Adjust – Blur – Motion blur

Selections – Invert
Effects – 3D Effects – Drop Shadow / 0 / 0 / 70 / 35 / # 000000

Selections – Select None
18
Open the tube Deco5-MV2020-VSP – Copy – Paste as new layer
Image – Add Borders – Symmetric
1 pixel color 1
19
Image – Resize – Resize to 800 pixels in width – Resize all layers checked
Adjust – Shapness – Unsharp mask

20
Sign your work
Merge All
Save as Jpeg.
The translation is tested by Marianne.
Marianne thank you very much

© Translation DesignPSP KeetjeDesign
This translation is registered with LSBene


