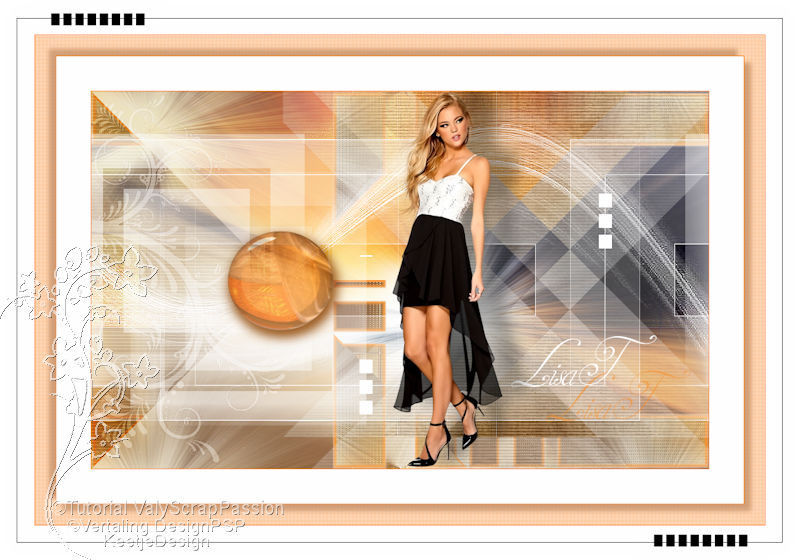
LisaT

Original tutorial Here
This tutorial is written by Valy Scrap Passion the © is from her.
You’re not allowed to copy, link and / or place these or parts of it without her permission.
The © of the materials wich are used is for the rightful owner.
If you want to use this tutorial on your own forum, club or group, you have to request permission from the writer herself.
If this tutorial looks like another, it is purely coincidental.
We have permission to translate Valy Scrap Passion tutorials into English.
Thank you Valy for the permission to translate your tutorials.
Nous avons la permission de traduire les tutoriels de Valy Scrap Passion en anglais.
Merci Beaucoup Valy , que je pouvez traduire vos tutoriels en anglais.
Materials Used:
1 Preset – LisaT-Glass1-VSP
1 Font – Invitation Script LIMITED FREE VERSION
1 Texture – texture 3
Double Click on the preset , which then installs itself in the plugin
Install the font if you want to make your own text
Place the texture 3 into the PSP plugin folder AAA filters folder Ablender
1 Alphafile – Alpha-LisaT-VSP
1 Colorcode – palette couleur
1 Mask – VSP229
1 Fond – Fond-VSP
1 Tube – Titre-LisaT-VSP
1 Tube – Deco1-LisaT-VSP
1 Tube – Deco2-LisaT-VSP
1 Tube – Deco3-LisaT-VSP
1 Tube – femmeVSP88
Open these materials in PSP / minimize mask
Download Materials Here
Plugin Used
Unlimited 2.0 – Simple – Pizza Slice Mirror
Unlimited 2.0 – It@lian Editors Effect – Effetto Fantasma
Unlimited 2.0 – Paper Textures – Striped Paper , Fine
AAA Filters – AAA Blender
L en K’s landksiteofwonders – L en K’s Zitah
Carolaine and Sensibility – cs-texture
Alien Skin – Eye Candy 5 – Impact – Glass
You can find the plugins Here
The translation is written with PSP 2018, but can also be made with other versions.
Colors Used

Note : When working with your own colors , play with the Blend Mode and/or Opacity at your own discretion
1
Materials palette – Foreground color 1 # fd8e22 / Background color 2 # ffffff

Open the Alpha-LisaT-VSP / Windows – Duplicate (or use Shift+D shortcuts) / Close the original file we working on the duplicate.
Selections – Select All
Open Fond-VSP Do not worry about the color at the moment Copy – Paste into selection
Selections – Select None
Adjust – Blur – Radial blur

If your color 1 is different from mine
Layers, New Raster Layer
Fill in your color 1
Layers – Properties – Blend Mode Hue
Layers – Merge – Merge Down
2
Layers – Duplicate
Effects – Plugin AAA Filters – AAA Blender Click open layer and choose texture 3

Effects – Image effects – Seamless Tiling / Default

Layers – Properties – Blend Mode Overlay / Opacity 75
Effects – Edge effects – Enhance More
Layerds – Merge – Merge Down
3
Selections – Load/Save selections – Load selection from alpha channel
Load selection # 1

Selections – Promote selection to layer
Selections – Select None
Effects – Plugin L en K’s landksiteofwonders – L en K’s Zitah

Effects – Plugin Unlimited 2.0 – Simple – Pizza Slice Mirror

4
Selections – Select All
Selections – Float
Selections – Defloat
Layers – New raster layer
Fill in the color 1 (2/3 clicks)
Selections – Modify – Contract – Number of pixels 3

Edit – Clear
Selections – Select None
Layers – Merge – Merge Down
5
Layer palette – Click on the Bottom layer
Selections – Load/Save selections – Load selection from alpha channel
Load selection # 2

Selections – Promote selection to layer
Selections – Select None
Effects – Plugin Unlimited 2.0 – It@lian Editors Effect – Effetto Fantasma

Adjust – Sharpness – Sharpen
Layers – Arrange – Bring to Top
Image – Mirror (horizontal)
Effects – Plugin Unlimited 2.0 – Paper Textures – Striped Paper , Fine

Layers – Merge – Merge Down
6
Layer palette – Click on the Bottom layer
Selections – Load/Save selections – Load selection from alpha channel
Load selection # 3

Selections – Promote selection to layer
Selections – Select None
Layers – Arrange – Bring to Top
Effects – Plugin Carolaine and Sensibility – cs-texture

Layers – Properties – Blend Mode Multiply
7
Layers – New raster layer
Fill in color 2
Layerds – New mask layer – From image VSP229

Effects – Edge effects – Enhance
Layers – Merge – Merge Group
Effects – Image effects – Offset / 0 / 82

Your layer palette looks like this

8
Layer palette – Click on the Bottom layer
Selections – Load/Save selections – Load selection from alpha channel
Load selection # 4

Selections – Promte selection to layer
Selections – Select None
Layers – Arrange – Bring to Top
Layers – Properties – Blend Mode Multiply
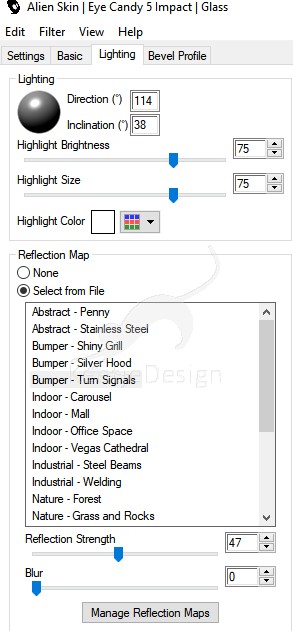
Effects – Plugin Alien Skin – Eye Candy 5 – Impact – Glass / Preset LisaT-Glass1-VSP
If needed you can change the color on the Tab Basic

Or enter these settings


Adjust – Brightness and Contrast – Brightness/Contrast

9
Open the tube Deco1-LisaT-VSP – Copy – Paste as new layer
Layers – Arrange – Move Down
10
Layer palette – Click on the Top layer
Open the tube Deco2-LisaT-VSP – Copy – Paste as new layer
Objects – Align – Left
Layers – Properties – Blend Mode Soft Light
Effects – Edge effects – Enhance
Layers – Arrange – Move Down
11
Layer palette – Click on the Top layer
Open the tube Titre-LisaT-VSP – Copy – Paste as new layer
Activate the Pick Tool (K) – Mode Scale / Position X 612 / Position Y 355

Type M to close the Pick Tool
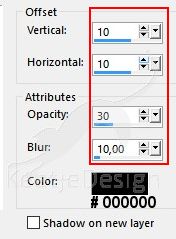
Effects – 3D Effects – Drop Shadow

12
Open the tube femmeVSP88 – Remove the Watermark – Copy – Paste as new layer
Image – Resize – Resize with 80% – Resize all layers not checked ( 2 times)
Activate the Pick Tool (K) – Mode Scale / Position X 438 / Position Y 1

Type M to close the Pick Tool
Effects – 3D Effects – Drop Shadow / minus 9 / 39 / 35 / 30

13
Image – Add Borders – Symmetric checked
1 pixel color 1
50 pixels color 2
1 pixel color 1
Selections – Select All
Image – Add Borders – Symmetric checked
30 pixels color 2
Effects – 3D Effects – Drop Shadow / 10 / 10 / 30 / 10

Effects – 3D Effects – Drop Shadow / minus 10 / minus 10 / 30 / 10

Selections – Invert
Effects – Texture effects – Blinds

Effects – Texture effects – Blinds

Selectione – Select None
14
Image – Add Borders – Symmetric checked
1 pixel color 1
50 pixels color 2
Open the tube Deco3-LisaT-VSP – Copy – Paste as new layer
Layers – Merge – Merge All (Flatten)
15
Image – Resize – Resize to 800 pixels in width – Resize all layers checked
Adjust – Sharpness – High-Pass Sharpen

Sign your work
Save as Jpeg.
We are done with this Valy tutorial
The translation is tested by Marianne
Marianne Thank you very much / Tube of LB

Another version /tube of LisaT

Other versions click on the image for the original size
- Marianne Thank you / Tube of LisaT
- Gloria Thank you / Tube of LisaT
© Translation LisaT DesignPSP KeetjeDesign 28-04-2019
This translation is registered with LSBene


