Elynn
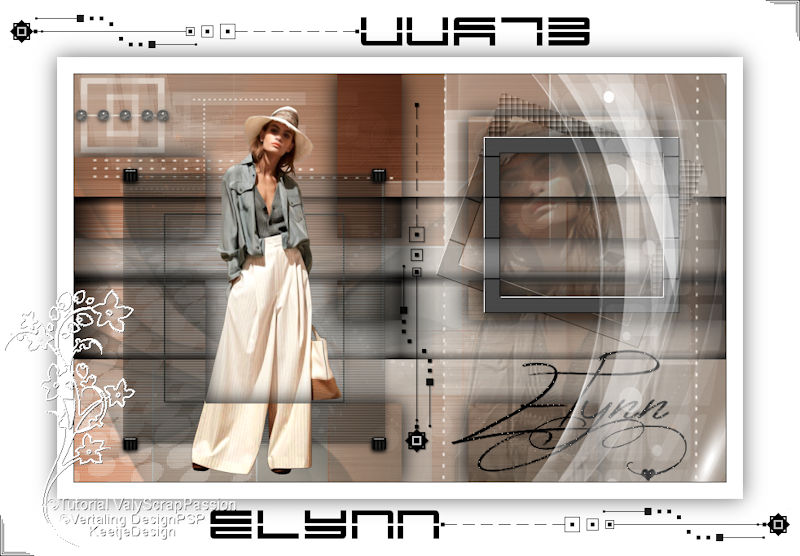
Original tutorial Hier
This tutorial is written by Valy Scrap Passion the © is from her.
You’re not allowed to copy, link and / or place these or parts of it without her permission.
The © ️ of the materials wich are used is for the rightful owner.
If you want to use this tutorial on your own forum, club or group, you have to request permission from the writer herself.
If this tutorial looks like another, it is purely coincidental.
We have permission to translate Valy Scrap Passion tutorials into English.
Thank you Valy for the permission to translate your tutorials.
Nous avons la permission de traduire les tutoriels de Valy Scrap Passion en anglais.
Merci Beaucoup Valy , que je pouvez traduire vos tutoriels en anglais.
Materials Used
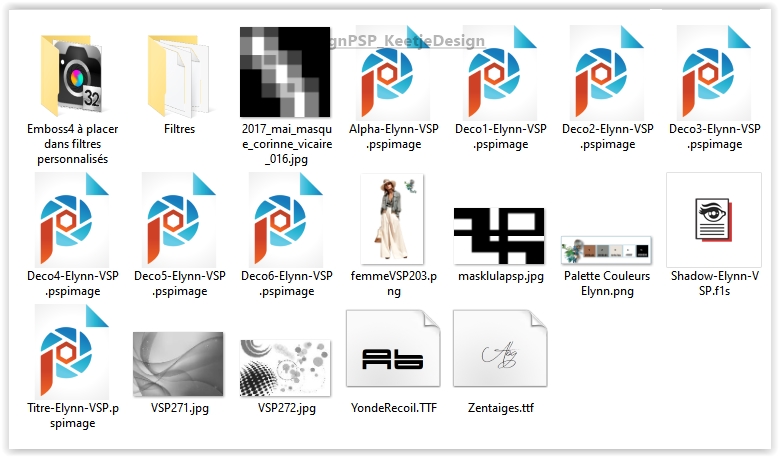
Place the preset Preset_UserDefinedFilter_Emboss_4 in your PSP Presets folder
Double Click on the preset Shadow-Elynn-VSP it will install itself in the filter
Install both fonts if you want to create your own text.
Open the masks in PSP / Minimize the masks
Download Materials Here
Plugins Used
AAA Filters – Tweed Frame
VanDerLee – Unplugged X
Alien Skin Eye Candy 5 – Impact – Glass
Alien Skin Eye Candy 5 – Impact – Perspective Shadow
Unlimited 2.0 – VM Toolbox – Blast
Unlimited 2.0 – Special Effects 1 – Blurred Mesh
Unlimited 2.0 – Emboss – Emboss Greyscale
UserDefinedFilter_Emboss_4
You can find the plugins Here
The translation is written with PSP 2018, but can also be made with other versions.
Colors Used

Note : When working with your own colors , play with the Blend Mode and/or Opacity at your own discretion
If you work with your own materials and colors / Color the tubes Deco 1 and Deco 2 with color 3 / Deco 3 and Deco 4 with color 2
1
Open the Alpha-Elynn-VSP – Window – Duplicate (or use Shift+D shortcut) / Close the original file, we working on the duplicate.
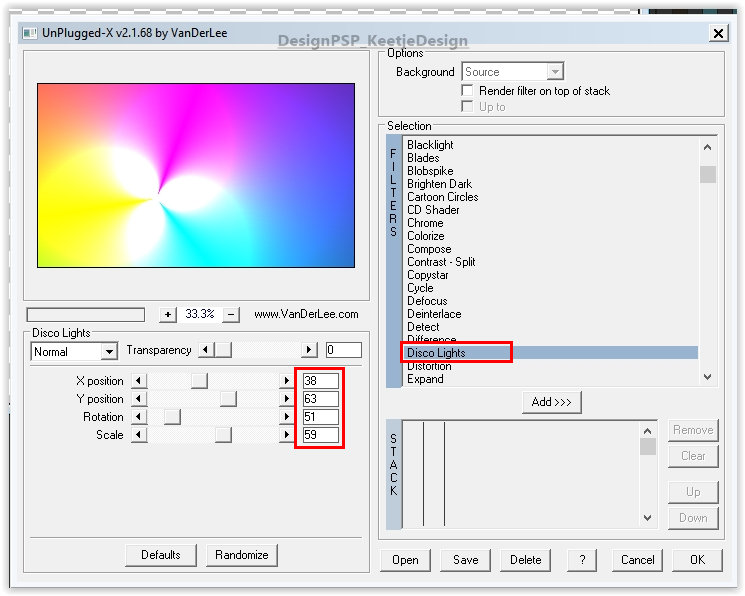
Effects – Plugin VanDerLee – Unplugged X – Disco Lights
Layers – New raster layer.
Fill in color 1
Layers – Arrange – Move down
Layer palette – Click the top layer
Layers – Properties / Blend Mode Luminance (Legacy).
Layers – Merge – Merge visible
2
Layers – New raster layer
Fill in color 2
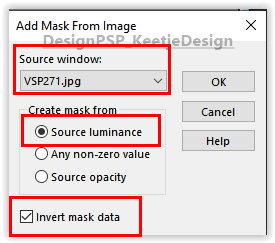
Layers – New mask layer – From image VSP271 Invert mask data checked
Layers – Merge – Merge group
3
Open the tube femmeVSP203 – Remove the watermark – Copy
do not close the tube we will use it again later
Activate your work
Paste as new layer
Image – Resize – Resize with 150% – Resize all layers not checked
Activate the Pick tool / Position X 361 / Position Y 34

Type M to close the Pick tool
Layers – Properties – Opacity 30
Effects – User Defined Filter – Emboss_4
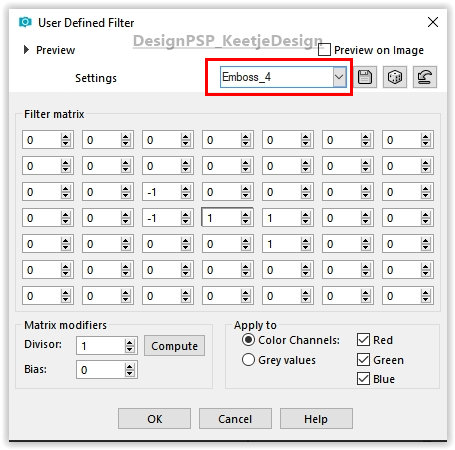
Layers – Arrange – Move down
4
Layer palette – Click the top layer
Layers – New raster layer
Fill in color 4
Layers – New mask layer – From image VSP272 Invert mask data checked

Layers – Merge – Merge group
Layers – Properties – Blend Mode Soft Light / Opacity 70
Effects – Edge effects – Enhance
Your layer palette looks like this
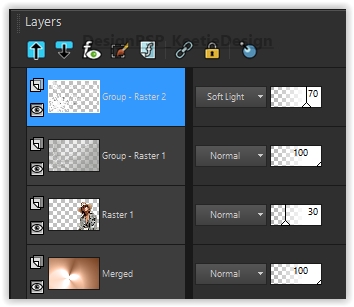
And your work looks like this:
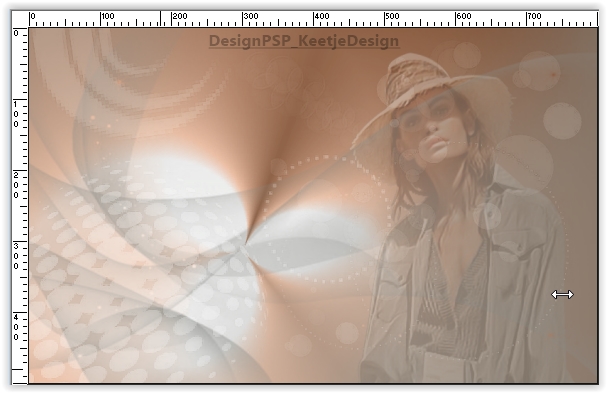
5
Layer palette – Click the bottom layer
Effects – Plugin Unlimited 2.0 – VM Toolbox – Blast
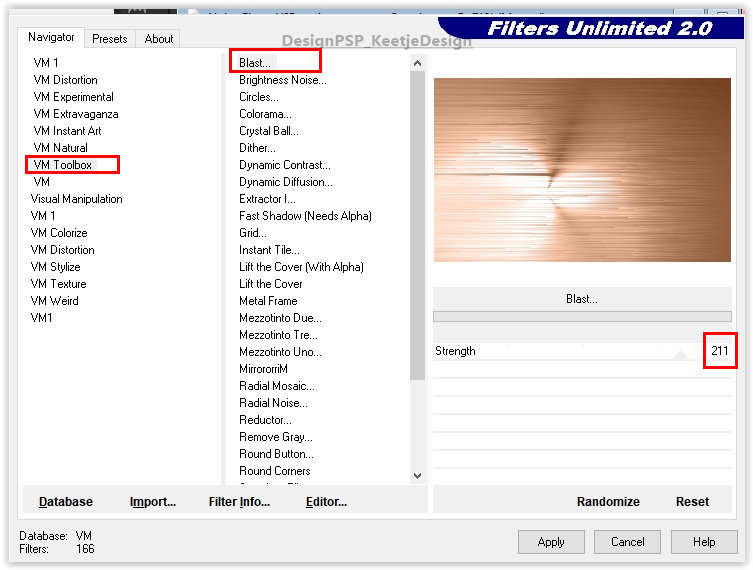
6
Layers – New raster layer
Fill in color 3
Layers – New mask layer – From image 2017_mai_masque_corinne_vicaire_016 Invert mask data not checked
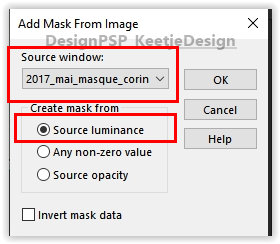
Image – Mirror – Mirror horizontal
Layers – Merge – Merge group
Effects – User Defined Filter – Emboss_4 / as before
7
Layer palette – Click the top layer
Open the tube Deco1-Elynn-VSP – Copy – Paste as new layer
Activate the Pick tool / Position X 452 / Position Y 0

Type M to close the Pick tool
Your layer palette looks like this
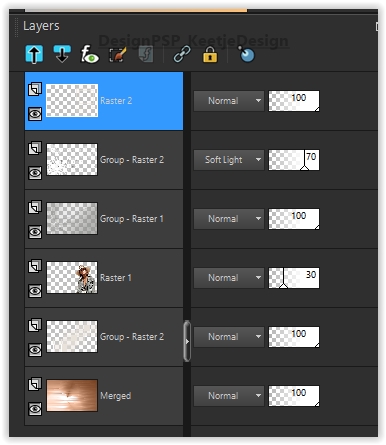
And your work looks like this:

8
Layers – Merge – Merge Visible
Selections – Load/Save selection – Load selection from alpha channel
Load selection # 1
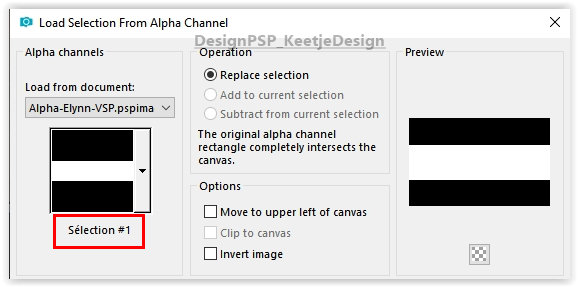
Selections – Promote selection to layer
Effects – Plugin Unlimited 2.0 – Special Effects 1 – Blurred Mesh

Selections – Select None
9
Open the tube Deco2-Elynn-VSP – Copy – Paste as new layer
Activate the Pick tool / Position X minus 26 / Position Y minus 16

Type M to close the Pick tool
10
Material palette / Foreground color 2 / Background color 3
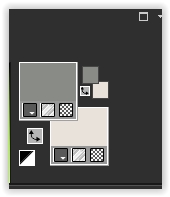
Create a Radial gradient on the Foreground
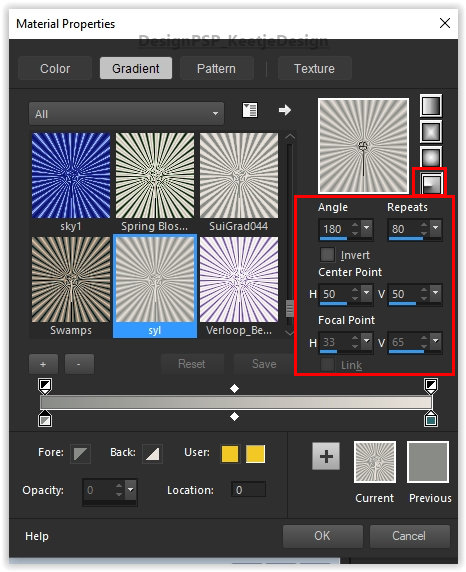
11
Layers – New raster layer
Selections – Load/Save selection – Load selection from alpha channel
Load selection # 2

Fill in the gradient
Selections – Select None
Layers – Duplicate
Activate the Pick tool / Position X 28 / Position Y 43

Layers – Duplicate
Activate the Pick tool / Position X 55 / Position Y 43

Layers – Duplicate
Activate the Pick tool / Position X 82 / Position Y 43

Layers – Duplicate
Activate the Pick tool / Position X 101 / Position Y 43

Type M to close the Pick tool
You have now this
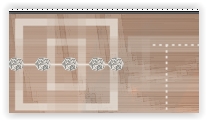
Layers – Merge – Merge down 4 times
Effects – Plugin – Alien Skin Eye Candy 5 – Impact – Glass – Clear

12
Open the tube Deco3-Elynn-VSP – Copy – Paste as new layer
Activate the Pick tool / Position X 60 / Position Y 121

Type M to close the Pick tool
Effects – 3D Effects – Drop Shadow / 4 / 4 / 35 / 8 / # 000000
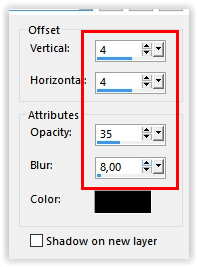
13
Open the tube Deco4-Elynn-VSP – Copy – Paste as new layer
Activate the Pick tool / Position X 53 / Position Y 111

Type M to close the Pick tool
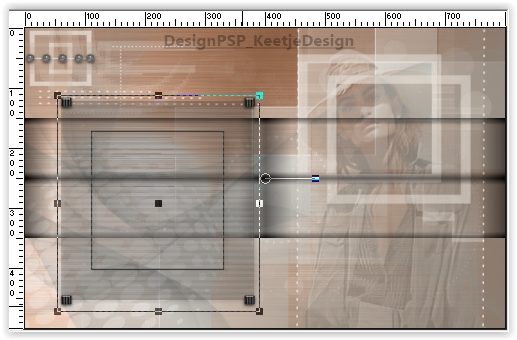
Your layer palette now looks like this
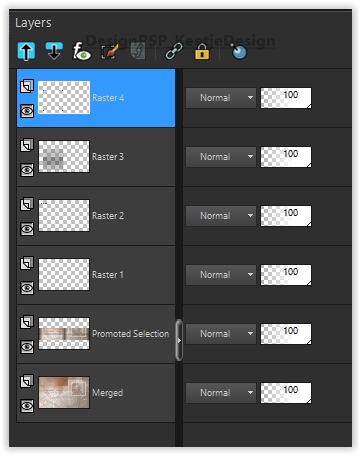
Your work now looks like this
14
Layers – Merge – Merge Visible
Layers – New raster layer
Selections – Load/Save selection – Load selection from alpha channel
Load selection # 3
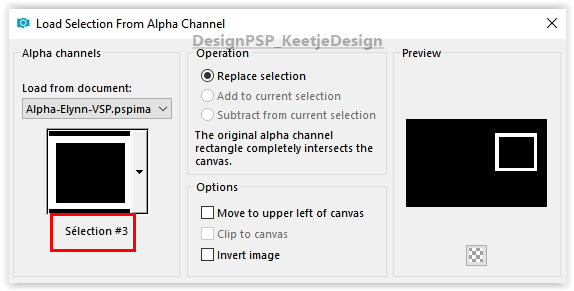
Fill in color 2
Selections – Select None
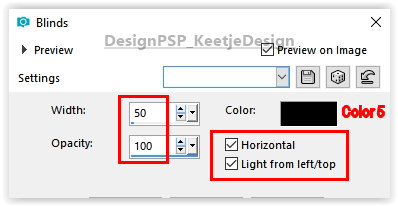
Effects – Texture effects – Blinds / Color 5
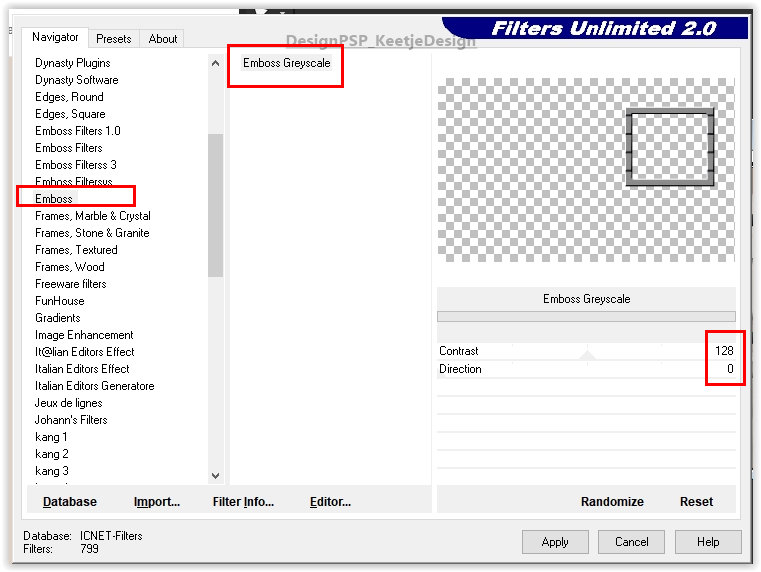
Effects – Plugin Unlimited 2.0 – Emboss – Emboss Greyscale
15
Layers – Duplicate
Layers – Arrange – Move Down
Image – Resize – Resize with 110% – Resize alle layers not checked
Image – Free rotate

Adjust – Shaprness – Sharpen
Effects – Image effects – Offset / minus 36 / 0

Lauers – Properties – Blend Mode Luminance ( Legacy) / Opacity 55
Effects – PLugin AAA Filters – Tweed Frame

16
Layer palette – Click the top layer
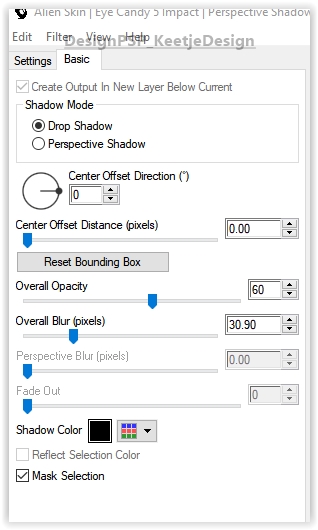
Effects – Plugin Alien Skin Eye Candy 5 – Impact – Perspective Shadow / Preset Shadow-Elynn-VSP
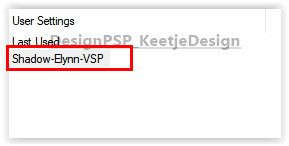
Or enter these settings
17
Activate the tube femmeVSP203 again – Copy – Paste as new layer
Image – Resize – Resize 2x with 75% – Resize all layers not checked
Image – Mirror – Mirror horizontal
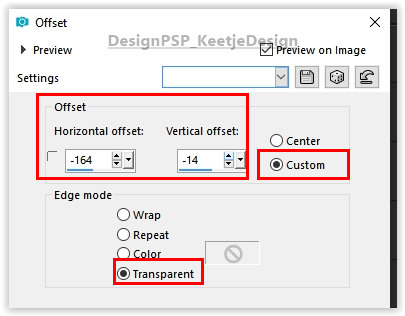
Effects – Image effects – Offset minus 164 / minus 14
18
Open the tube Title-Elynn-VSP – Copy – Paste as new layer]
Activate the Pick tool / Position X 462 / Position Y 338

Type M to close the Pick tool
19
Layers – Merge – Merge Visible
Layers – Duplicate
Layers – New mask layer – From Image masklulapsp / Invert mask data not checked

You don’t see the effect of the mask and it’s normal
Layers – Merge – Merge Group
Layers – Properties – Blend Mode Multiply
Effects – PLugin Alien Skin Eye Candy 5 – Impact – Perspective Shadow / Preset Shadow-Elynn-VSP
20
Open the tube Deco5-Elynn-VSP – Copy – Paste as new layer
Objects – Align – Right
21
Image – Add Borders – Symmetric
1 pixel color 5
20 pixels color 4
Selections – Select All
Image – Add Borders – Symmetric
70 pixels color 4
Effects – Plugin Alien Skin Eye Candy 5 – Impact – Perspective Shadow
Selections – Select None
22
Open the tube Deco6-Elynn-VSP – Copy – Paste as new layer
Layers – Merge – Merge All (Flatten)
Image – Resize – Resize to 800 pixels wide
Sign your work
Merge All
Save as Jpeg.
The translation is tested by Marianne.
Marianne thank you very much / Tubes off
crea
Another version / Tube off Coline
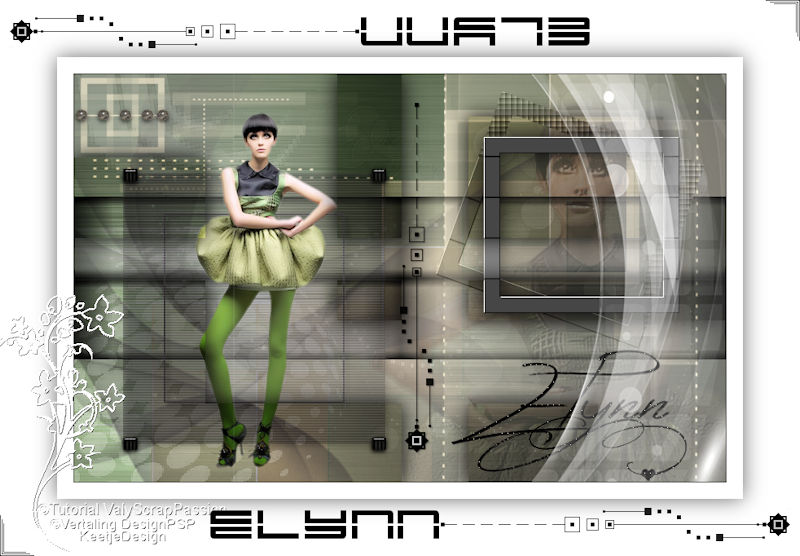
Click on the image for the original size
xxx
© Translation Elynn DesignPSP KeetjeDesign 05-06-2020
This translation is registered with LSBene


