Marluce

Original tutorial Here
This tutorial is written by Estela Fonseca the © is from her.
You’re not allowed to copy, link and / or place these or parts of it without her permission.
The © ️of the materials wich are used is for the rightful owner.
If you want to use this tutorial on your own forum, club or group, you have to request permission from the writer herself.
We have permission to translate Estela Fonseca’s tutorials into English.
Thank you Estela for the permission to translate your tutorials.
Temos permissão para traduzir os tutoriais da Estela Fonseca para o inglês.
Obrigado Estela pela tradução dos tutriais.
Materials Used:
1 Masker – Becky_Mask023
1 Tube – JHanna_280 Background
1 Tube – JHanna_280tube
1 Tube – k@rine_dreams_Woman260_Mars_09
Download Materials Here
Plugins Used:
FM Tile Tools – Saturation Emboss
FM Tile Tools – Blend Emboss
Plugins AB 02 – Another Nice Circle Of Sand
Graphics Plus – Cross Shadow
AP Lines – SilverLining – Dotty Grid
Alien Skin – Eye Candy 5 – Impact – Brushed Metal
The translation is made with PSP 2018 , but can also be done with other versions.
Note : When working with your own colors , play with the Blend Mode and/or Opacity at your own discretion
1
Open a New Transparent Image of 700 X 550 pixels
Selections – Select All
2
Open de tube JHanna_280 Background – Copy – Paste into the selection
Selections – Select None
3
Effects – Reflection Effects – Rotating Mirror

4
Layers – Duplicate
Adjust – Blur – Gaussian Blur / Radius 30
5
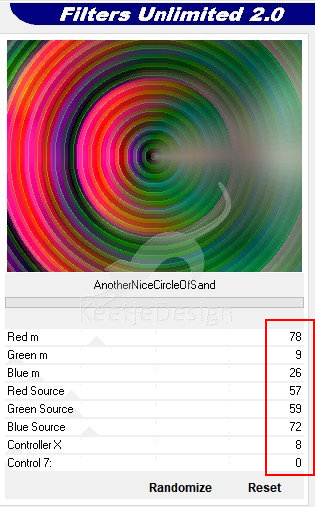
Effects – Plugin Plugins AB 02 – Another Nice Circle Of Sand (2 times)

6
Open the Mask Becky_Mask023 – Minimize
Layers – New Mask Layer – From Image

Layers – Merge – Merge Group
Layers – Properties – Blend Mode Multiply / Opacity 60
7
Effects – Plugin FM Tile Tools – Saturation Emboss / Default

8
Open the tube JHanna_280tube – Copy – Paste as new layer
Image – Resize – Resize 50 % – All Layers not checked
Image – Mirror (horizontal)
Position into the lower left corner / as in the example at the top
Effects – Plugin Graphics Plus – Cross Shadow / Default
9
Open the tube k@rine_dreams_Woman260_Mars_09 – Copy – Paste as new layer
Image – Mirror (horizontal)
Layer palette Blend Mode Soft Light
Paste again as new layer
Image – Mirror (horizontal)
Image – Resize – Resize 70% – All layers not checked
Position to the right – as in the example at the top
10
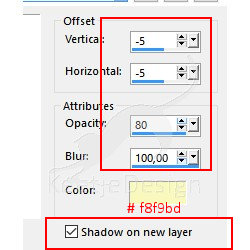
Effects – 3D Effects – Drop Shadow
Color a light color of the tube I used the color # f8f9bd / minus 5 / minus 5 / 80 / 100 / shadow on new layer checked

11
Layer palette – Click at the Shadow layer
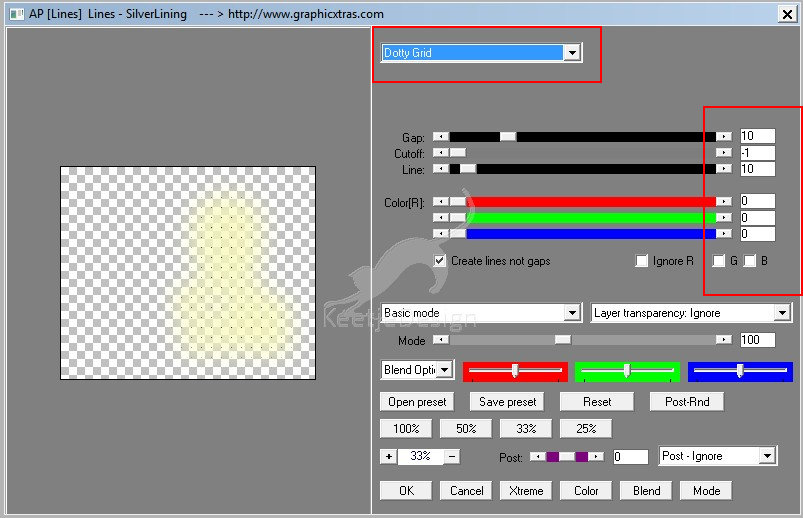
Effects – Plugine AP Lines – SilverLining – Dotty Grid

Effects – Plugine FM Tile Tools – Blend Emboss / Default
Change the Blend Mode or the Opacity of this layer (I chose Multiply)
Layers – Merge – Merge All
12
Image – Add Borders – Symmetric
2 pixels color # 000000
15 pixels contrast color
13
Activate the Magic Wand Tool – Select the 15 pixels border
Effect – Plugin
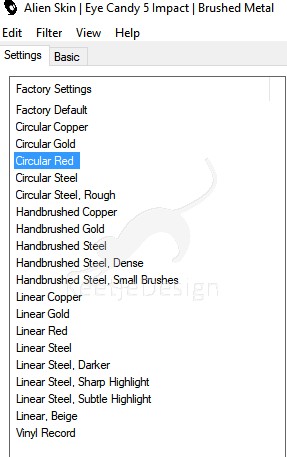
Alien Skin – Eye Candy 5 – Impact – Brushed Metal

Effects – Edge effects – Enhance
Selections – Select None
Image – Add Borders – Symmetric
2 pixels color # 000000
Sign your work
Merge All
Save as Jpeg
The translation has been tested by Marianne
Thank you Marianne tube of Libellule

Another example tubes of Calguis and LDesings

© Translation Marluce DesignPSP KeetjeDesign 02-01-2019
This translation is registered with LSBene


