

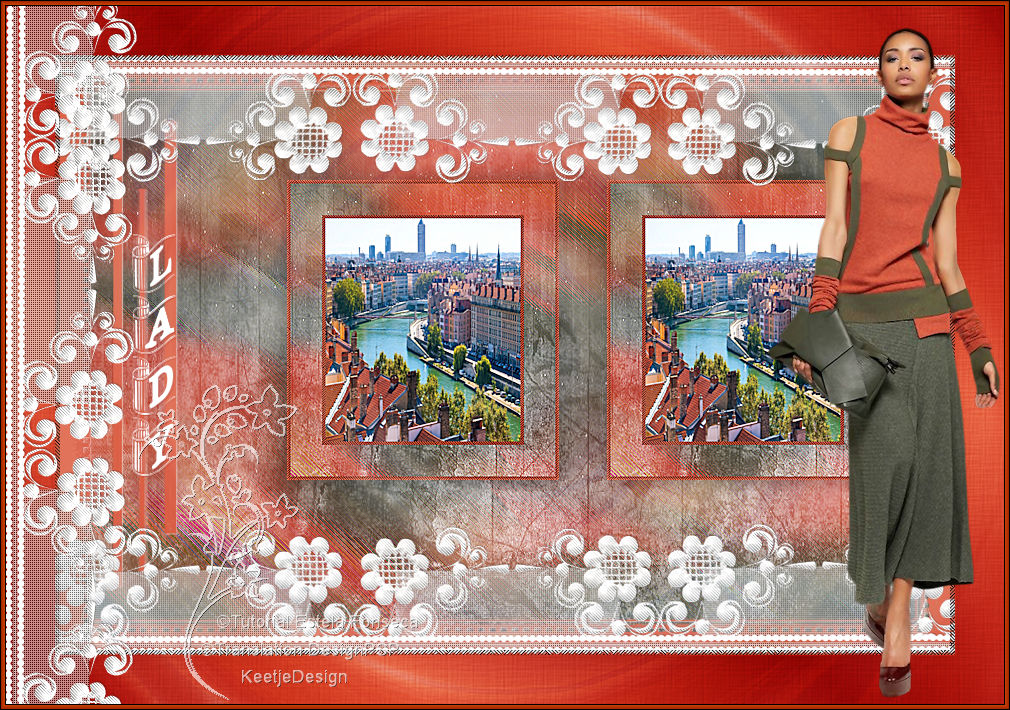
Lady

Original tutorial Here
This tutorial is written by Estela Fonseca the © is from her.
You’re not allowed to copy, link and / or place these or parts of it without her permission.
The © ️ of the materials wich are used is for the rightful owner.
If you want to use this tutorial on your own forum, club or group, you have to request permission from the writer herself.
We have permission to translate Estela Fonseca’s tutorials into English.
Thank you Estela for the permission to translate your tutorials.
Temos permissão para traduzir os tutoriais da Estela Fonseca para o inglês.
Obrigado Estela pela tradução dos tutriais.
Her site

Materials Used:
1 Preset – rippleslady
Double Click on the preset , which then installs itself in the plugin
1 Mask – atag23dworisch
1 Maks – cas_Mask_0117_05
1 Image – 18699483_10155142813727279_2579532350669048954_o
1 Tube – Texto
1 Tube – MDL_Lace
1 Tube – calguisglamour2339
Open these materials in PSP / Duplicate with Shift + D / Close the originals / Minimize both masks
Download Materials Here
Plugins Used:
Unlimited 2.0 – Andrew’s Filters 24 – Razon Back in Front
Unlimited 2.0 – Willy – Takinami Bamboo Web
Alien Skin – Eye Candy 5 – Nature – Ripples
AAA Frames – Frame Works
The translation was made with PSP 2018 , but can also be done with other versions.
Note : When working with your own colors , play with the Blend Mode and/or Opacity at your own discretion
1
Materials palette – Foreground color # 4f666c / Background color # bcdeea

Create a Linear gradient in the Foreground

Open a new transparent image of 900 X 600 pixels
Fill in the gradient
2
Selections – Select All
Open the tube calguisglamour2339 – Copy – Paste into selection
Selections – Select None
3
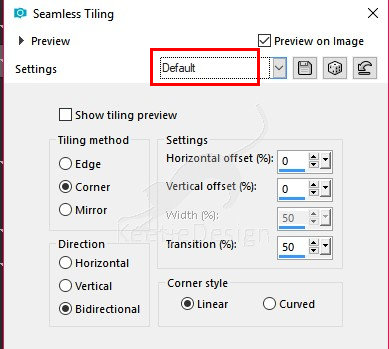
Effects – Image effects – Seamless Tiling / Default
Adjust – Blur – Motion Blur (4 times)

Effects – Plugin Unlimited 2.0 – Andrew’s Filters 24 – Razon Back in Front

Effects – Edge effects – Enhance
4
Layers – New raster layer
Fill in the color of the Background
Layers – New mask layer – From image atag23dworisch

Effects – Edge effects – Enhance More
Layers – Merge – Merge Group
Effects – 3D Effects – Drop Shadow / 1 / 1 / 80 / 1 / wit

5
Layer palette – Click on the Bottom layer
Layers – New raster layer
Fill in the color # ffffff
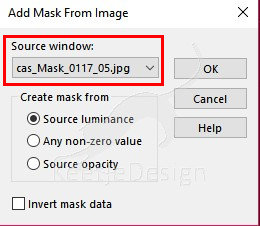
Layers – New mask layer – From image cas_Mask_0117_05
Adjust – Sharpness – Sharpen More
Layers – Merge – Merge Group
The layer palette looks like this

6
Layers – Merge – Merge Visible
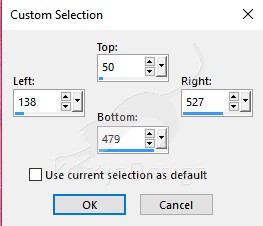
Activate Selection Tool Rectangle (S) – Custom Selection

Selections – Promote selection to layer
Hold selection
7
Selections – Modify – Select selection borders

Fill in the color # bcdeea
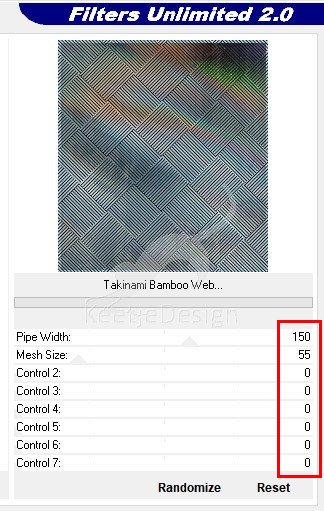
Effects – Plugin Unlimited 2.0 – Willy – Takinami Bamboo Web
Selections – Select None
8
Activate Selection Tool Rectangle (S) – Custom Selection
Selections – Modify – Contract – Number of pixels 50
Layers – New raster layer
Open the image 18699483_10155142813727279_2579532350669048954_o – Copy – Paste into selection
Selections – Modify – Select selection borders
Fill in the color # bcdeea
Effects – Plugin Unlimited 2.0 – Willy – Takinami Bamboo Web / Same settings as before 150 / 55
Selections – Selec None
9
Layers – Merge – Merge Down
Image – Resize – Resize with 70% – Resize all layers unchecked
Adjust – Sharpness – Sharpen More
Layers – Duplicate
Effects – Image effects – Offset / 320 / 0

Layers – Merge – Merge Down
Effects – 3D Effects – Drop Shadow / 0 / 0 / 35 / 30 zwart

10
Open the tube MDL_Lace – Copy – Paste as new layer
Image – Resize – Resize with 99% – Resize all layers unchecked
Objects – Aligne – Top
Layers – Duplicate
Image – Mirror – Mirror vertical
Layers – Merge – Merge Visible
11
Selections – Select All
Image – Add Borders – Symmetric checked
50 pixels color # bcdeea
Selections – Modify – Select selection borders
Effects – Plugin Unlimited 2.0 – Willy – Takinami Bamboo Web / Same settings as before 150 / 55
Selections – Select None
12
Selections – Select All
Selections – Modify – Contract – Number of pixels 45
Selections – Invert
Materials palette – Create a Linear gradient in the Foreground
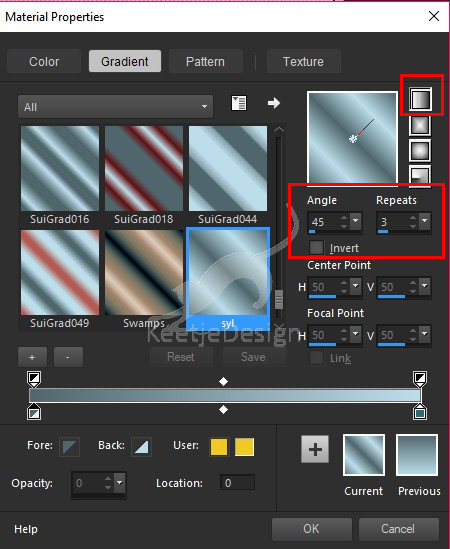
Fill in the selection
Selections – Promote selection to layer
Effects – Plugin Alien Skin – Eye Candy 5 – Nature – Ripples / Preset rippleslady

Or enter those settings


Effects – Edge effects – Enhance
Hold – Selection
13
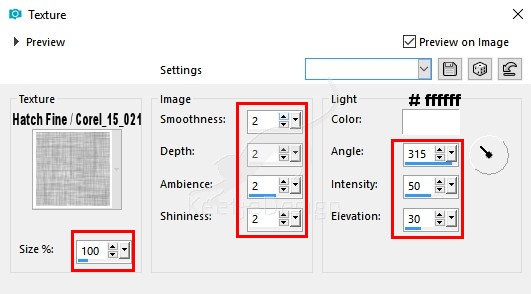
Effects – Texture effects – Texture / Hatch Fine / Corel_15_021
Layers – Properties – Blend Mode Soft Light
Selections – Invert
Effects – 3D Effects – Drop Shadow / 0 / 0 / 35 / 30 / Black
Selections – Select None
14
Open again the tube MDL_Lace – Copy – Paste as new layer
Image – Free Rotate

Activate the Pick Tool / Mode Scale / Position X 0 / Position Y – minus 179

15
Open again the tube calguisglamour2339 – Copy – Paste as new layer
Image – Resize – Resize with 80% – Resize all layers – unchecked
Position to the right
Adjust – Sharpness – Sharpen
16
Open the tube Texto – Copy – Paste as new layer
Effects – Image effects – Offset / minus 350 / 0

Effects – 3D Effects – Drop Shadow / 1 / 1 / 35 / 1 / 799bd2

17
Image – Add Borders – Symmetric checked
5 pixels color # ffffff
Effects – Plugin AAA Frames – Frame Works

18
Sign your work
Merge All
Save as Jpeg.
The translation has been tested by Marianne.
Marianne thank you very much / Tube of Libellule / Image from Pixabay

Another example / Tube of Rooske Design / Image from internet
© Translation Lady DesignPSP KeetjeDesign 11-04-2019
This translation is registered with LSBene