Desafio

Original tutorial Here
This tutorial is written by Estela Fonseca the © is from her.
You’re not allowed to copy, link and / or place these or parts of it without her permission.
The © ️ of the materials wich are used is for the rightful owner.
If you want to use this tutorial on your own forum, club or group, you have to request permission from the writer herself.
We have permission to translate Estela Fonseca’s tutorials into English.
Thank you Estela for the permission to translate your tutorials.
Temos permissão para traduzir os tutoriais da Estela Fonseca para o inglês.
Obrigado Estela pela tradução dos tutriais.
Materials Used:
1 Mask – Narah_mask_Abstract150
1 Tube – elemento-desafioef
1 Tube – JHanna_249 misted tube
Download Materials Hier
Plugins Used:
Kang 1 – circuit Weaver
Kang 1 – ben-wah’s Sister
Toadies – What Are You?
The translation was made with PSP 2018 , but can also be done with other versions.
Colors Used

Note : When working with your own colors , play with the Blend Mode and/or Opacity at your own discretion
1
Materials palette – Foreground color # 847d63 / Background color # e6e5c9
Make on the Foreground a Gradient Style Linear / Angle 45 / Repeats 1

Open a New transparent image of 800 X 550 pixels
Fill in the Gradient
2
Effects – Plugin Kang 1 – circuit Weaver

Layers – Duplicate
Image – Mirror – Mirror horizontal
Layers – Properties – Opacity 50
Layers – Merge – Merge Visible
3
Layers – Duplicate
Effects – Plugin Kang 1 – ben-wah’s Sister

4
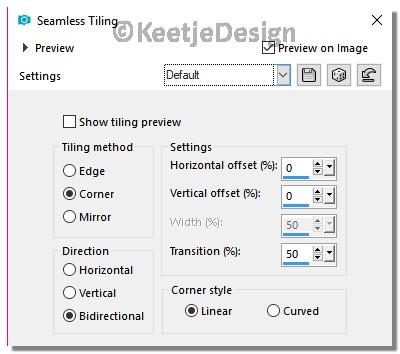
Effects – Image Effects – Seamless Tiling

Layers – Properties – Opacity 31
Layers – Merge – Merge Visible
5
Layers – New Raster Layer
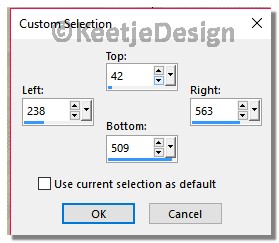
Activate Selection Tool Rectangle – Custom selection

Fill in the Gradient
Selections – Modify – Contract / Number of Pixels 20
Fill in the color # e6e5c9
Keep selected
6
Open the tube JHanna_249 misted tube Copy – Paste as new layer (On your work)
Slide the tube into the selection

Selections – Invert
Press the Delete key
Selections – Select None
7
Layers – Merge – Merge Down
Layers – Duplicate
Layer palette – Click on the middle layer
Effects – Plugin Toadies – What Are You? / 20 / 20 (2 times)

Effects – Edge Effects – Enhance More (2 times)
8
Layer palette – Click on the top layer
Effects – 3D Effects – Drop Shadow
Color # 000000 / 0 / 0 / 50 / 20

9
Layers – New Raster Layer
Fill in the color # ffffff
Open the mask Narah_mask_Abstract150 – Minimize
Activate your work
Layers – New mask layer – From image

Adjust – Sharpness – Sharpen More
Layers – Merge – Merge Group
10
Activate the Pick Tool (K)- Modus Scale / Position X minus 154 / Position Y minus 159

Press the M key to close the Pick Tool
Effects – 3D Effects – Drop Shadow
Color # 7a7267 / 1 / 1 / 100 / 0

Layers – Duplicate
Image – Mirror – Mirror horizontal
Image – Mirror – Mirror vertical
Layers – Merge – Merge Down
Layers – Duplicate
Layers – Properties – Blend Mode Overlay / Opacity 73
11
Layers – Merge – Merge Visible
Image – Add Borders – Symmetric checked
1 pixel color # 969076
1 pixel color # ffffff
1 pixel coler # 969076
30 pixels color # ffffff
1 pixel color # 969076
12
Open the tube elemento-desafioef – Copy – Paste as New Layer ( on your work)
Effects – 3D Effects – Drop Shadow
Color # 9a947b / 1 / 1 / 100 / 0

Effects – 3D Effects – Drop Shadow
Color # 9a947b / minus 1 / minus 1 / 100 / 0

Layers – Merge – Merge Visible
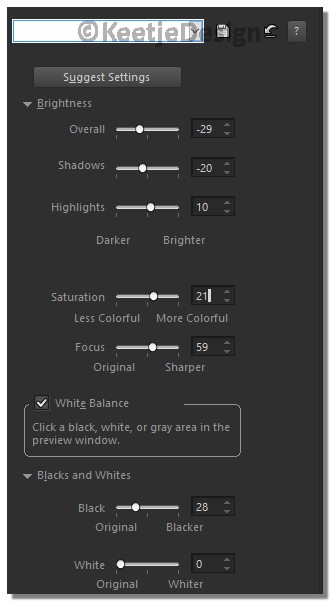
Adjust – Smart Photo Fix

Sign your work
Layers – Merge – Merge All
Save as Jpeg.
The translation has been tested by Marianne met de tube van Franie Margot
Thank you Marianne

Another Example with the tube of Luz Cristina

- With Tube of K@rine Dreams Thank you Marianne
© Translation Desafio DesignPSP KeetjeDesign 23-09-2018
This translation is registered with LSBene


