Blue Fashion

Original tutorial Here
This tutorial is written by Estela Fonseca the © is from her.
You’re not allowed to copy, link and / or place these or parts of it without her permission.
The © ️ of the materials witch are used is for the rightful owner.
If you want to use this tutorial on your forum, club or group, you have to request permission from the writer herself.
We have permission to translate Estela Fonseca’s tutorials into English.
Thank you Estela for the permission to translate your tutrials.
Temos permissão para traduzir os tutoriais da Estela Fonseca para o inglês.
Obrigado Estela pela tradução dos tutriais.
Materials Used
1 Mask – maskbluefashion-ef
1 Tube – elementobluefashion-ef
1 Tube – bluefasion_wisdom_designs
Download Materials Here
Plugins Used
Unlimited 2.0 – Kang 1 – new Facets
Penta.com – Color Dot
Penta.Com – Jeans
The tutorial was made with PSP X2, but can also be done with other versions.
The translation was made with PSP 2018
Used Colors

Note : When working with your own colors , play with the Blend Mode and/or Opacity at your own discretion
1
Materials Palette – Foreground Color # 335088 / Background Color # afdafc
or choose 2 colors from your tube
Make a Gradient Style Sonburst as follows

Open a New Transparent Image of 700 X 550 pixels
Fill with the Gradient
2
Layers – Duplicate
Effecten – Plugin Kang 1 – new Facets

Blend Mode Soft Light
Layers – Merge – Merge Visible
Effects – Edge Effects – Enhace More
3
Layers – New Raster Layer
Fill with white
Open the Mask maskbluefashion-ef – minimalize
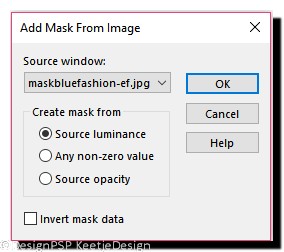
Layers – New Mask Layer – From Image / Mask maskbluefashion-ef

Layers – Merge – Merge Group
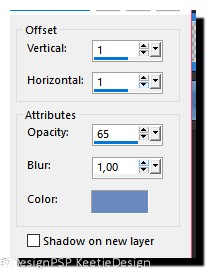
Effects – 3D Effects – Drop Shadow
Color # 6b8ac0 / 1 / 1 / 65 / 1,00

4
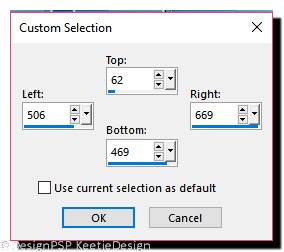
Activate the Selection Tool Rectangle (S) – Costom Selection – As follows


Layer palette – Click on the bottom layer
Effects – Plugin Penta.com – Color Dot

Selections – Select None
5
Layer palette – Click on the top layer
Layers – New Raster Layer
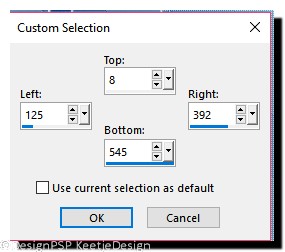
Activate the Selection Tool Rectangle (S) – Costom Selection – As follows

Fill the selection with the Color # 335088
Selections – Modify – Contract – Number of pixels 2 / Press your Delete key
Selections – Modify – Contract – Number of pixels 10
Fill the selection with the Color # 335088
Selections – Modify – Contract – Number of pixels 2
Fill the selection with the Color # afdafc
Layers – Properties – Blend Mode Overlay / Opacity 30
Effects – Plugin Penta.com – Jeans / Default Settings
Selections – Select None
Example of your Layers

6
Layers – Merge – Merge Visible
Open tube elementobluefashion-ef – Copy – Paste as New Layer
7
Open tube bluefasion_wisdom_designs – Copy – Paste as New Layer
Image – Resize 75% – All Layers not Checked
Put the tube in place / See example at the top
Adjust – One Step Photo Fix
8
Image – Add Borders – Symmetrical
2 pixels # ffffff
10 pixels # 77c0f3
2 pixels # ffffff
Sign your work
Layers – Merge – Merge All (Flatten)
Save as Jpeg.
The translation has been tested by Marianne
Thank you Marianne

© Translation Blue Fashion DesignPSP KeetjeDesign 15-06-2018
This translation is registered with LSBene


