

Smell like a rose
This tutorial was devised and written by Karin 19/01/2021, the © for translation is mine Dennis.
It is not allowed to copy, link and / or place these or parts thereof without my permission.
The tutorial is written with PSP19 (X9) but can also be made with other versions.
If this lesson looks like any other lesson, it is purely coincidental.
———–
The © of the materials used is for the rightful owners and the tube makers.The mask is from Narah and the Text is from Yoka.
Open the Material in PSP / Window Duplicate or Shift + D / Close the originals
Filters used:
Simple / Left Right Wrap
Mock / Windo
AAA Frames / Foto Frame
Caroline and Sensibility / CS Halloween 2
Medhi / Wavy Lab 1.1
Filters Unlimited 2.0 / BKG Designer SF10II / Diamonds
Alien Skin Eye Candy 5 / Impact / Extrude
MuRa’s Meister / Copies
Toadies / What Are You
———
The tutorial is written with these Colors and Materials
Color Palette
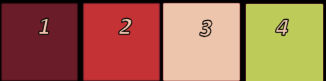
If you use your own Colors and / or Materials, you may have to play with Blend Mode and / or Opacity
———
Download your materials here:
You will need a Main Tube / Mine is from Lightartist_XXX
Step 1
Open the Alpha file Alfa_SmellsLikeaRose / Window / Duplicate (or use Shift + D)
Close the original we will work on the copy
Unfortunately, Selection 2 is unnecessary in the alpha file. so do not worry when it is skipped. 🙂
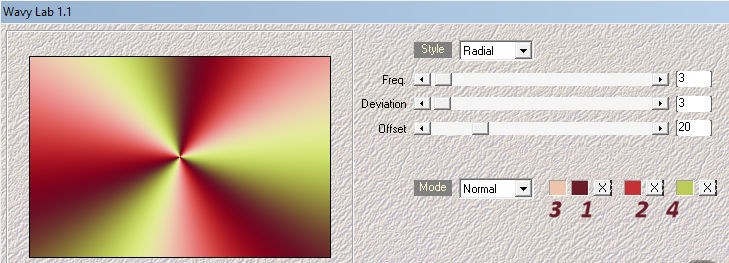
Step 2
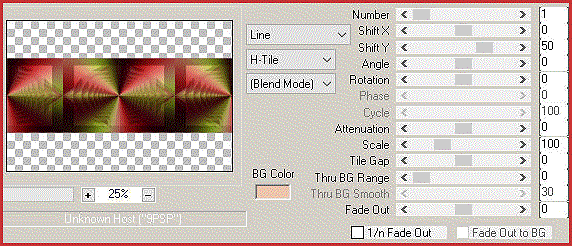
Effects / Plugins / Medhi / Wavy Lab 1.1 with the following settings:
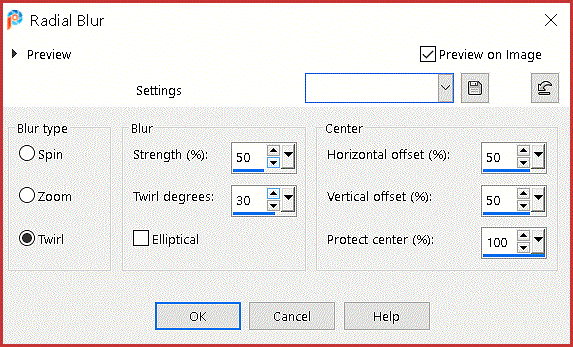
Adjust / Blur / Radial Blur with the following setting:
Step 3
Layers / Duplicate
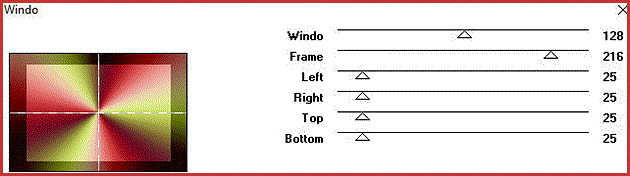
Effects / Plugins / Mock / Windo (with the following settings) (default)
Layers / Properties, Blend Mode Multiply / Opacity 80
Layers / Merge / Merge Down
Step 4
Selections / Selection Load/Save / Load Selection from Alpha Channel “Selection1
(Replace Selection only checked)
Selections / Promote Selection to Layer
Effects / Plugins / Caroline and Sensibility / CS Halloween 2 (with the following settings)
Selections / Select None
Step 5
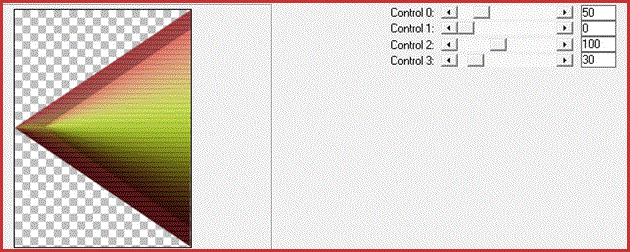
Effects / Plugins / Simple / Left Right Wrap
Layers / Duplicate
Image / Mirror / Mirror Horizontal
Layers / Merge / Merge Down
Step 6
Layers / Duplicate
Effects / Plugins / It@ lian Editors Effect / Effecto Fantasma
X and Y at 15
Effects / Edge Effects / Enhance
Layers / Merge / Merge Visible
Step 7
Layers / Duplicate
Effects / Reflection Effects / Feedback (with the following settings)
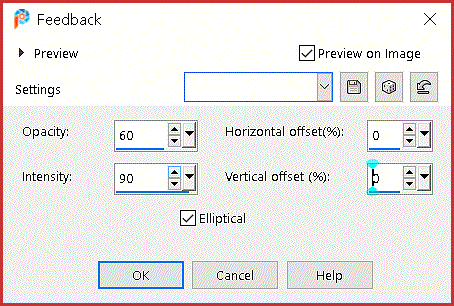
Image / Resize 50% Resize all Layers NOT checked
Step 8
Effects / Plugins / MuRa’s Meister / Copies
(with the following settings)
Effects / 3D Effects / Drop Shadow
Vertical & Horizontal 2 / Opacity 80 / Blur 3 / Color 4 #bdcb59
Repeat again with:
Vertical & Horizontal / -2 / Opacity 80 / Blur 3 / Color 4 #bdcb59
Step 9
Layers / New Raster Layer
Fill with Color 3 #edc5ac
Layers / New Mask Layer / From Image
Open theNarah Mask 0851
Source Luminance only checked
Layers / Merge / Merge Group
Effects / Edge Effects / Enhance
Layers / Arrange / Move Down
Step 10
Effects / Plugins / Toadies / What Are You
X and Y at 12
Effects / Edge Effects / Enhance More
Effects / 3D Effects / Drop Shadow
Vertical & Horizontal 2 / Opacity 80 / Blur 3 / Color 4 #bdcb59
Step 11
Activate the Top Layer in the Layers Palette
Layers / New Raster Layer
Selections / Load/Save Selection / Load Selection from Alpha Channel / Load “Selection3
(Replace Selection only checked)
Flood Fill the Selection with Color 3 #edc5ac
Step 12
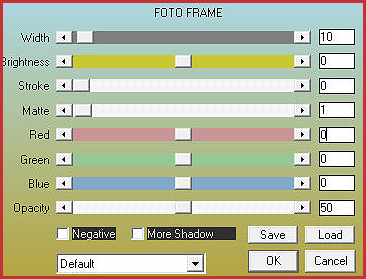
Effects / Plugins / AAA Frames / Photo Frame
Selections / Select None
Click with your Magic Wand in the middle of the square to select
Select a part of your own tube to copy (I took the face off my tube)
Edit / Copy
Edit / Paste into Selection
Adjust / Sharpness / Sharpen
Selections / Select None
Step 13
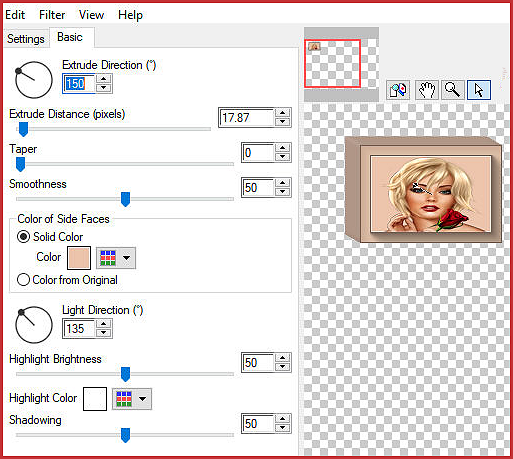
Effects / Plugins / Alien Skin Eye Candy 5 / Impact / Extrude
(Color is 3) (with the following settings)
Layers / Duplicate
Image / Mirror / Mirror Horizontal
Layers / Merge / Merge Down
Effects / 3D Effects / Drop Shadow
Vertical & Horizontal 2 / Opacity 80 / Blur 3 / Color 1 #6a1c29
Repeat again with:
Vertical & Horizontal -2 / Opacity 80 / Blur 3 / Color 1 #6a1c29
Step 14
Layers / New Raster Layer
Flood Fill with Color 3 #edc5ac
Layers / New Mask Layer from Image
Open the Narah Mask 1158
Source Luminance only checked
Layers / Merge / Merge Group
Effects / Edge Effects / Enhance
Effects / Image Effects / Offset
Horizontal 0 / Vertical -150, Transparent checked
Step 15
Image / Add Borders / Symmetric, 1-pixel Color 1 #6a1c29
Image / Add Borders / Symmetric, 2 pixels Color 4 #bdcb59
Image / Add Borders / Symmetric / 1-pixel Color 1 #6a1c29
Image / Add Borders / Symmetric / 5-pixels Color 4 #bdcb59
Image / Add Borders / Symmetric / 1-pixel Color 1
Image / Add Borders / Symmetric / 20-pixels Color 4 #bdcb59
Step 16
Effects / Plugins / AAA Frames / Foto Frame
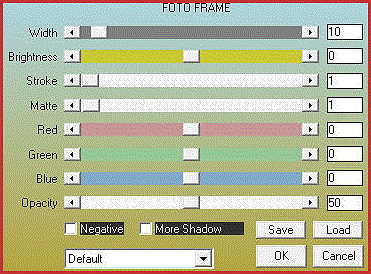
Repeat again and set the top slider width to 30
Step 17
Open your own tube (reduce it if necessary)
Edit / Copy
Edit / Paste as a New Layer
(move a little to the right)
Layers / Duplicate
Activate the middle Layer in the Layers Palette
Adjust / Blur / Gaussian Blur 40
Activate the Top Layer in the Layers Palette
Effects / 3D Effects / Drop Shadow
Vertical & Horizontal 10 / Opacity 50 / Blur 25 / Color Black
Step 18
Add any attached text
Add a Drop Shadow of choice
Place your name or watermark
Save as jpg
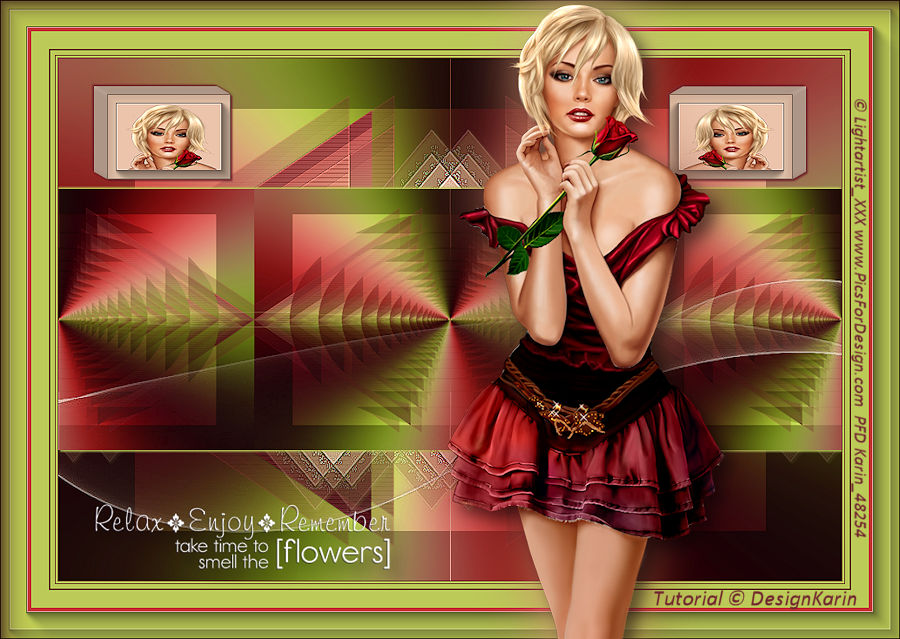
The lesson is finished
Hope you like it again!
My Version